Sanmol Software is leading custom solutions provider as per customer needs!!
Sanmol Software
U15, Breezy Castle, 125 Owen Roberts Dr, PO Box 32322, Grand Cayman, KY1-1209, Cayman Islands
Index
| Sr.No. | Section |
|---|---|
| 1 | Architecture |
| 2 | Registeration & Login |
| 3 | Registeration & Login |
| 4 | Inventory |
| 4.1 | Departments |
| 4.2 | Categories |
| 4.3 | Bin Location |
| 4.4 | Products |
| 4.5 | Service Item |
| 4.6 | Print Sequence |
| 4.6 | Pricing Batches |
| 4.7 | Assembly |
| 4 | Sales |
| 4.1 | Customers |
| 4.2 | Sales Orders |
| 5 | Purchase |
| 5.1 | Vendors & suppliers |
| 5.2 | Purchase orders |
| 5.3 | Customer Declarations |
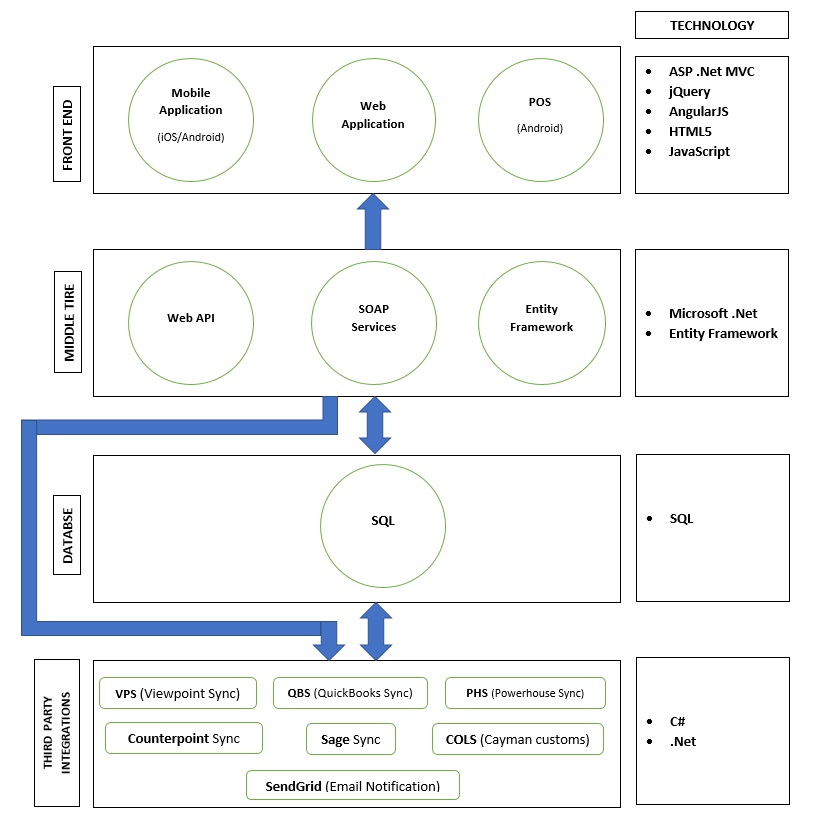
Ezybooks High Level Architecture
System Requirements
- Windows server 2012 or newer
- Microsoft framework 4.6 or newer
- SQL Server 2012 or newer version instace
- IIS 10 - It should be enabled for ASP.NET applications
- SendGrid integrations to send email notifications
- Shared Apple account for mobile apps deployment, default from ezybooks account
- Shared Google Play store account for mobile apps deployment, default from ezybooks account
- Sysem requirements for inhouse and private cloud deployments:
- SQL Server 2012 or newer version on server, can on same web server or separate
- One IP address - if application wants to use outside of office or in field then public IP or we have to use VPN
- Public IP is recommended as we can migrate company website or customer portal in future
- SMTP Server settings to send emails
- One email - donotreply@domain.com with password to send email notifications
- Apple account to deploy iphone or ipad build for private deployment
- Google playstore account to deploy android build for private deployment
1. Ezybook URL
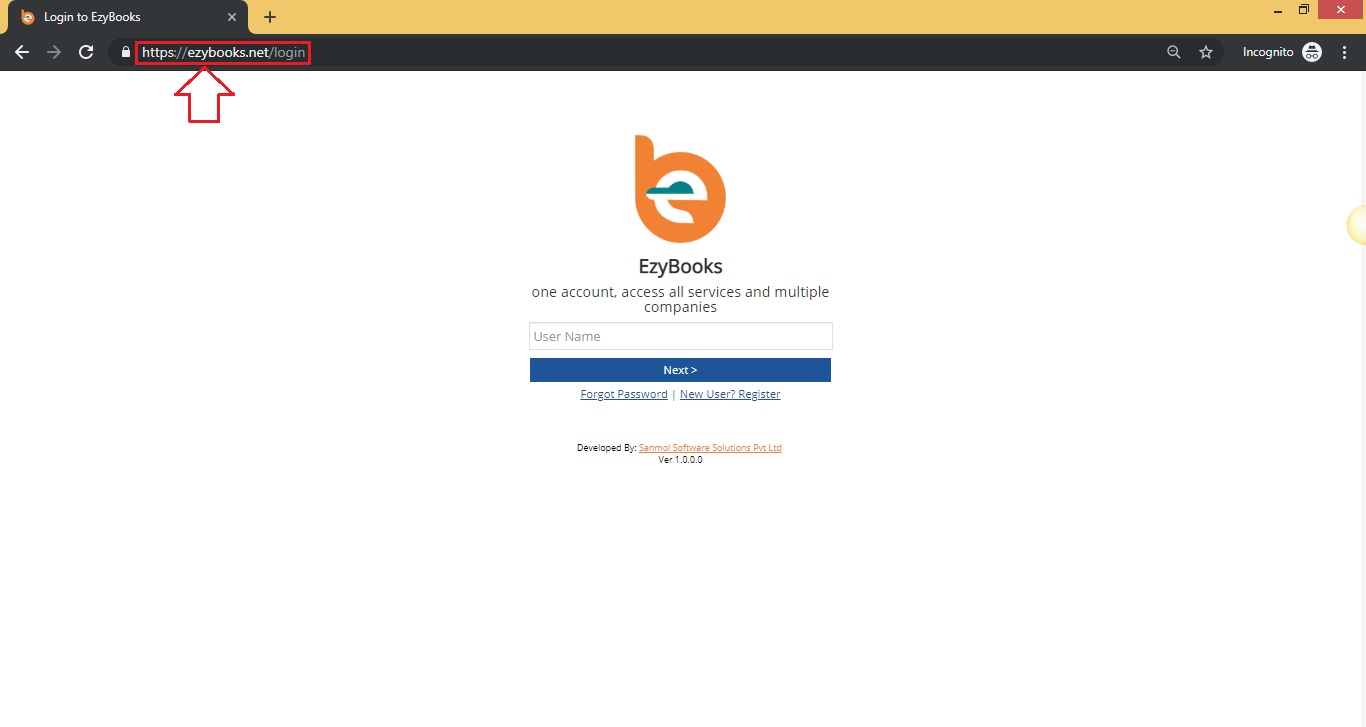
If you are new user and interested into Ezybooks application firstly you need to register into Ezybooks application. Please enter https://ezybooks.net this URL into your browser. Please check following screenshot.
2. New Registration
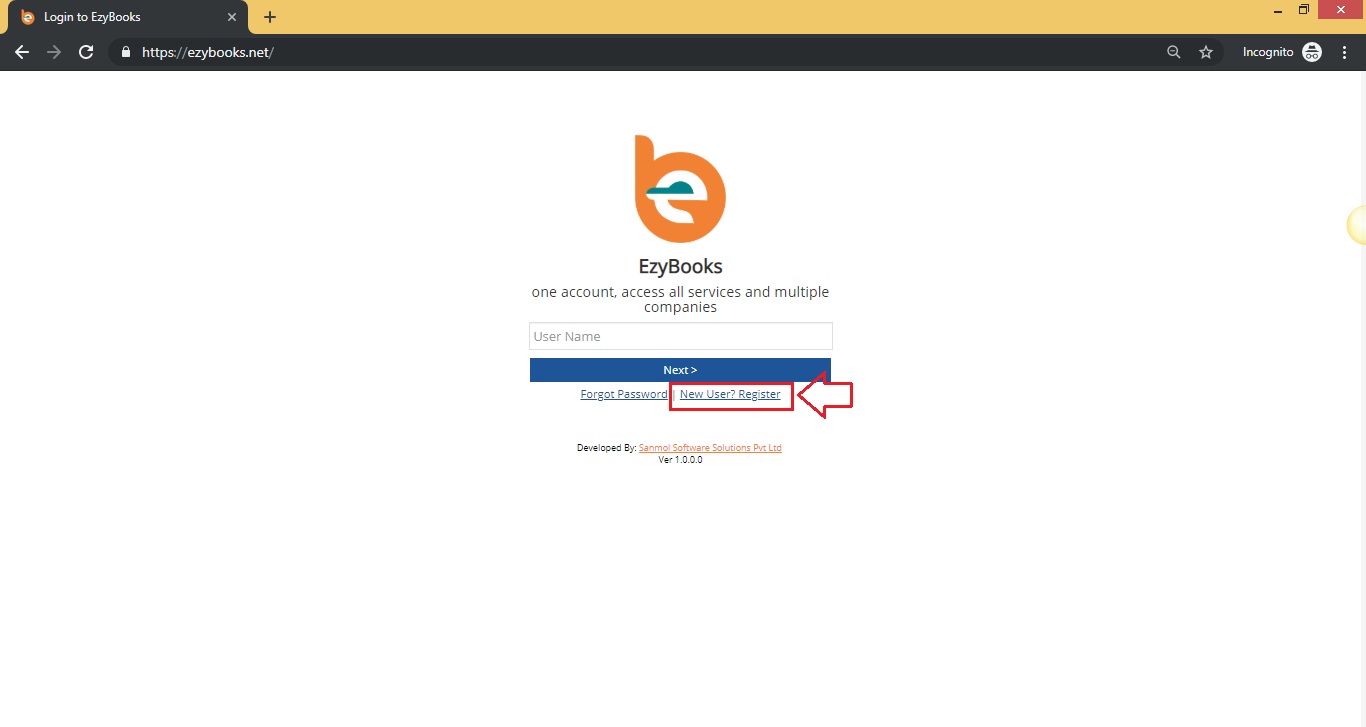
After click on Ezybooks application URL you can see login screen bellow the login option there is "New User? Register", please click on that. Please check following screenshot.
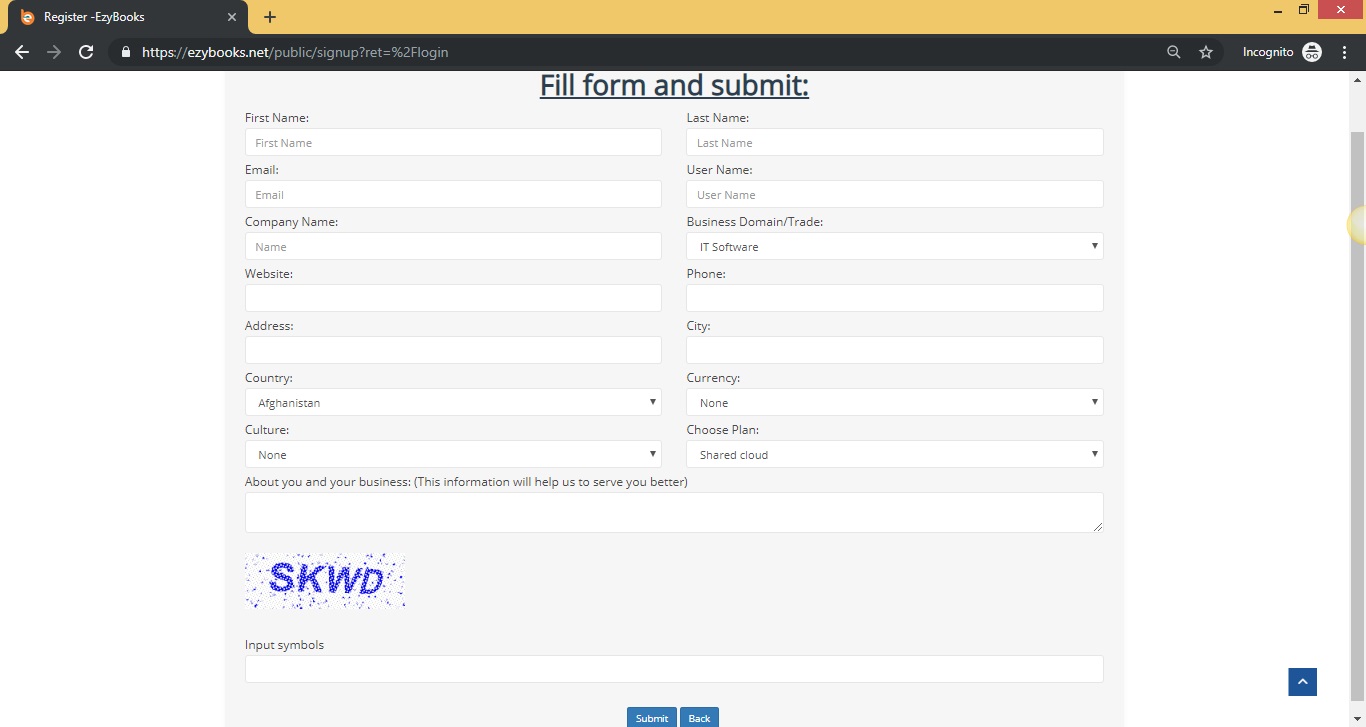
2.1 Registration Page
Please fill all mandatory details from the registration form and submit. After your successful registration you will receive the confirmation email link and account password on your registered email.
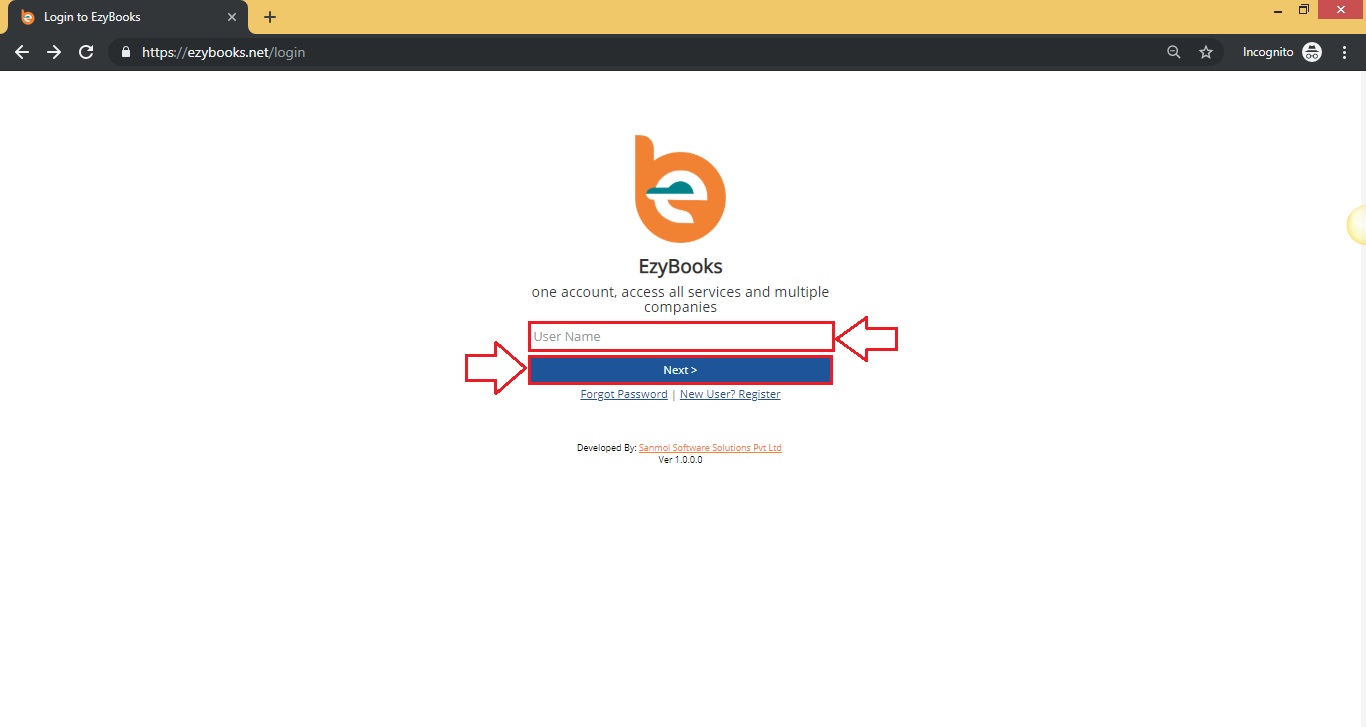
3 Login Page
When you confirm your account from activation link, you can login your account using username and password sent from email.
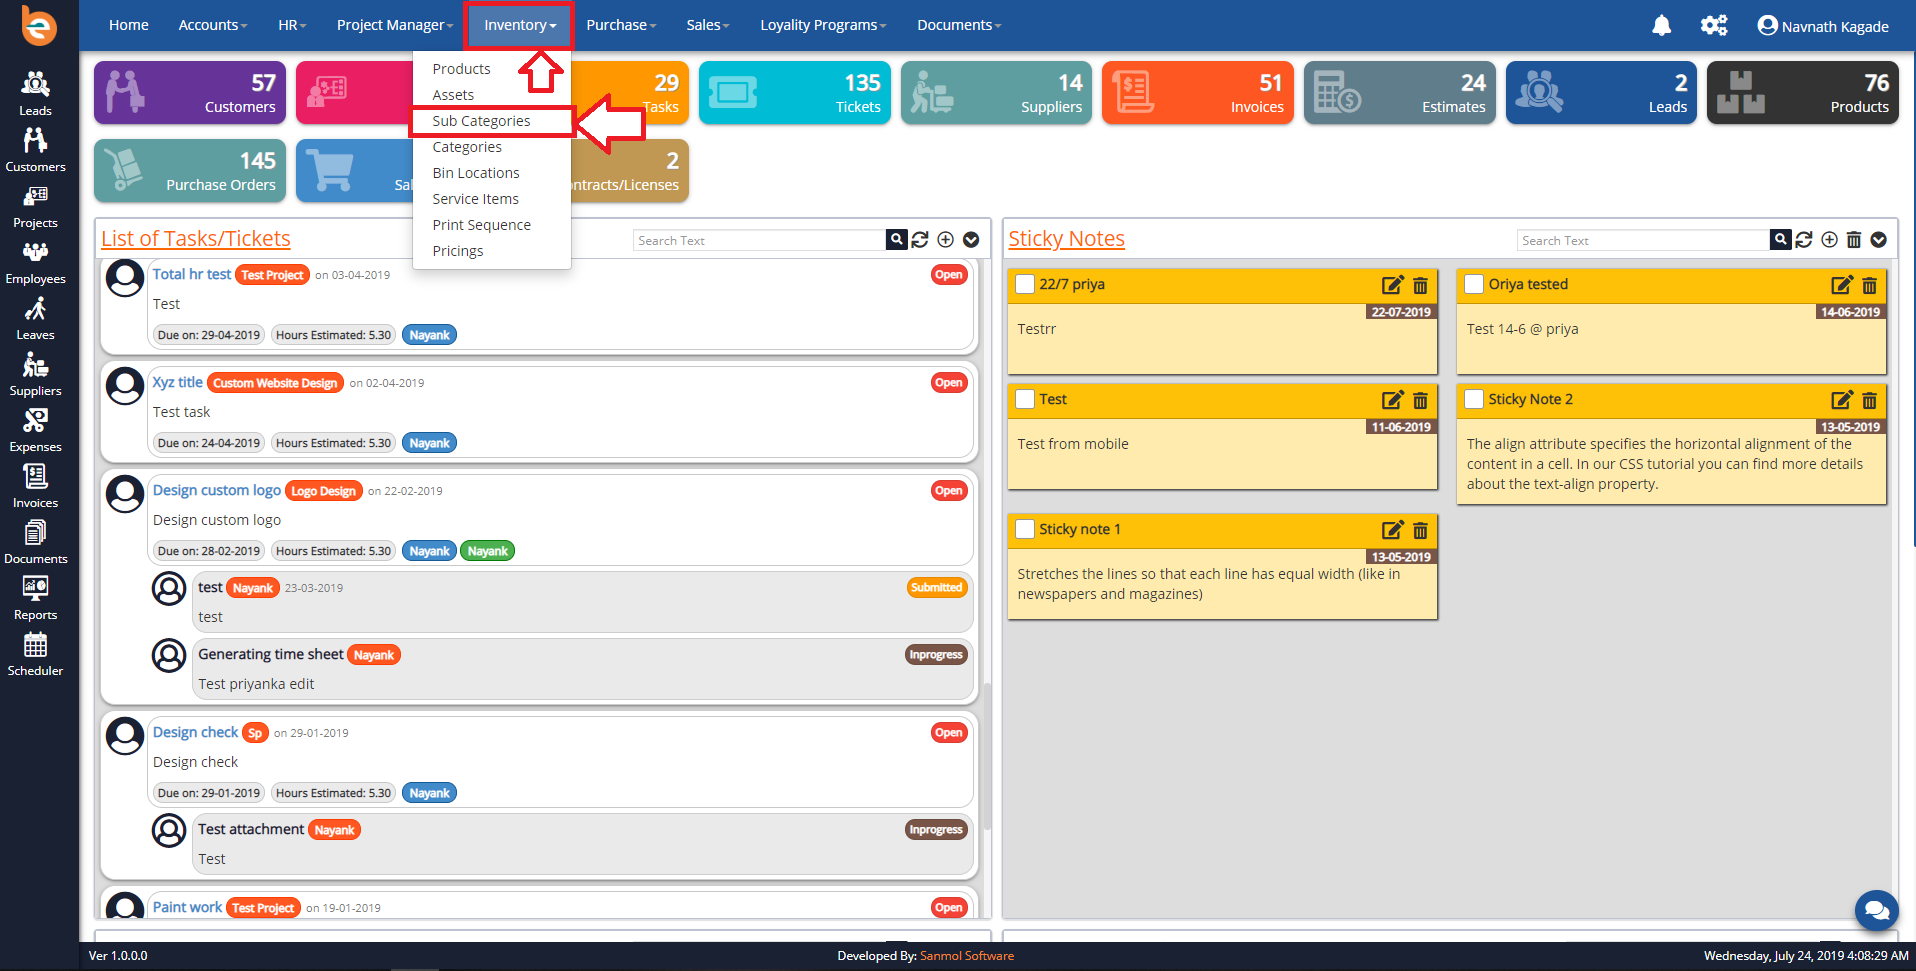
4 Inventory
4.1 Sub Categories
Firstly you need to add Sub Categoriess from your company, for Sub Categories setup please click on the Inventory menu after that click on Sub Categories menu.
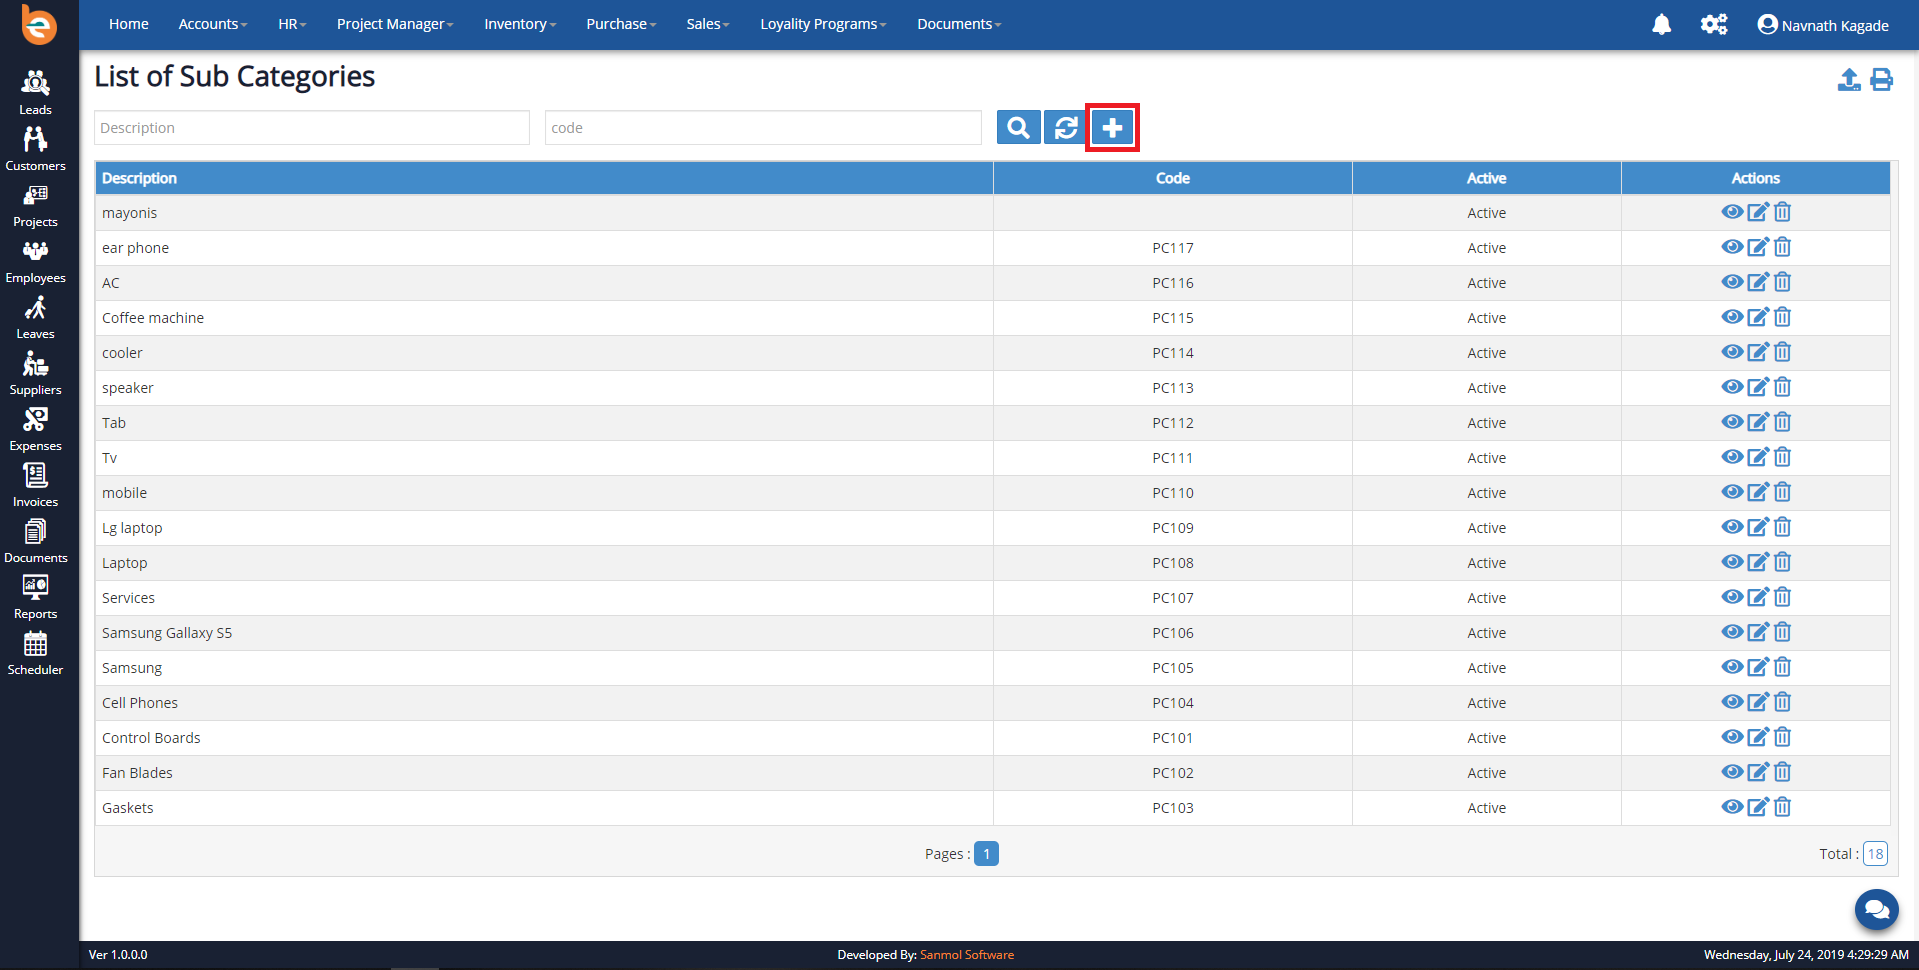
4.1.1 Add New Sub Categories
Click on the plus icon from the page for adding new Sub Categories. Please check following screen.
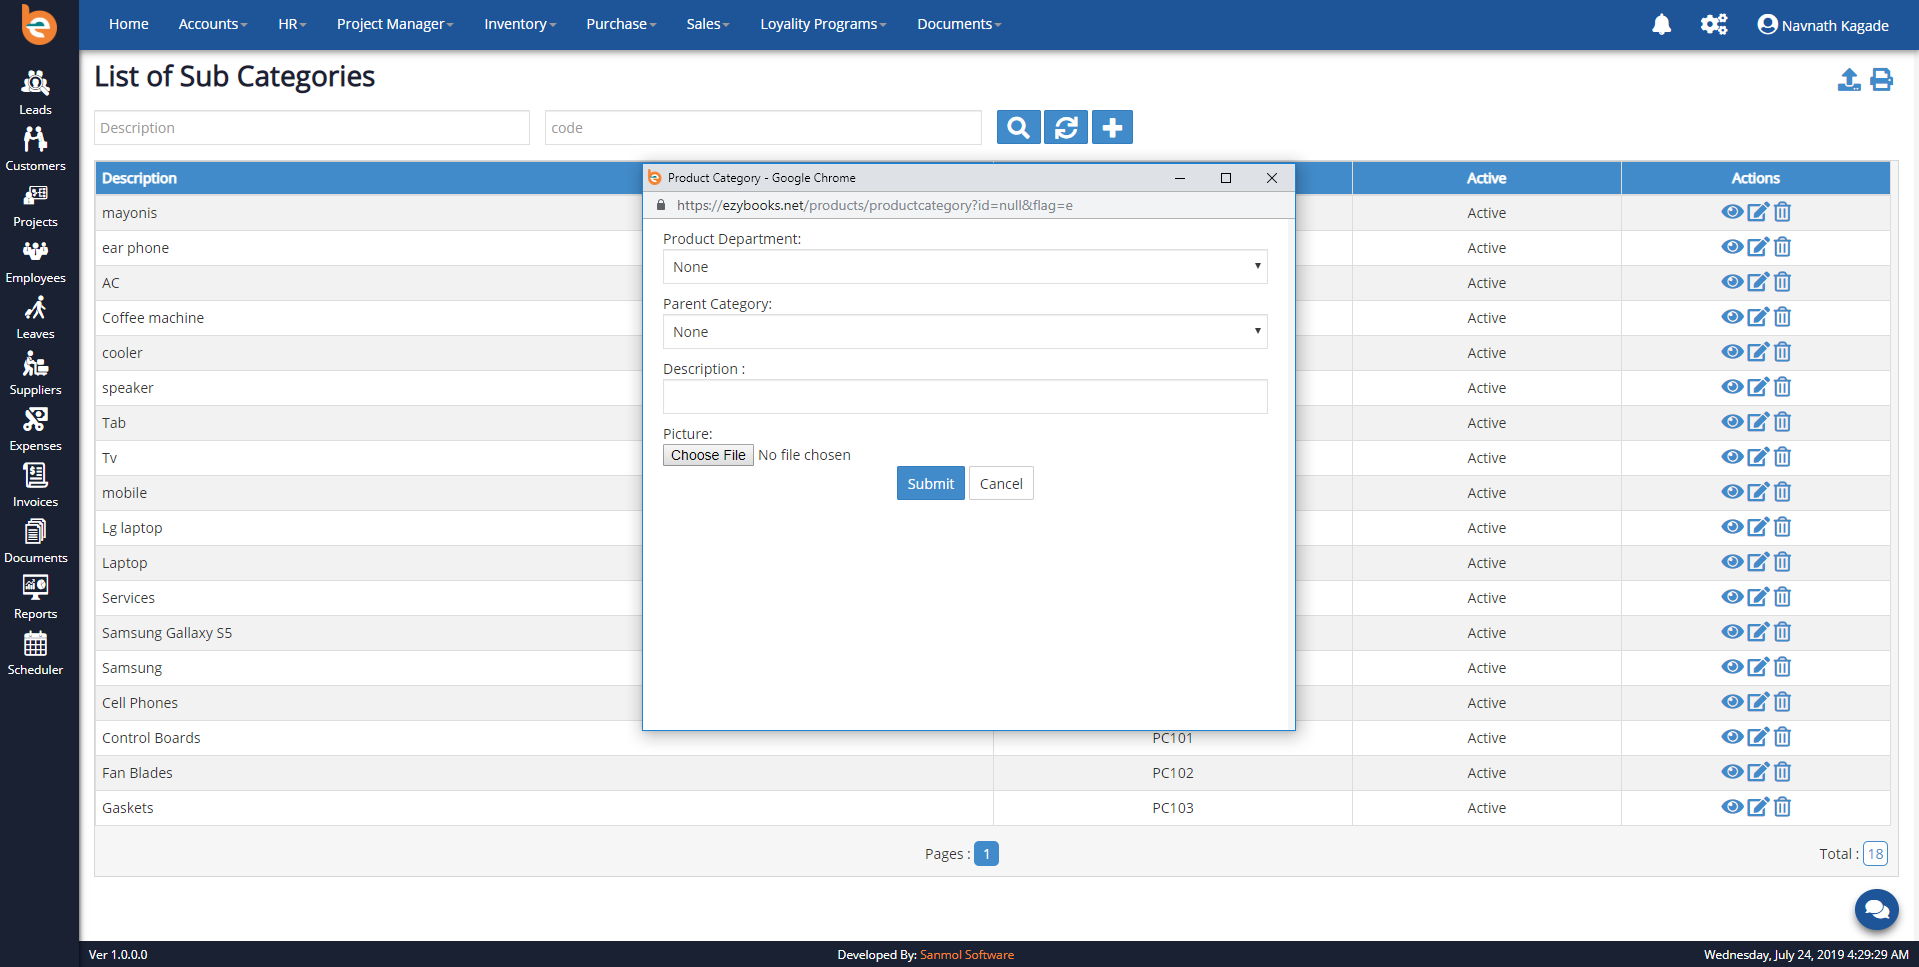
4.1.2 New Sub Categories Page
When you click on the plus icon you can see the pop-up for entering the Sub Categories name. Example: If your inventory handeled by warehoush4 Sub Categories you can add "Warehouse" as Sub Categories. Please check following screen.
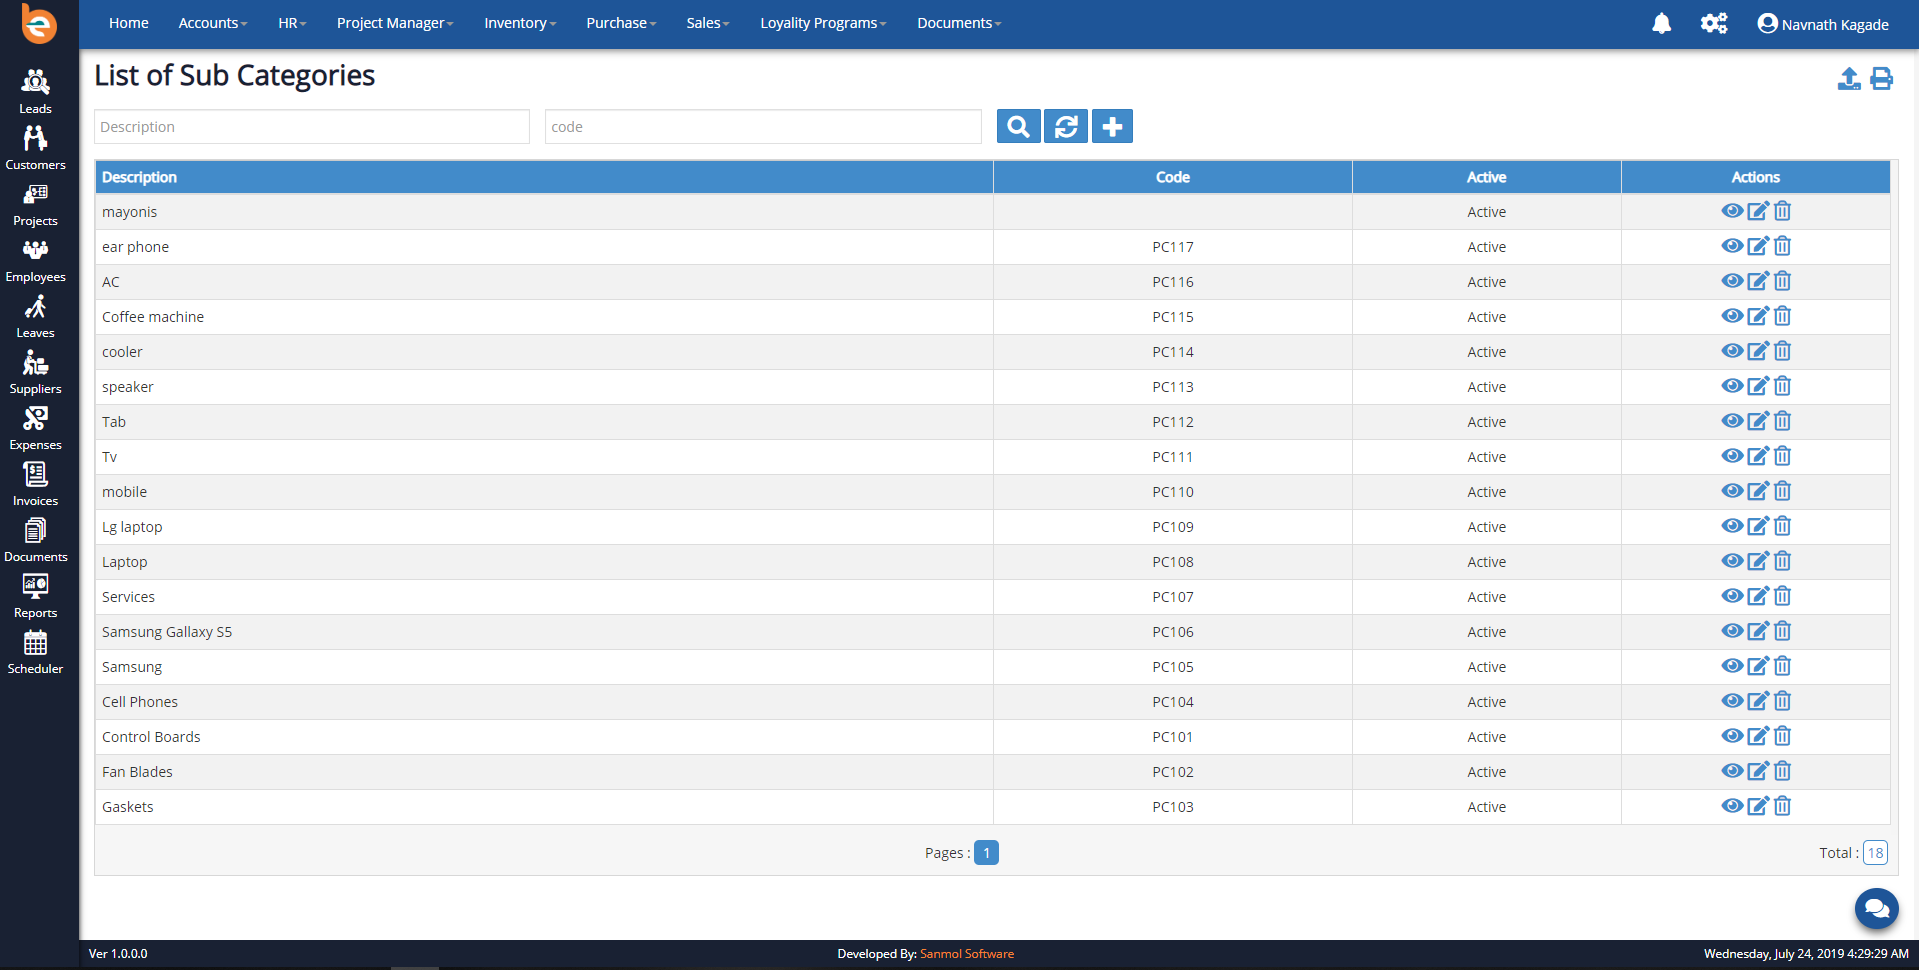
4.1.3 Sub Categories List
When you added Sub Categoriess you can see the list of Sub Categoriess as per following screen.
4.1.4 Sub Categories List Action Buttons
If you want to update, edit or delete Sub Categories which you already added you can do those operations using action buttons.
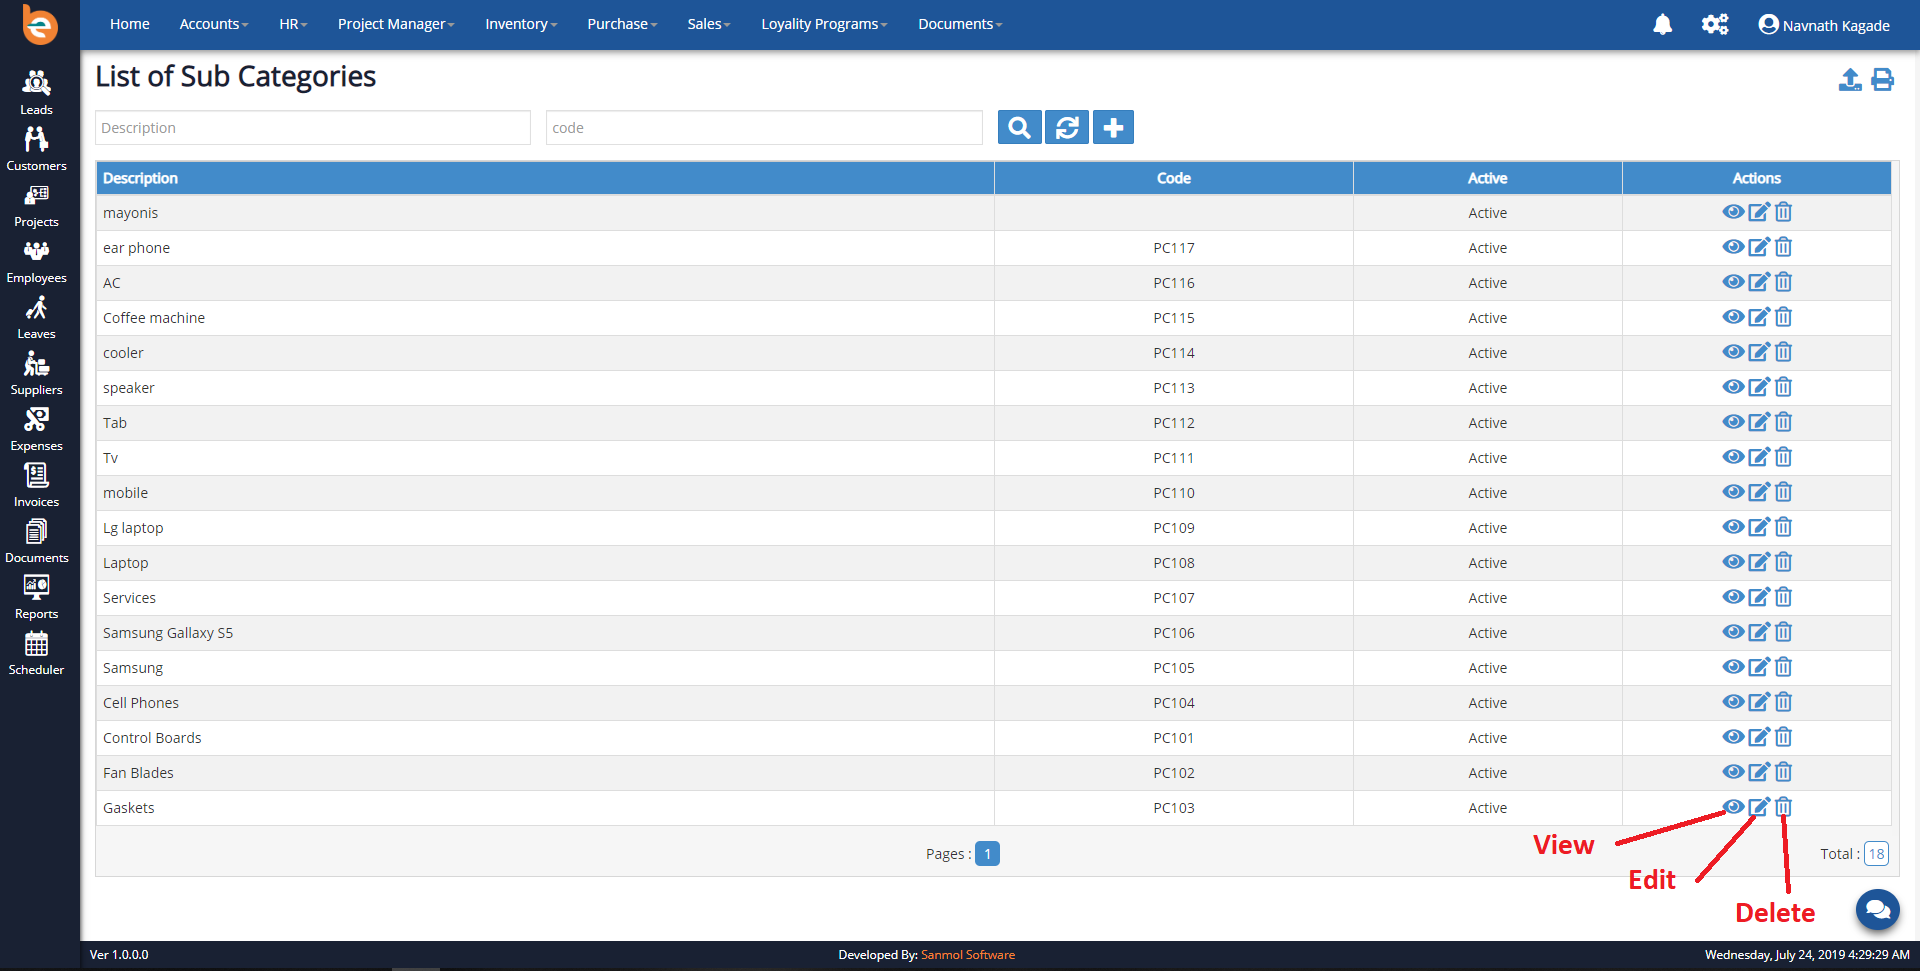
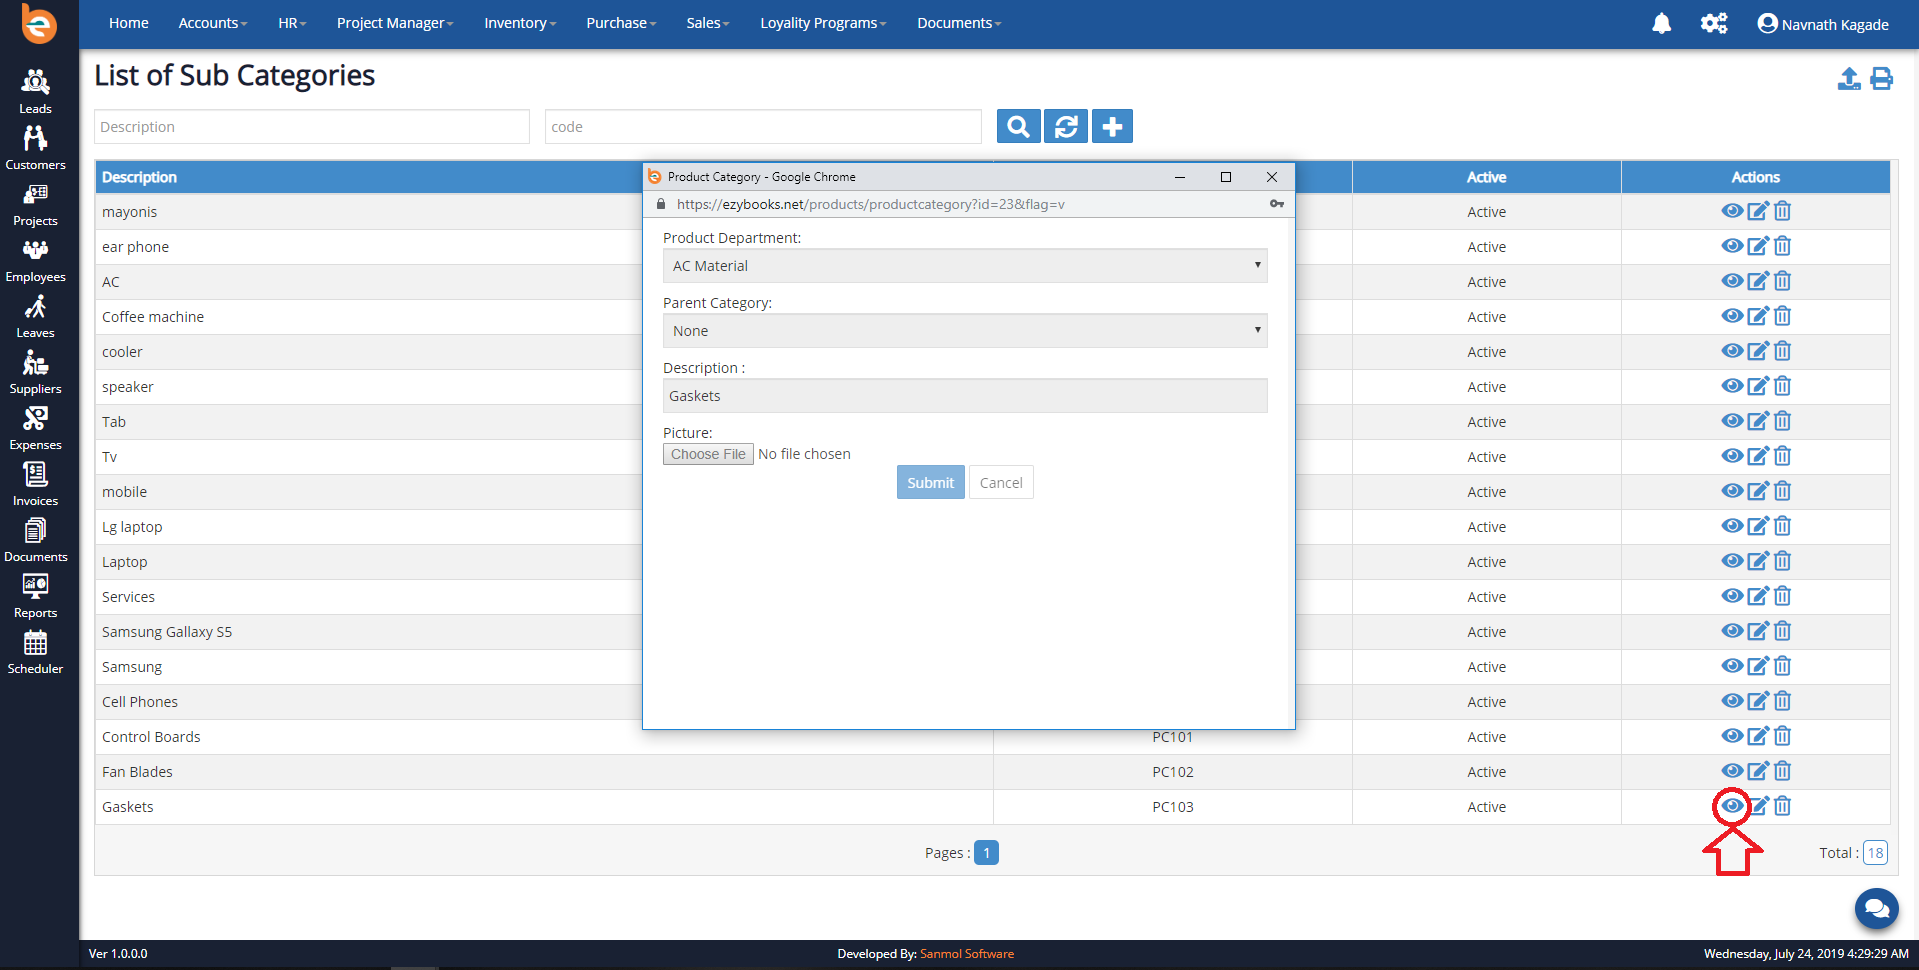
4.1.5 Sub Categories View
If you want to view Sub Categories description which you have added click on view button.
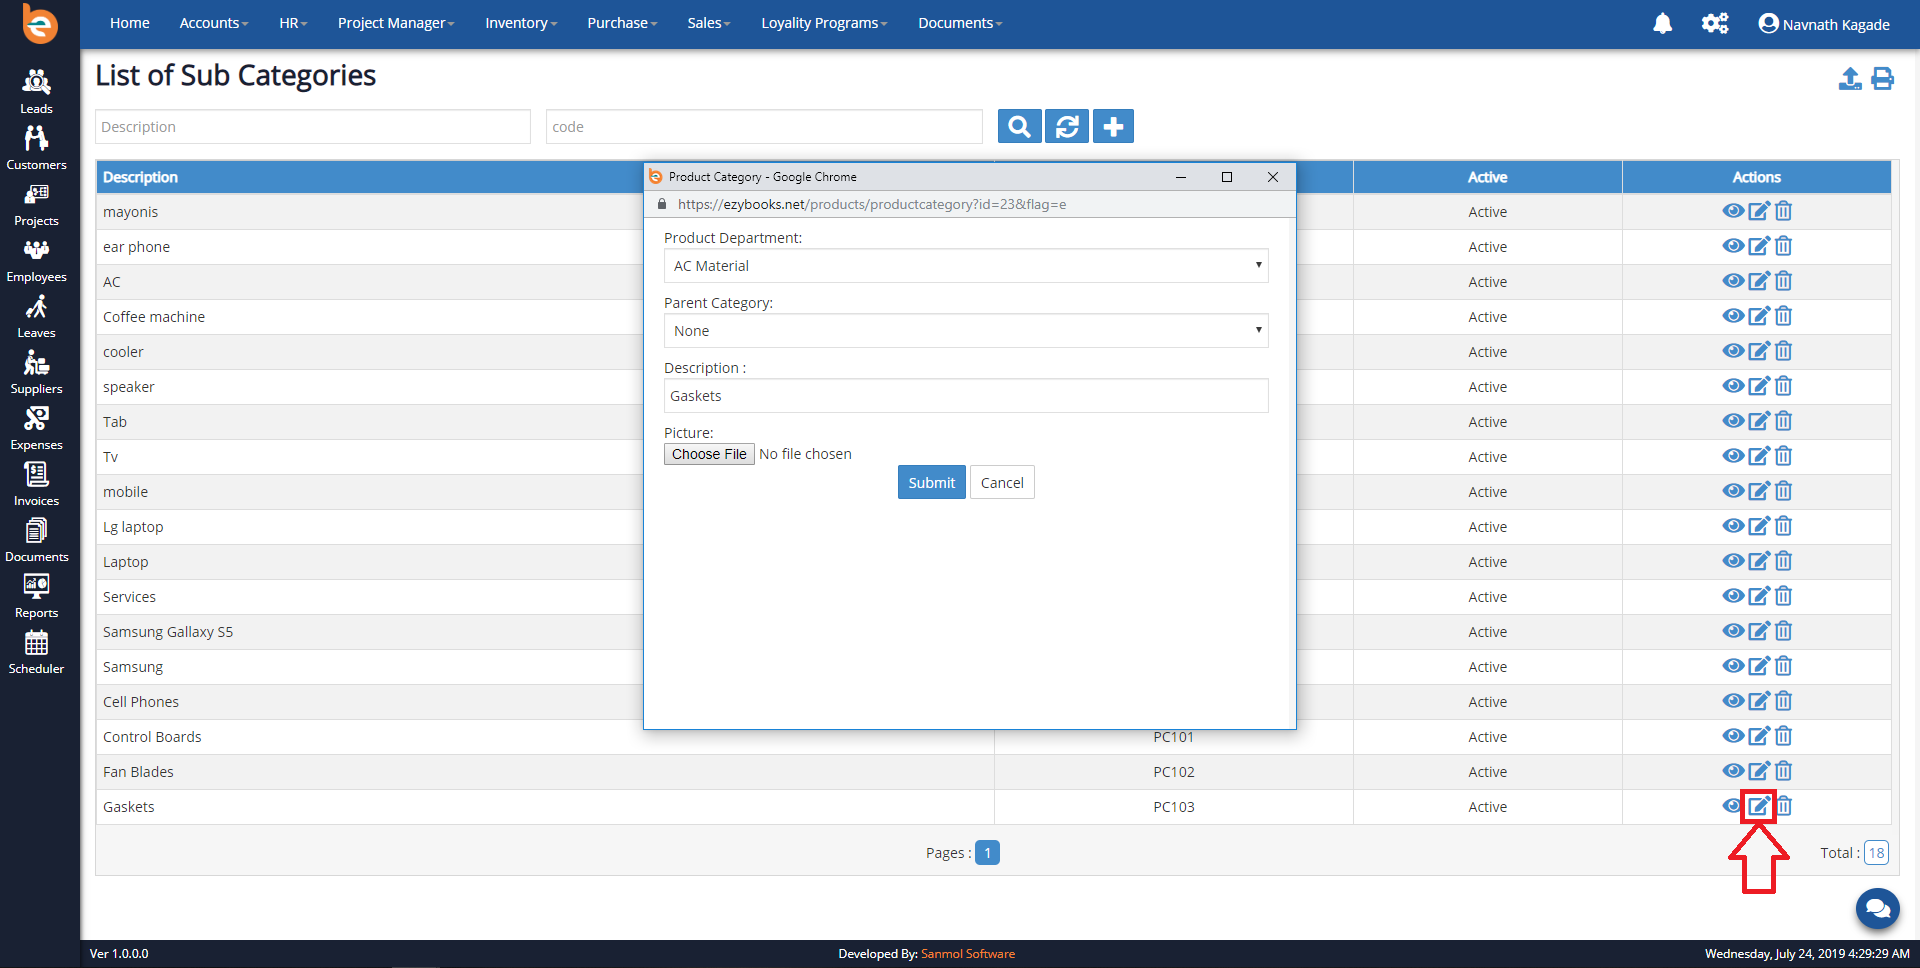
4.1.6 Sub Categories Edit
If you want to edit Sub Categories description which you have added click on edit button.
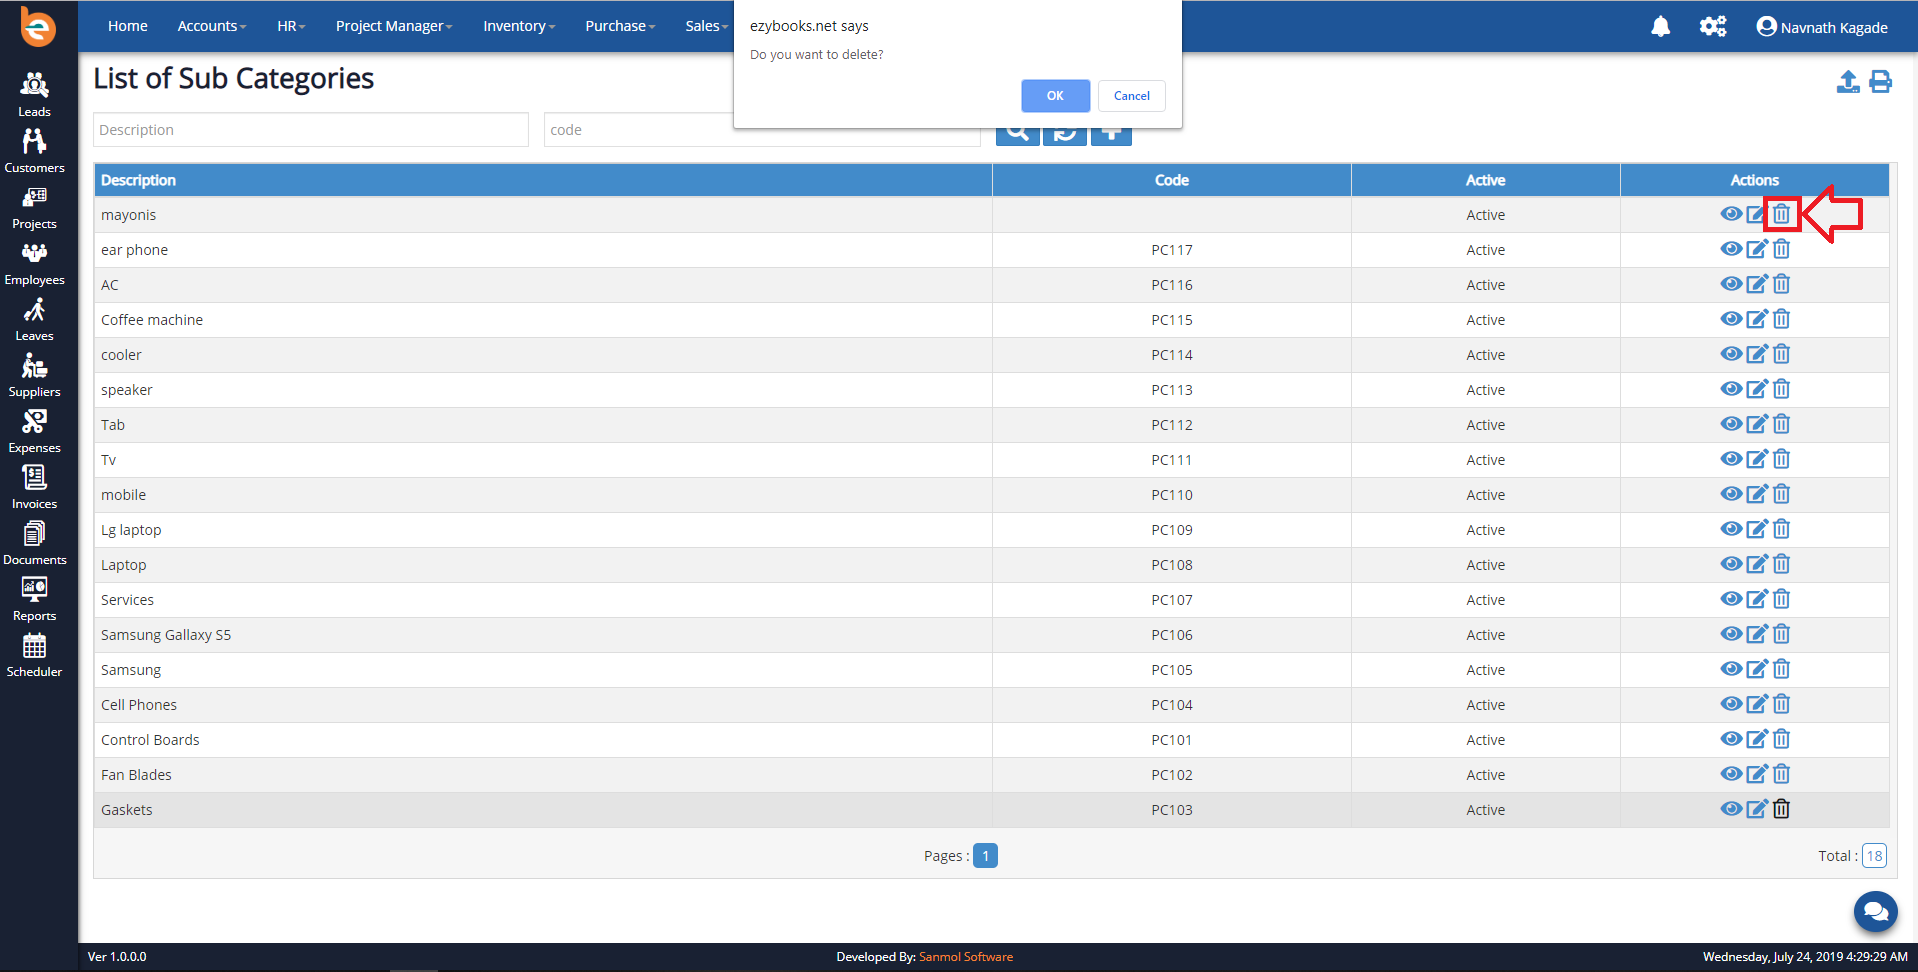
4.1.7 Sub Categories Delete
If you want to delete Sub Categories which you have added click on delete button.
4.2 Categories
After adding the Sub Categories you need to add Categories which is important for products
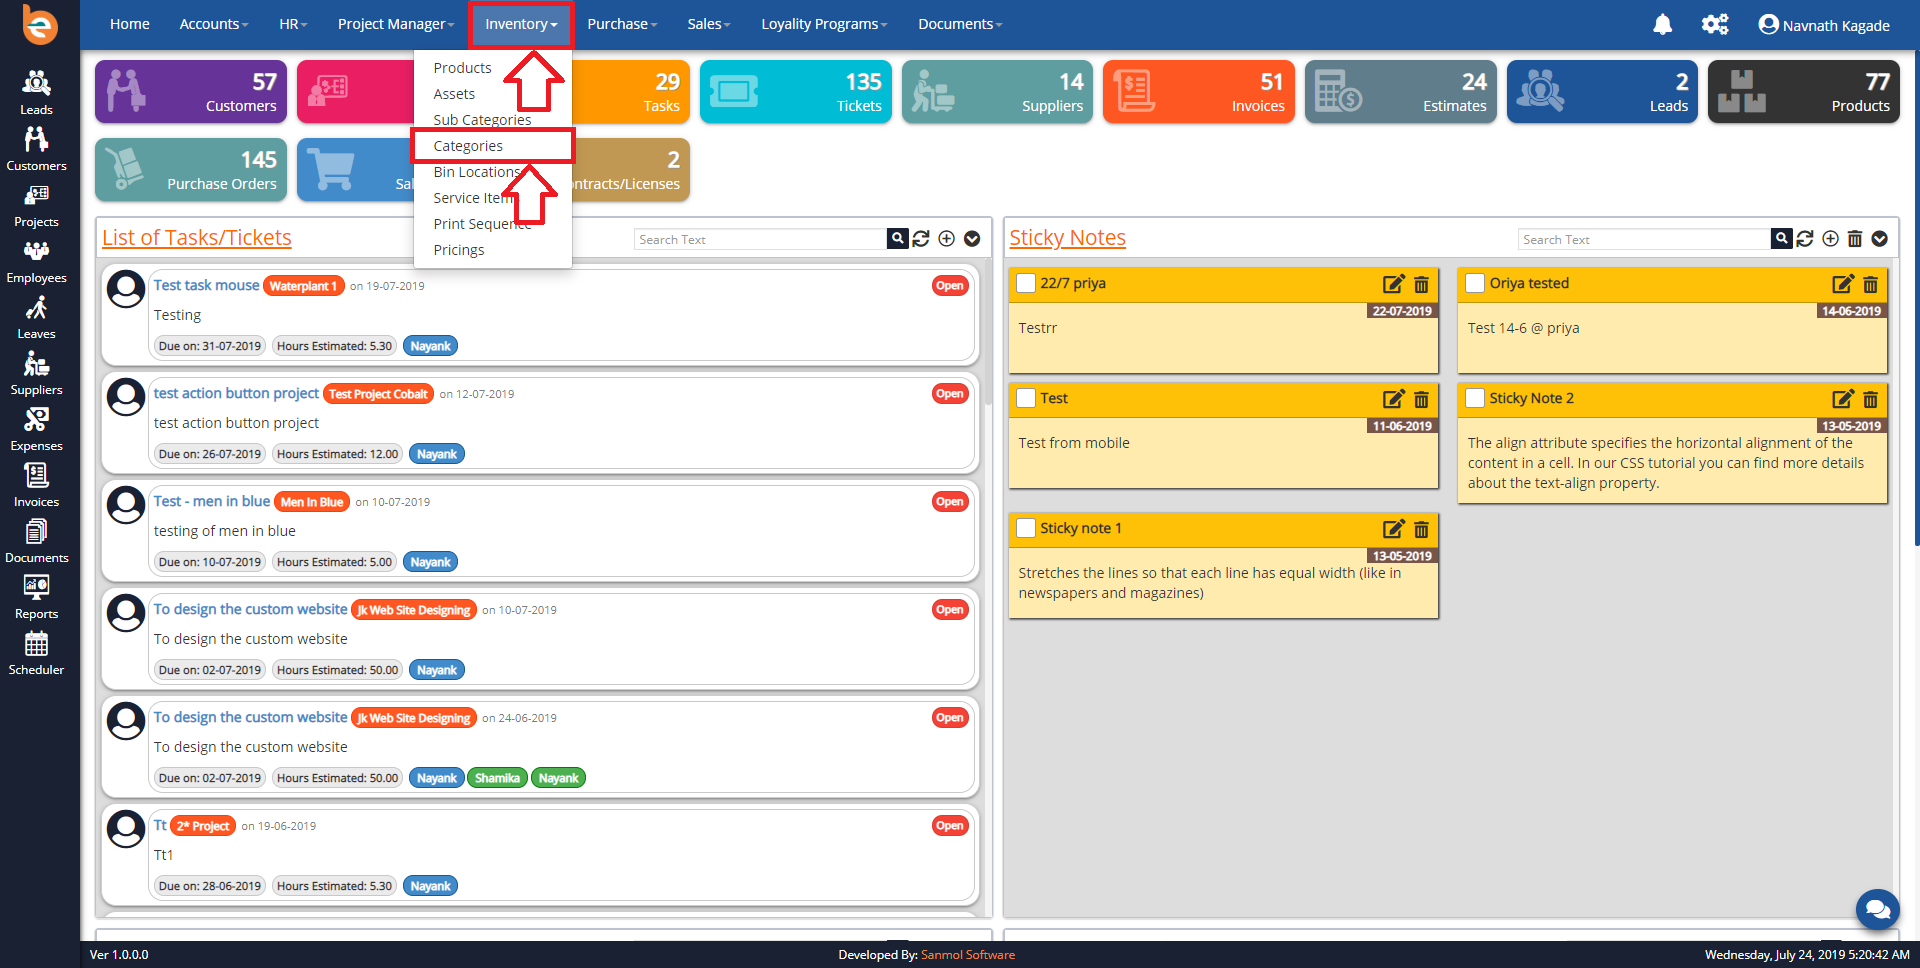
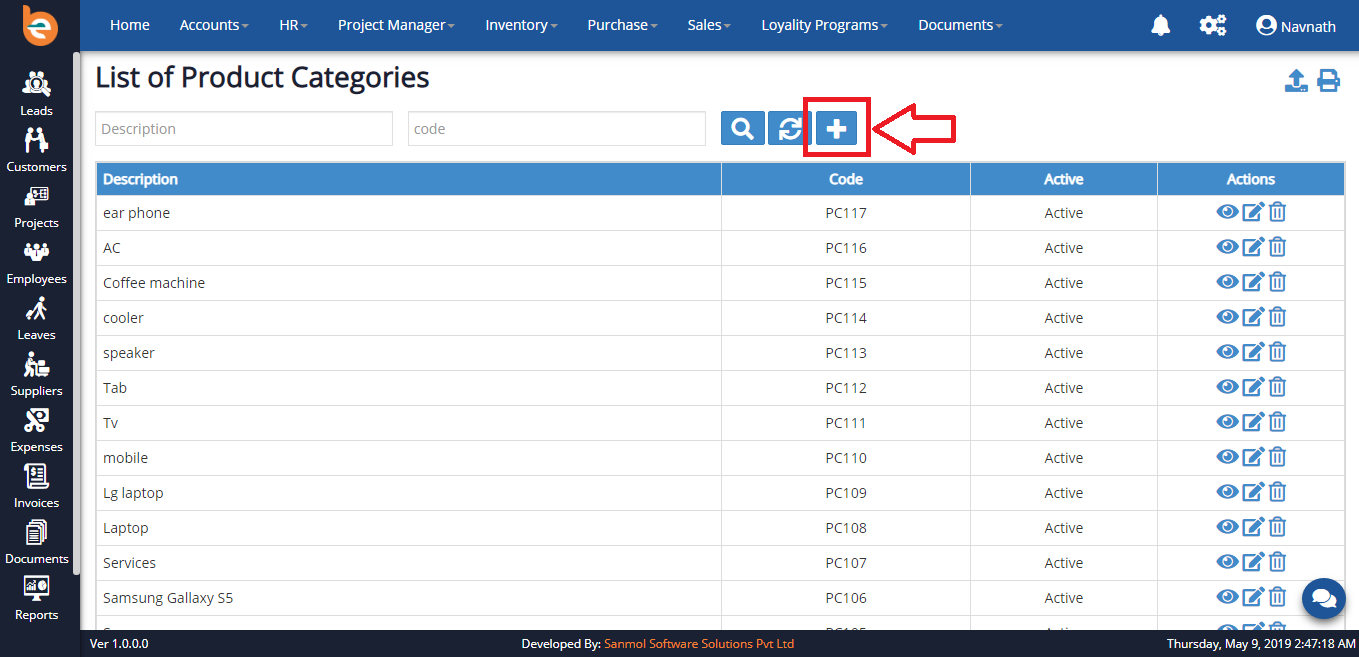
4.2.1 Add New Category
When you click on Category menu you can see the following screen, there is plus icon click on that for adding new Category
4.2.2 Add Category
When you click on plus icon you can see following form for adding new Category

4.2.3 Category List
You can see here all categories list which you have added previously.
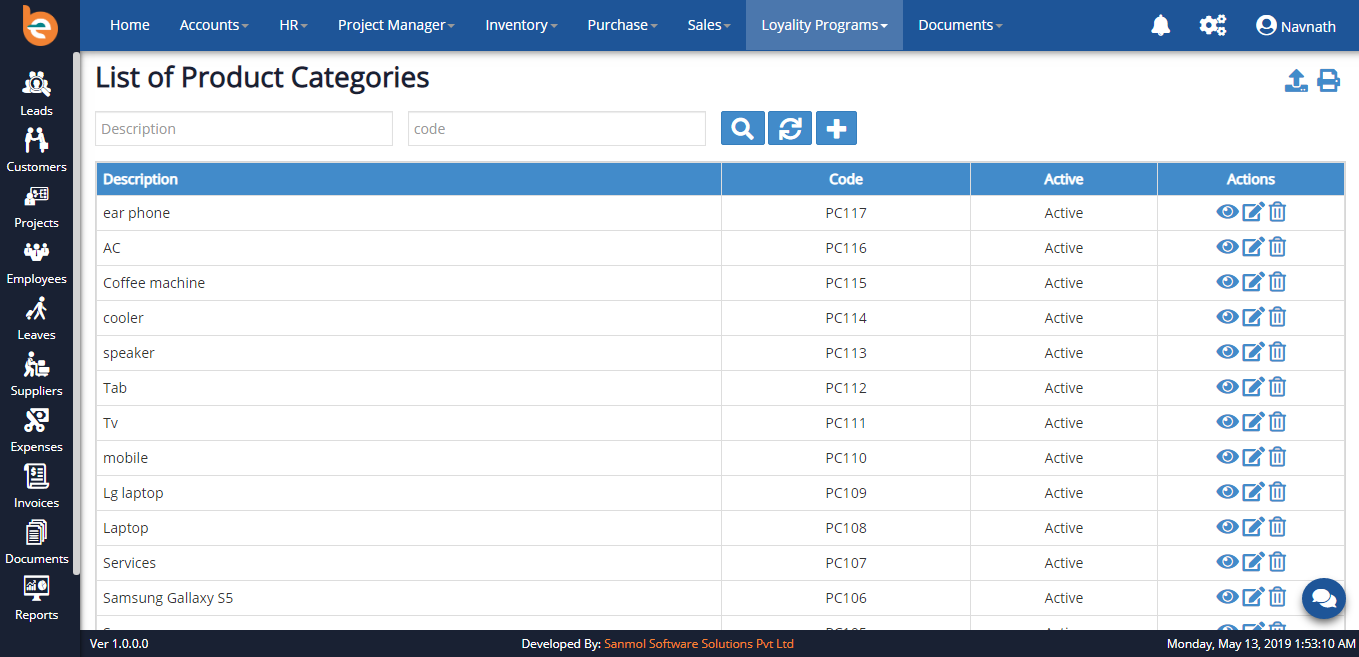
4.2.4 Category List Action Buttons
If you want to view, edit or delete categories which you have added already, you can do those operations from given icons as per follows screen.
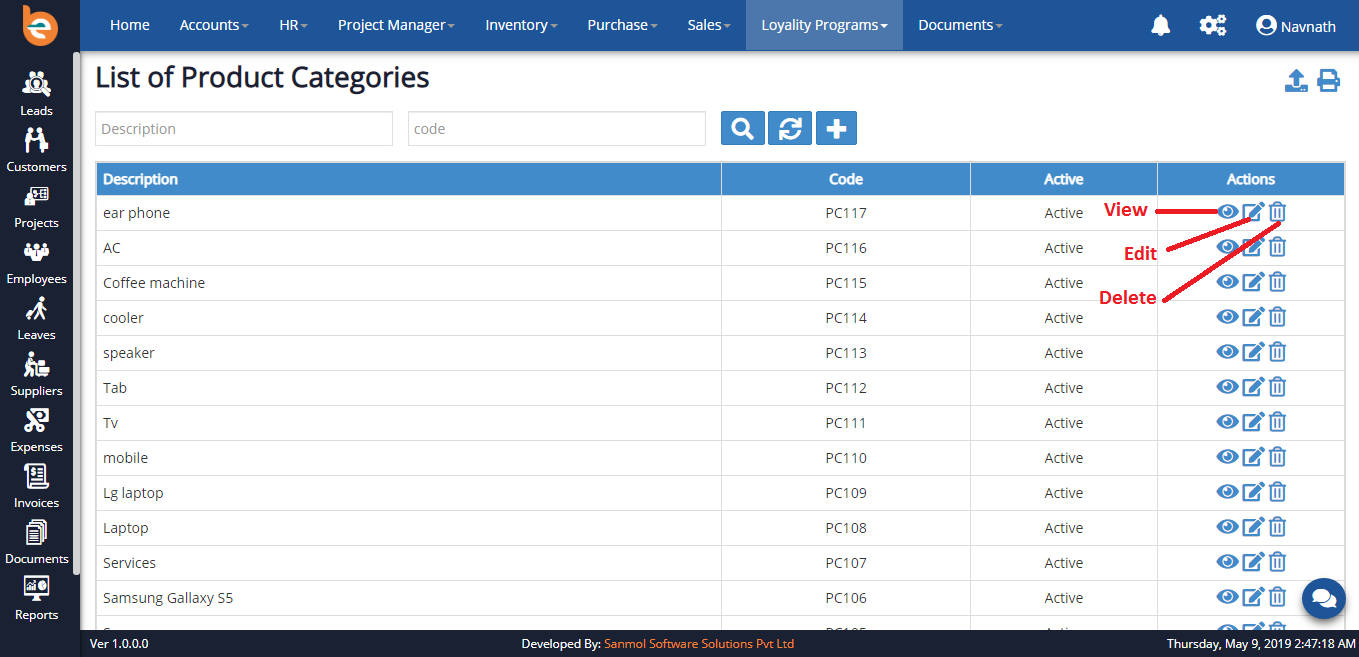
4.2.5 Category View
If you want to view categories, description which you have already added click on the view icon as per shown in the follows screen.

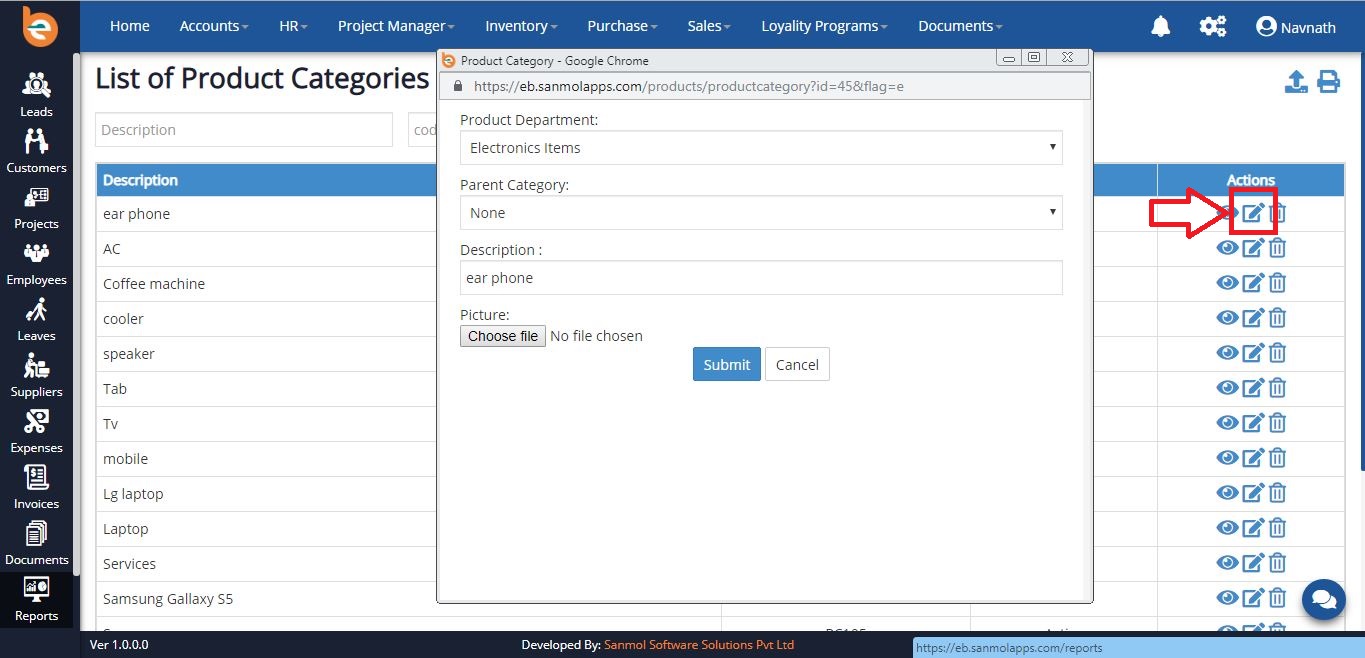
4.2.6 Category Edit
If you want to edit categories, description which you have already added click on the edit icon as per shown in the follows screen.
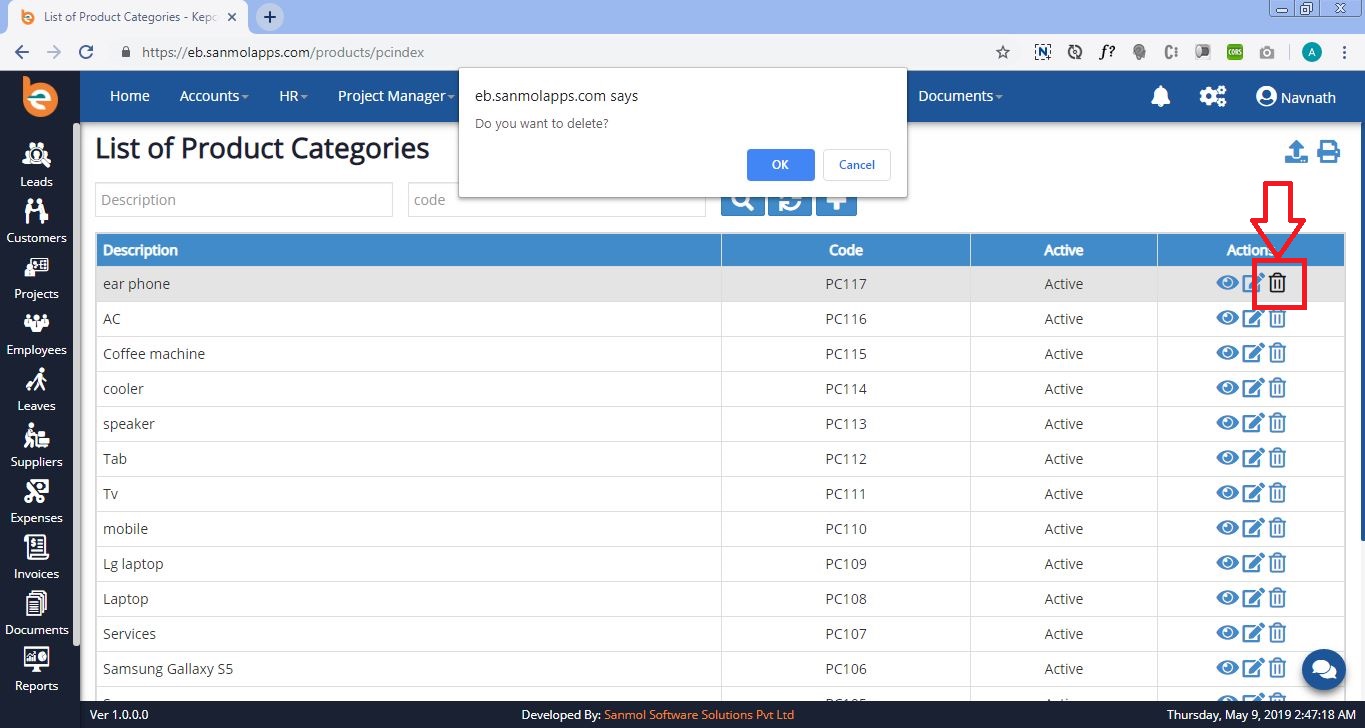
4.2.7 Category Delete
If you want to delete categories which you have already added click on the delete icon as per shown in the follows screen.
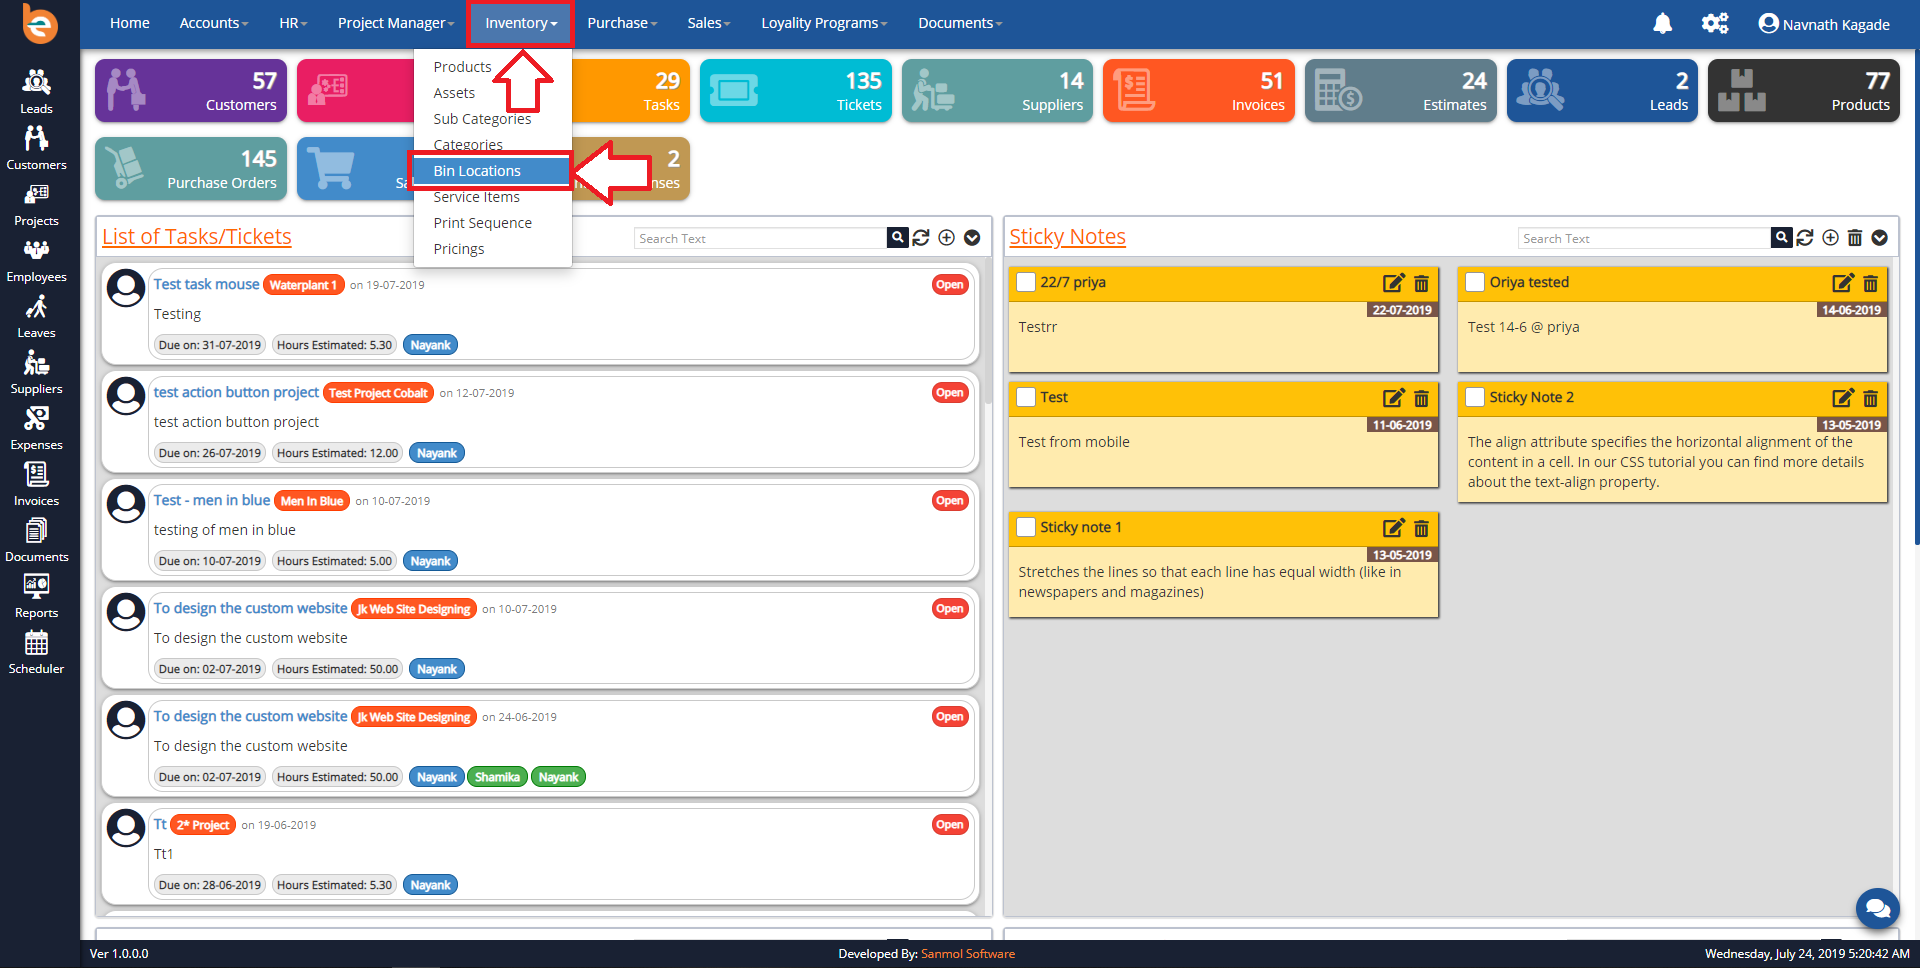
4.3 Bin Location
After adding Categories and Departments you need to add Bin Locations, for that you can click on Inventory menu then you can see Bin Location menu click on that.
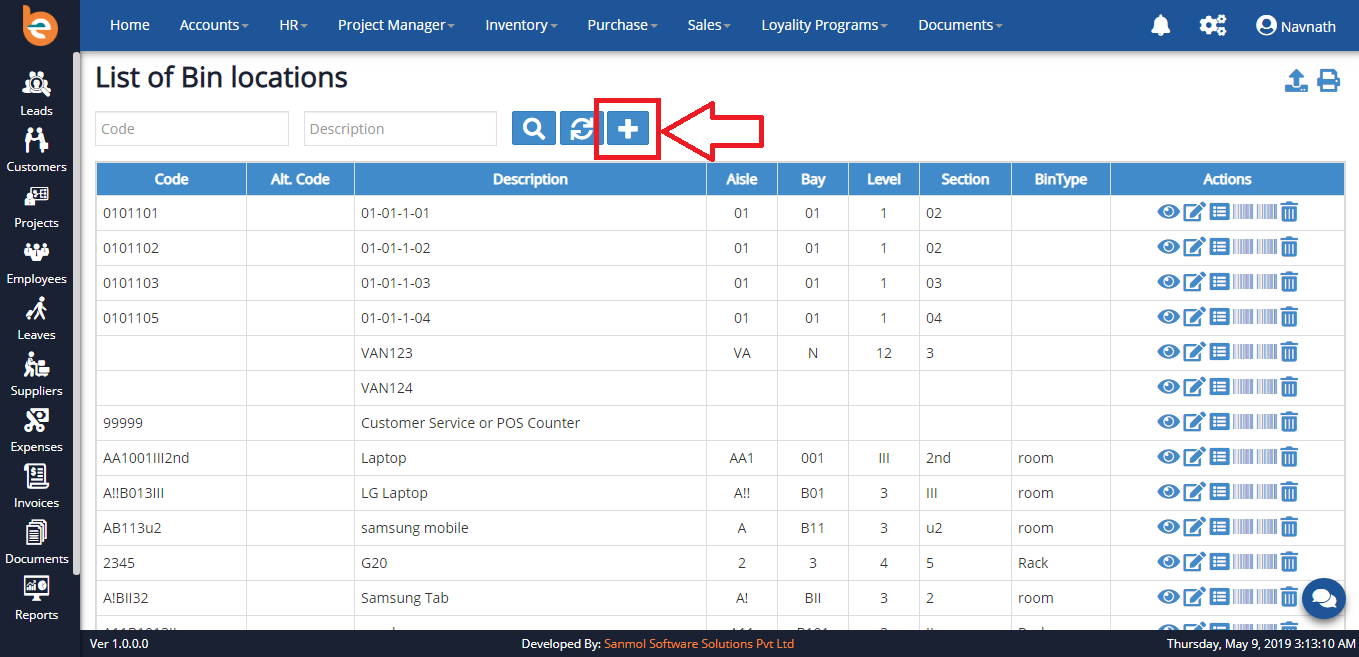
4.3.1 Add New Bin Location
For adding new bin location click on plus icon you can see as per follows screen.
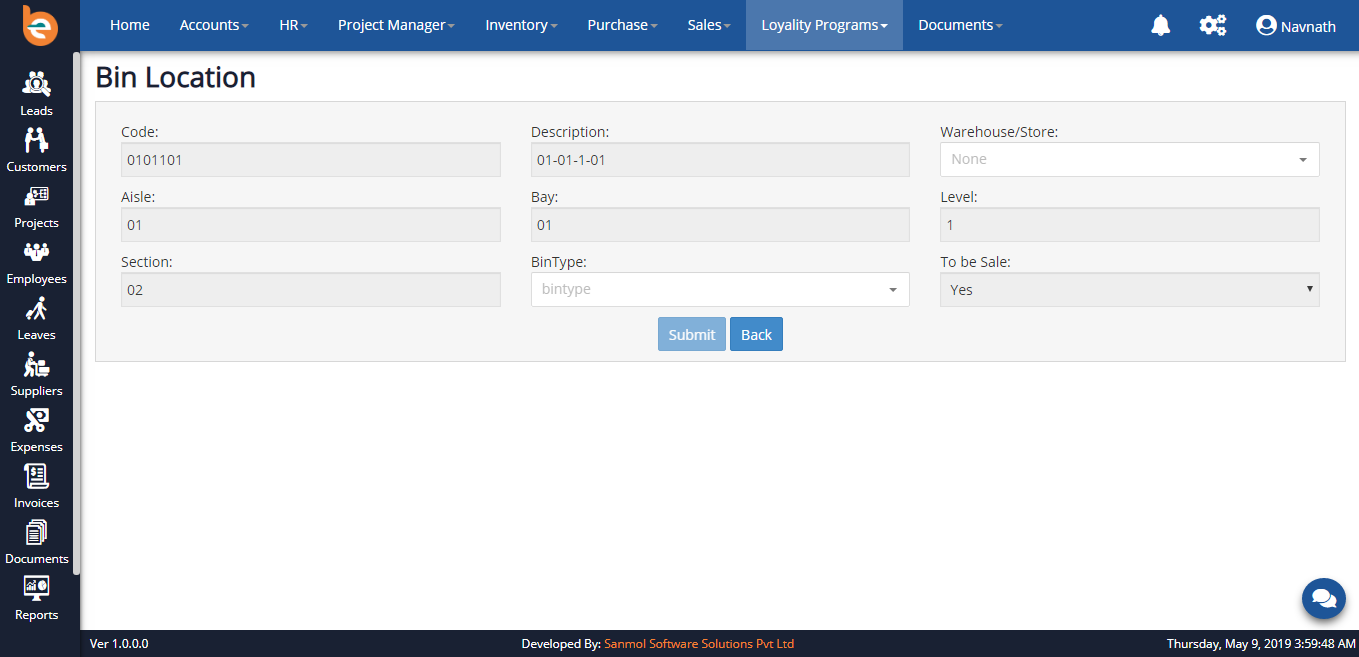
4.3.2 Add Bin Location
When you click on plus icon you can see form where you have to enter mandatory fields.

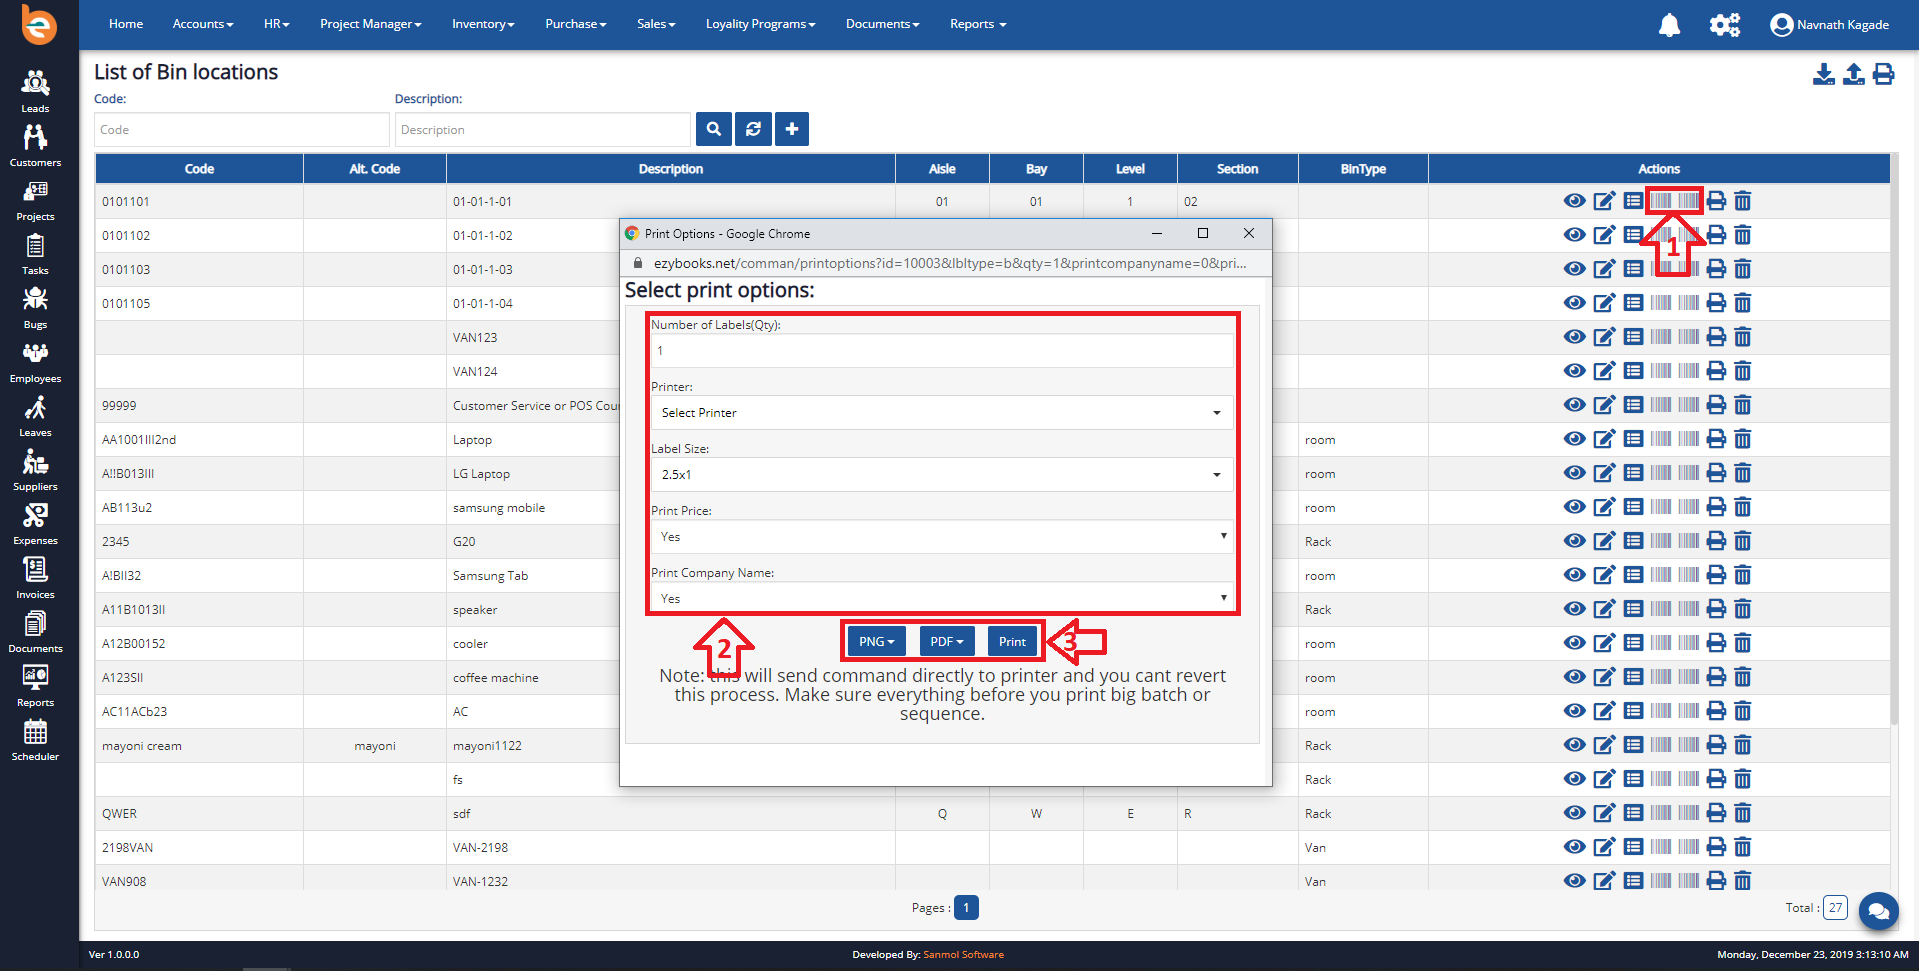
4.3.3 Bin Location List
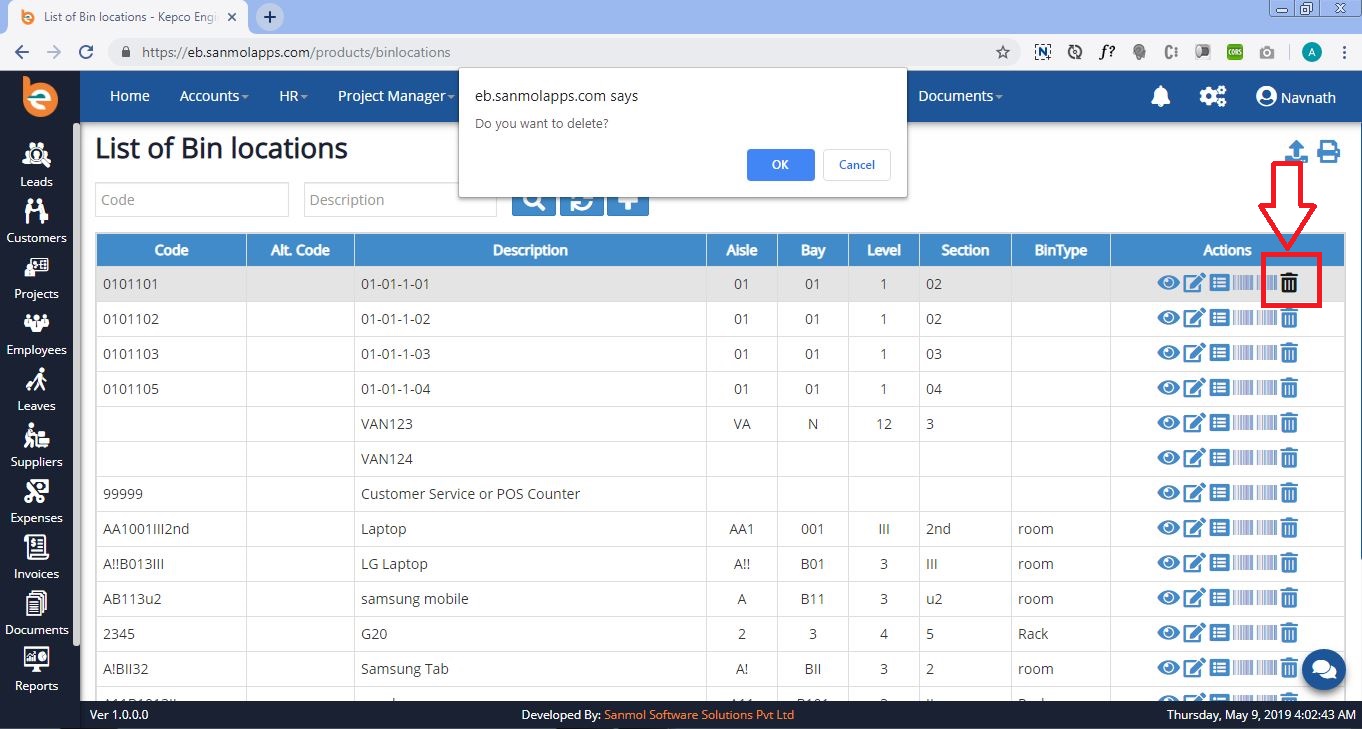
You can see all Bin Location List and options for edit, delete and view.
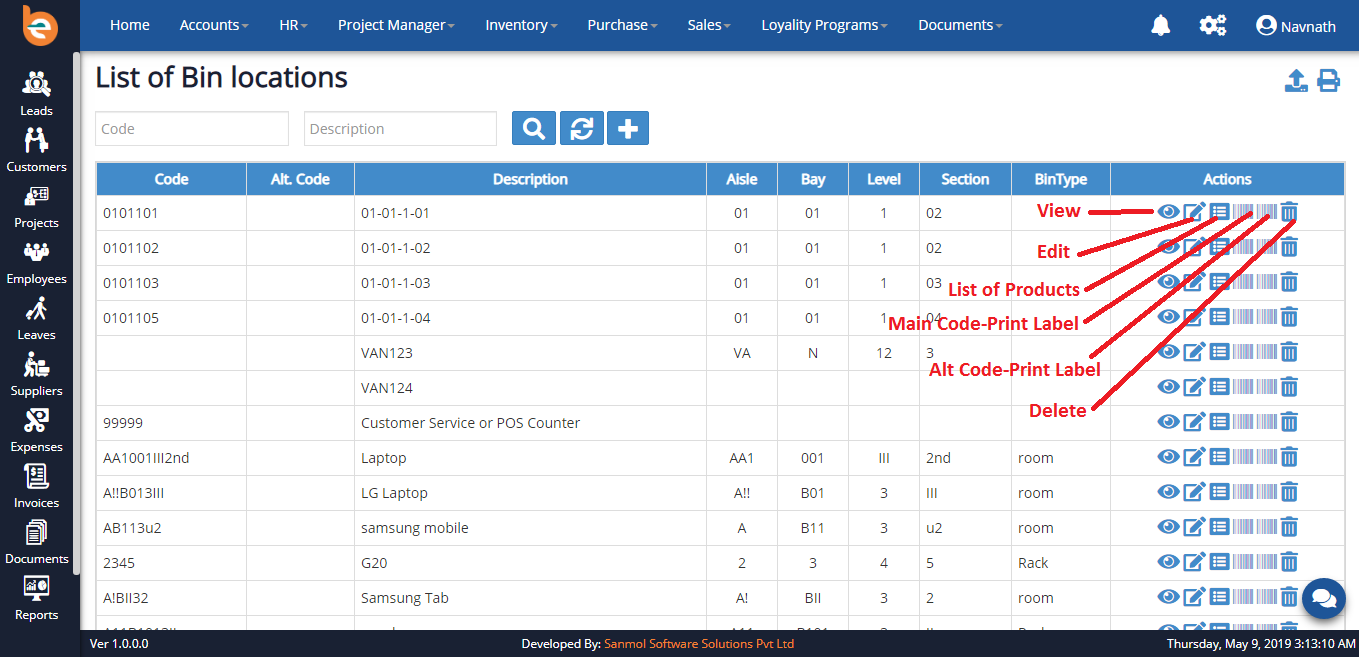
4.3.4 View Bin Location
You can view details of the Bin Location which you have added previously.
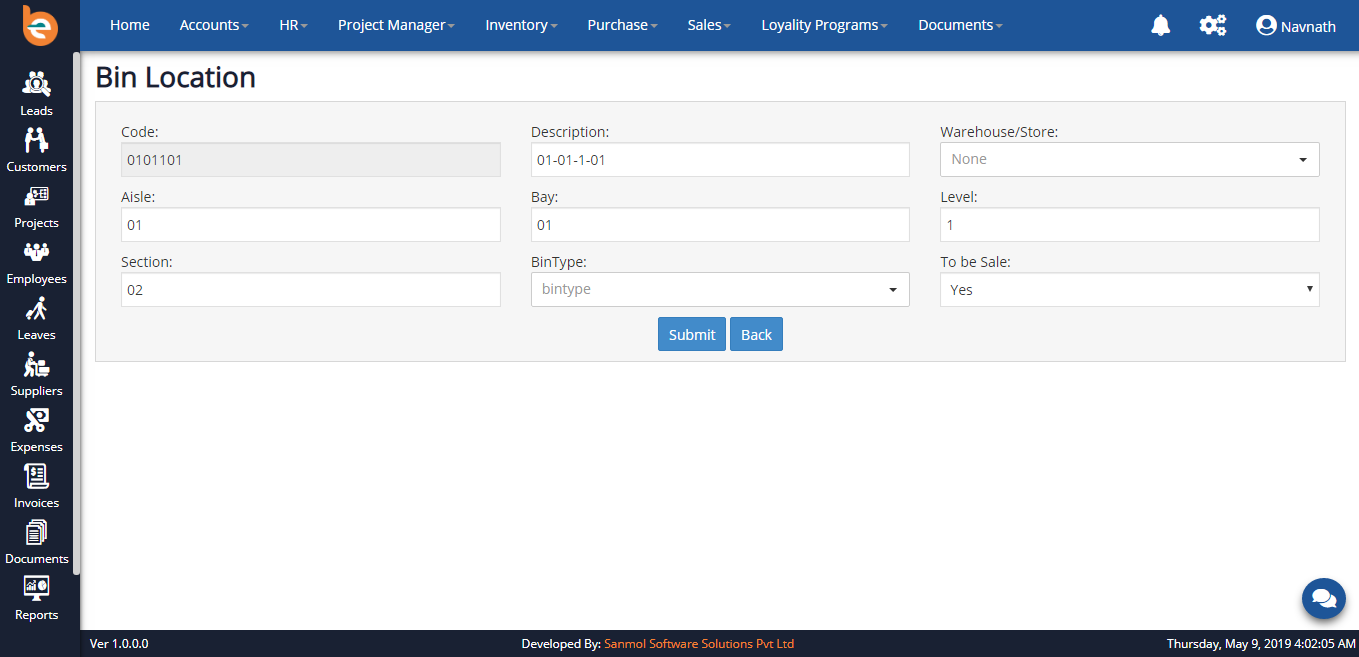
4.3.5 Edit Bin Location
You can edit details of the Bin Location which you have added previously.
4.3.6 Print Bin Location Label
You can print Bin Location label from this option.
4.3.7 Delete Bin Location
You can Delete Bin Location which you have added previously.
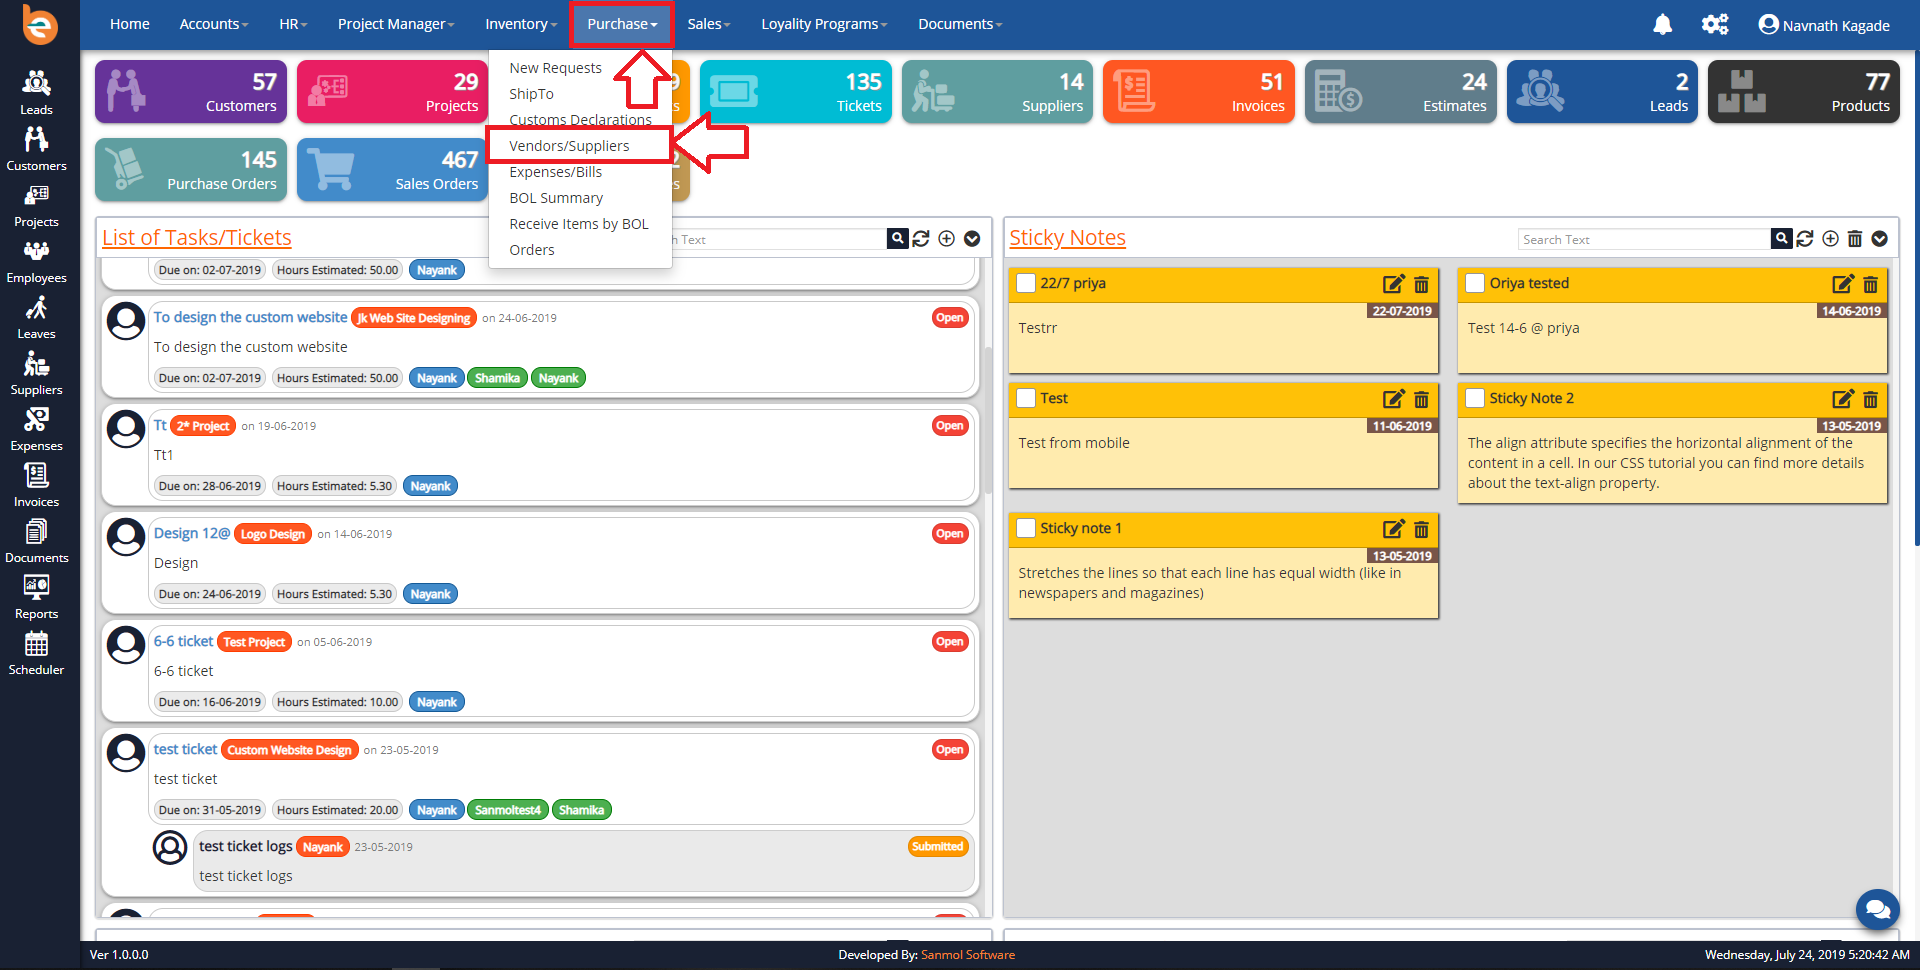
4.4 Suppliers
Under the Purchase menu you can see the Vendors/Suppliers option, from where you can add or view suppliers. Please follow the following screen.
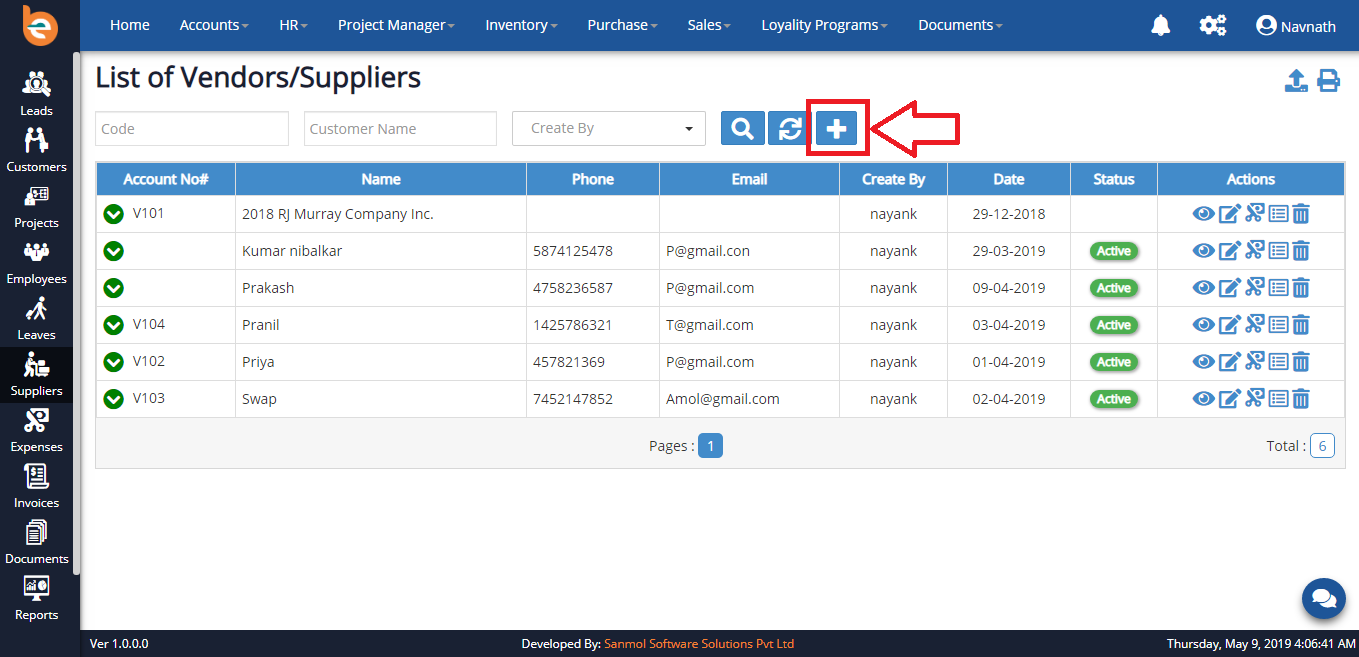
4.4.1 Create Suppliers
When you click on the Vendors/Suppliers option from the menu, you can see screen as per follows, there is plus icon for adding new Vendors/Suppliers.
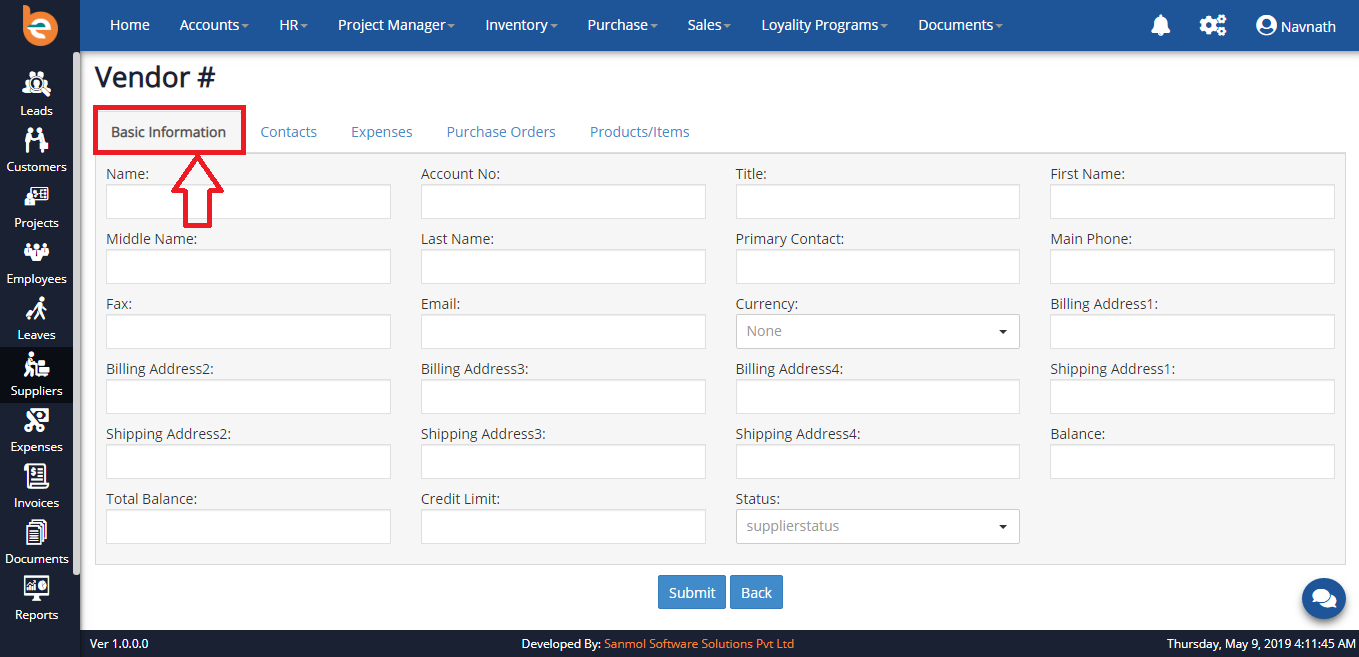
4.4.1.1 Create Suppliers - Basic Information
When you click on the plus icon following Supplier form will show, you should add all mandatory details of the supplier as per shown in the screen and finally click on submit.
4.4.1.2 Create Suppliers - Contacts
There is second tab contacts on Supplier form screen, click on that you can add multiple contacts after click on add contact button.
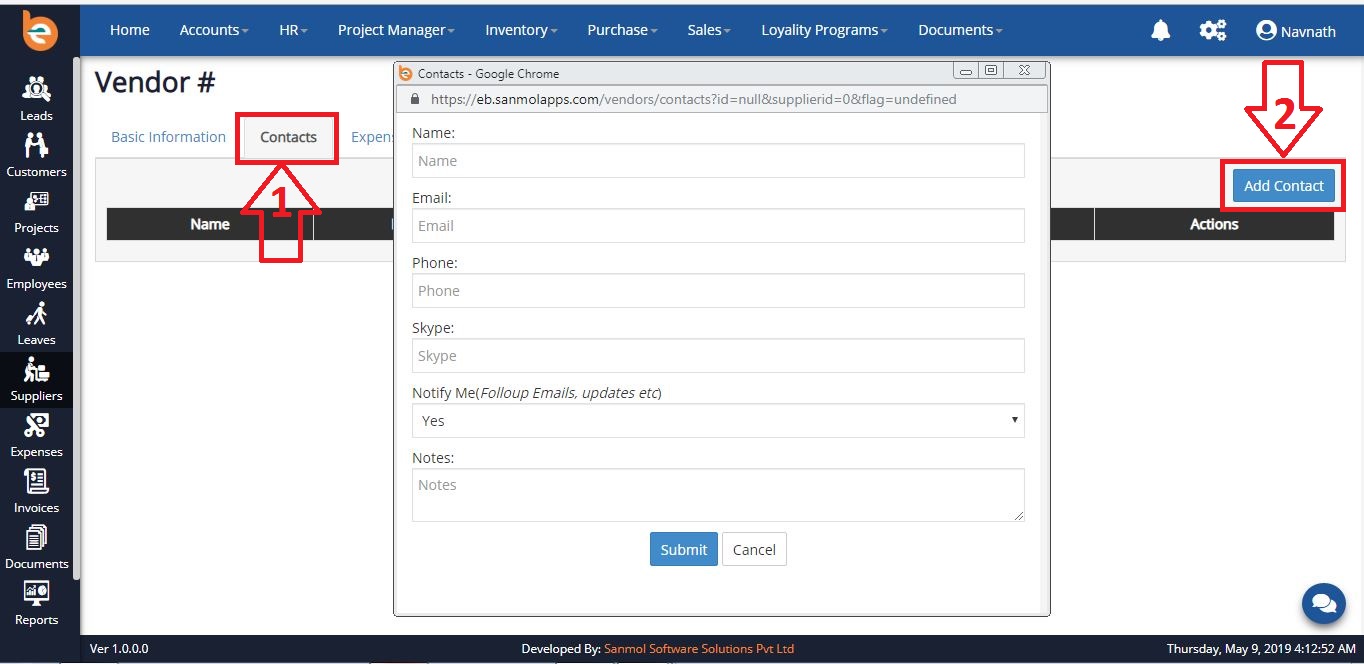
4.4.1.2.1 Create Suppliers - Contacts List
After adding the contacts of the supplier you can see the list of contact in the Contacts tab, you can update, view, delete contact using the action buttons.
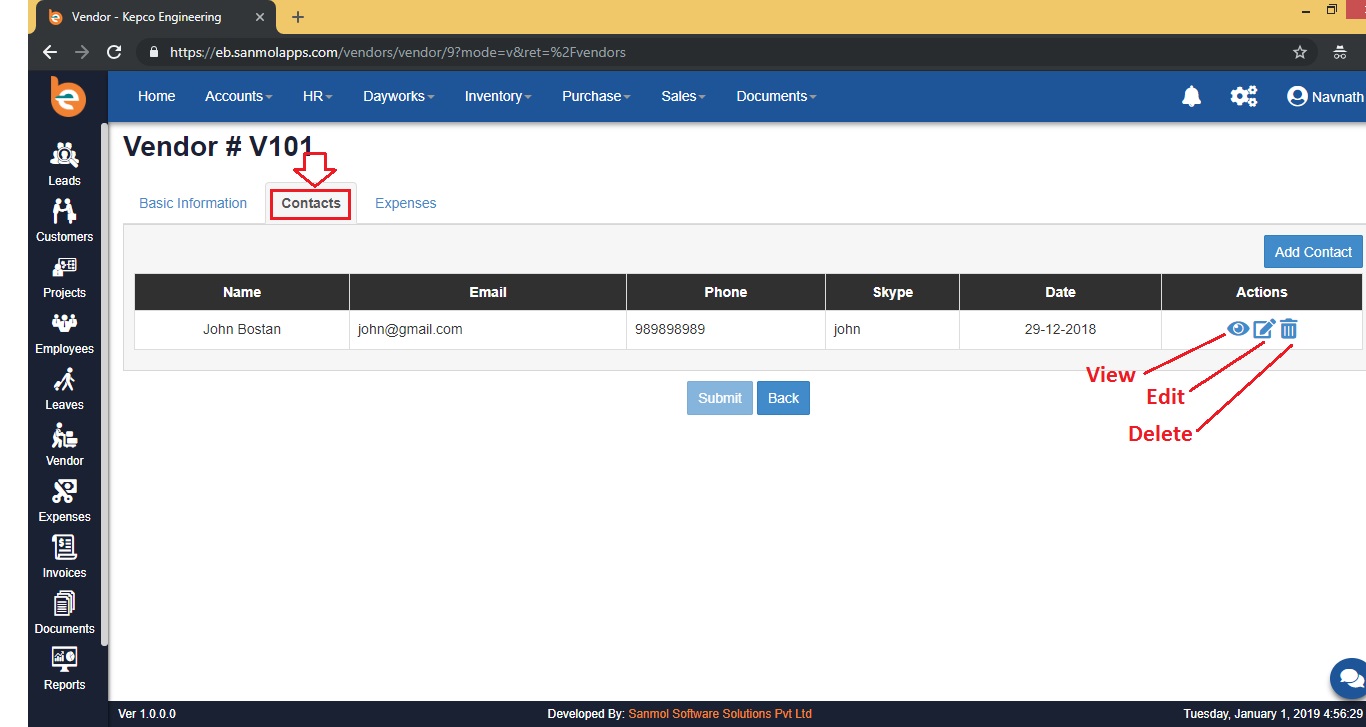
4.4.1.3 Create Suppliers - Expenses
On the main Supplier form third tab is the Expenses when you click on that you have option to add expenses if any, related to that customer.
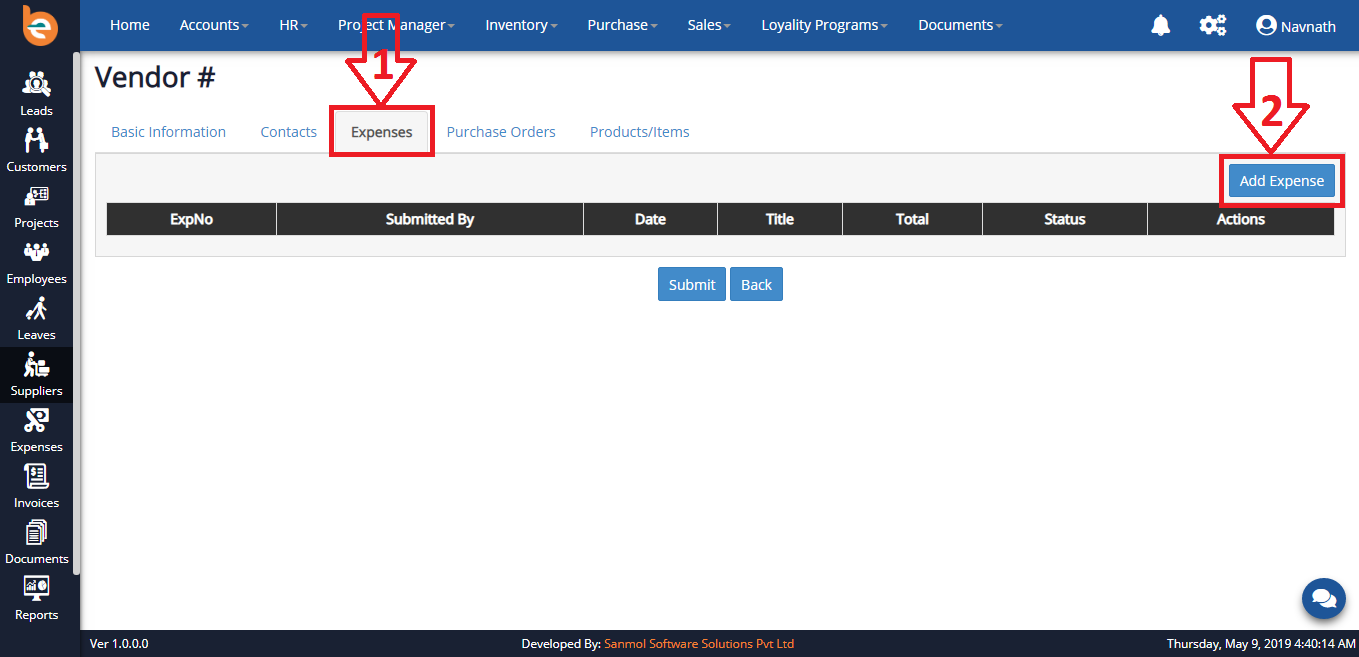
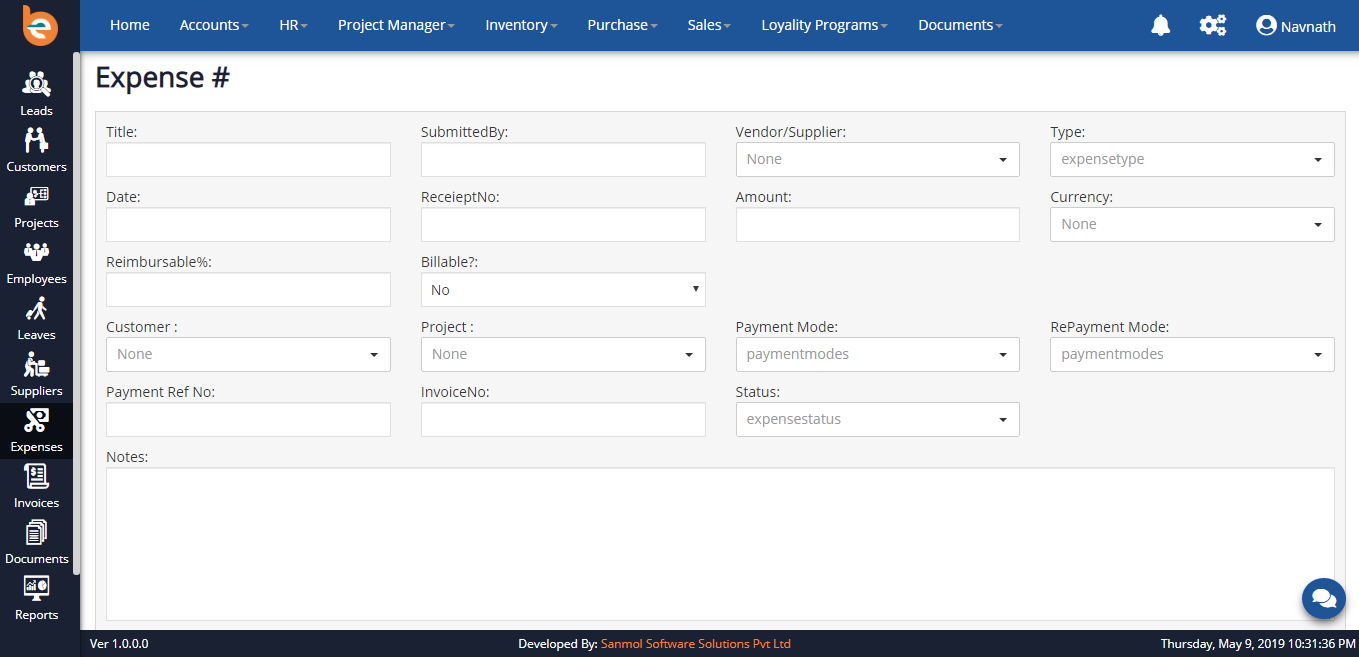
4.4.1.3.1 Create Suppliers - Expenses Form
When you click on the add expenses you can see expenses form. Please fill all the mandatory details and submit.
4.4.1.3.1.1 Create Suppliers - Expenses Types
Initially when you are going add first expense in the Ezybooks you need to add expeses types as per your company requirement, it is just for first time configuration when you add next time automatically it will show.
Examples of the Expenses Type:
1. Capital Expenses
2. Business Expenses
3. Personnel
4. Cost of Goods Sold
5. Rent
6. Rent
7. Taxes
8. Insurance
9. Other Expenses
10. Miscellaneous
As per following screen you have textbox for adding new expense type, just put expense type in the textbox and click enter or on plus given icon.

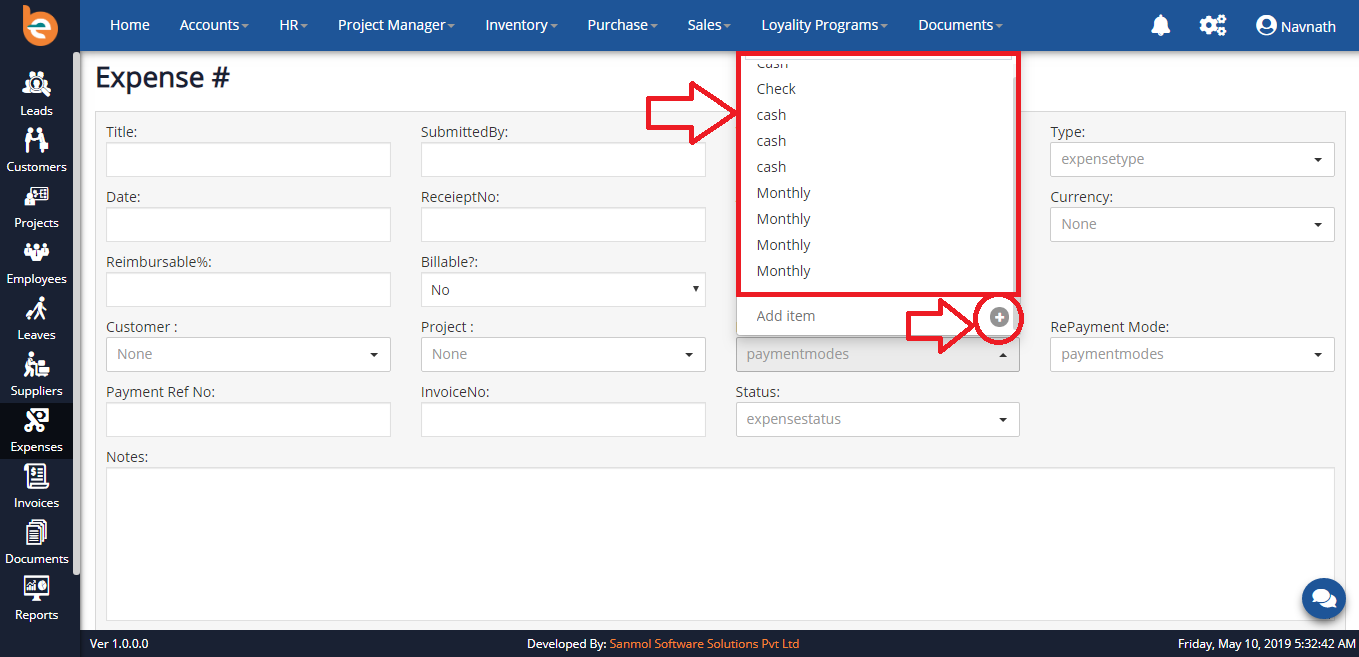
4.4.1.3.1.2 Create Suppliers - Payment Mode
Initially when you are going to add first expense, in the Ezybooks you need to add Payment Mode as per your company requirement, it is just for first time configuration when you add next time automatically it will show.
Examples of the Payment Mode:
1. Cash
2. Check
3. Bank Transfers / Electronic Funds Transfer (EFT)
4. Credit Cards
5. Debit Cards
6. Apple Pay
As per following screen you have textbox for adding new payment mode, just put payment mode in the textbox and click enter or on plus given icon.
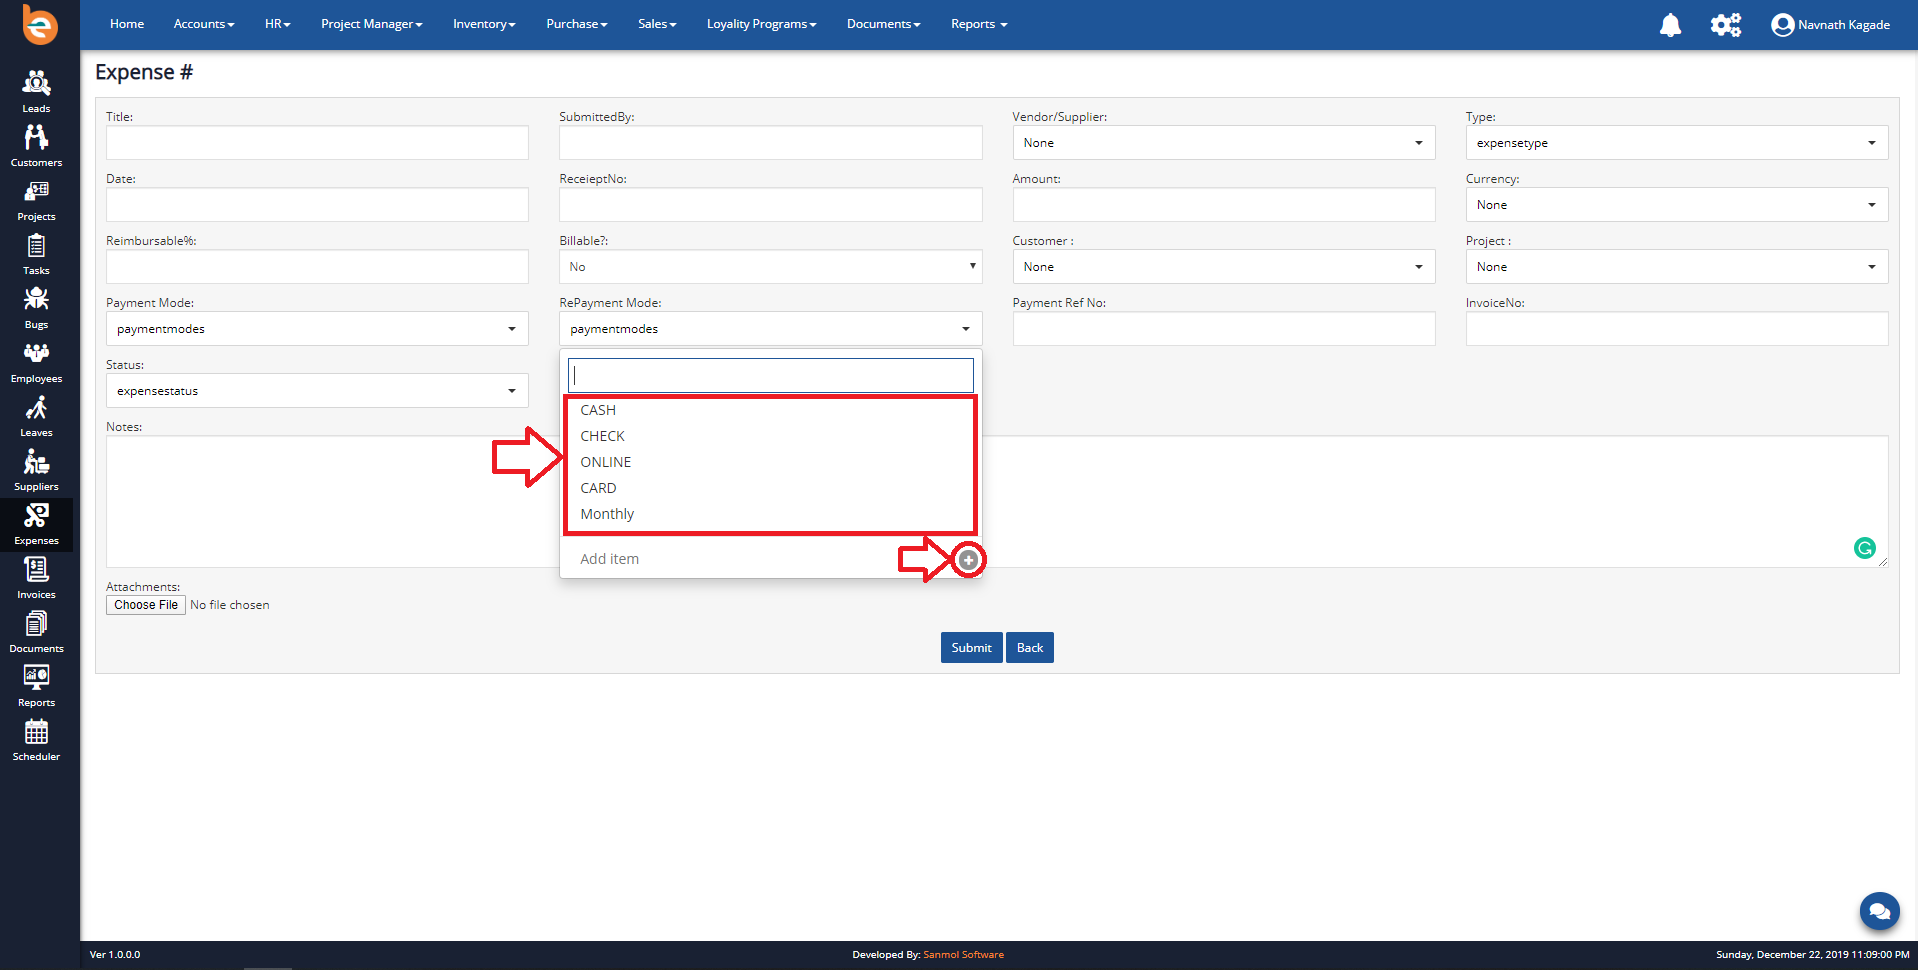
4.4.1.3.1.3 Create Suppliers - RePayment Mode
Initially when you are going to add first expense in the Ezybooks you need to add RePayment Mode as per your company requirement, it is just for first time configuration when you add next time automatically it will show.
Examples of the RePayment Mode:
1. Cash
2. Check
3. Bank Transfers / Electronic Funds Transfer (EFT)
4. Credit Cards
5. Debit Cards
6. Apple Pay
As per following screen you have textbox for adding new repayment mode, just put repayment mode in the textbox and click enter or on plus given icon.
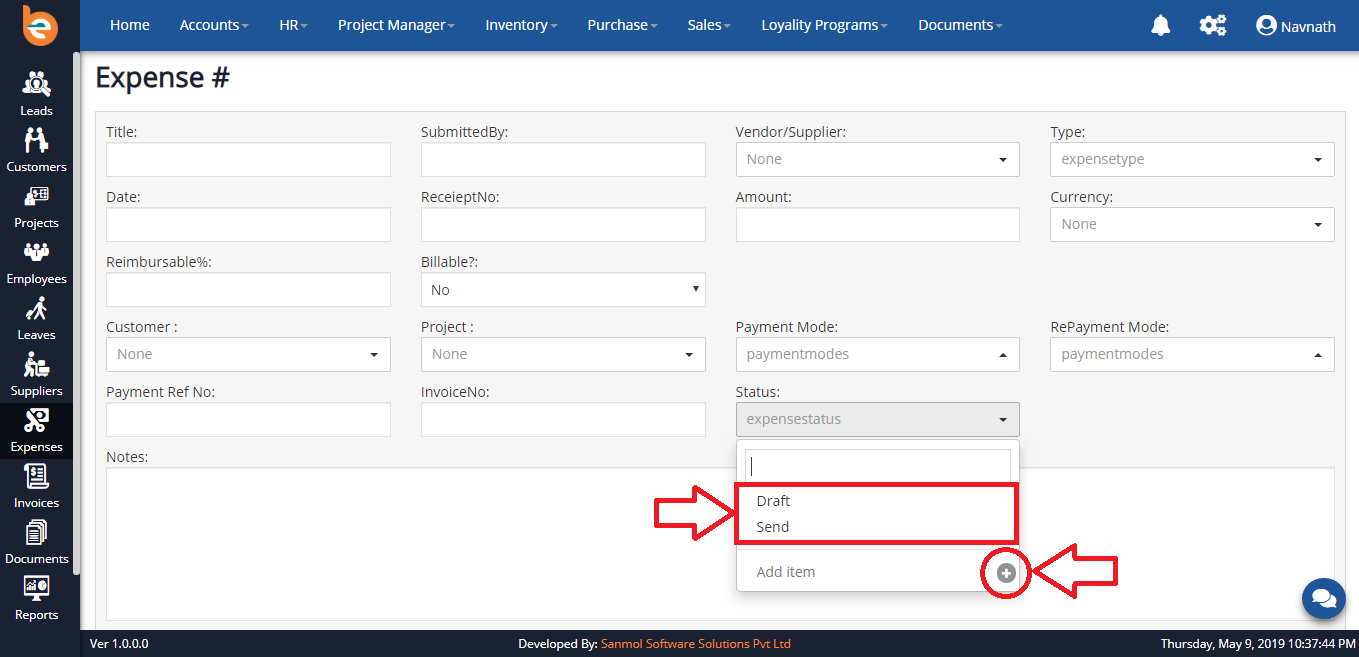
4.4.1.3.1.4 Create Suppliers - Expense Status
Initially when you are going to add first expense in the Ezybooks you need to add Expense Status as per your company requirement, it is just for first time configuration when you add next time automatically it will show.
Examples of the Expense Status:
1. Draft
2. Pending Approval
3. Pending Payment
4. Archived
As per following screen you have textbox for adding new expense status, just put expense status in the textbox and click enter or on plus given icon.
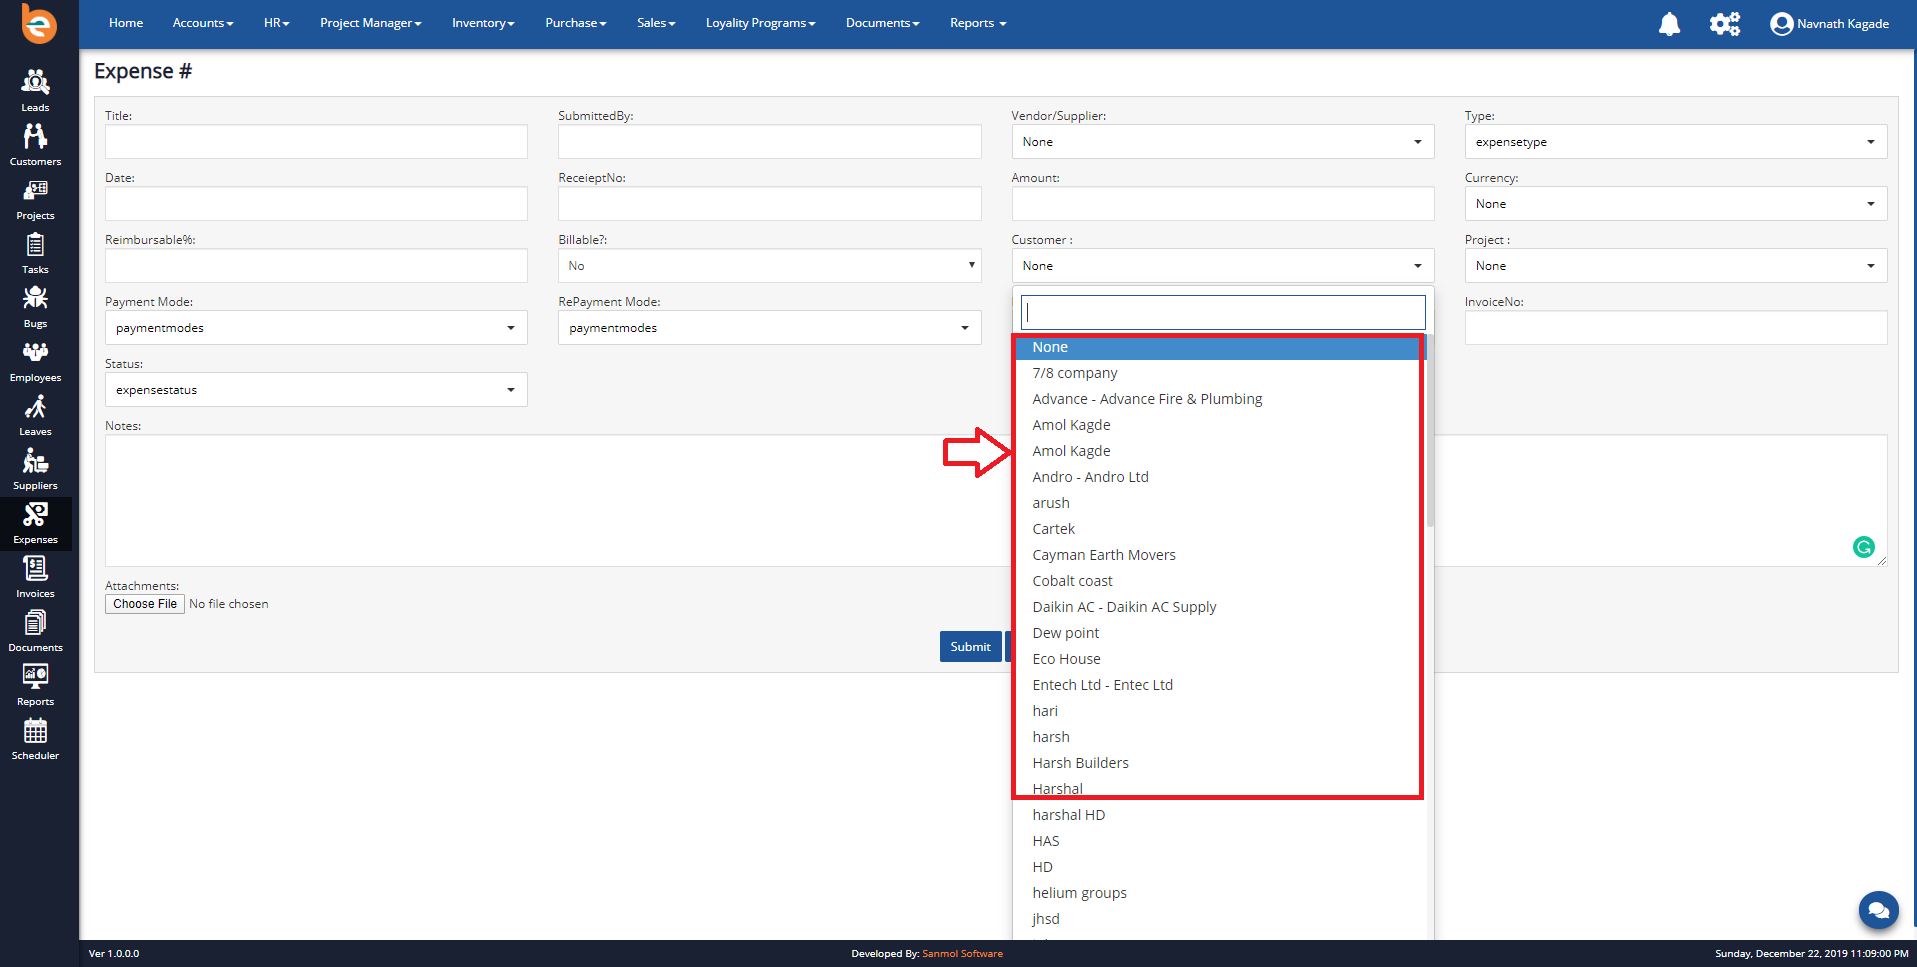
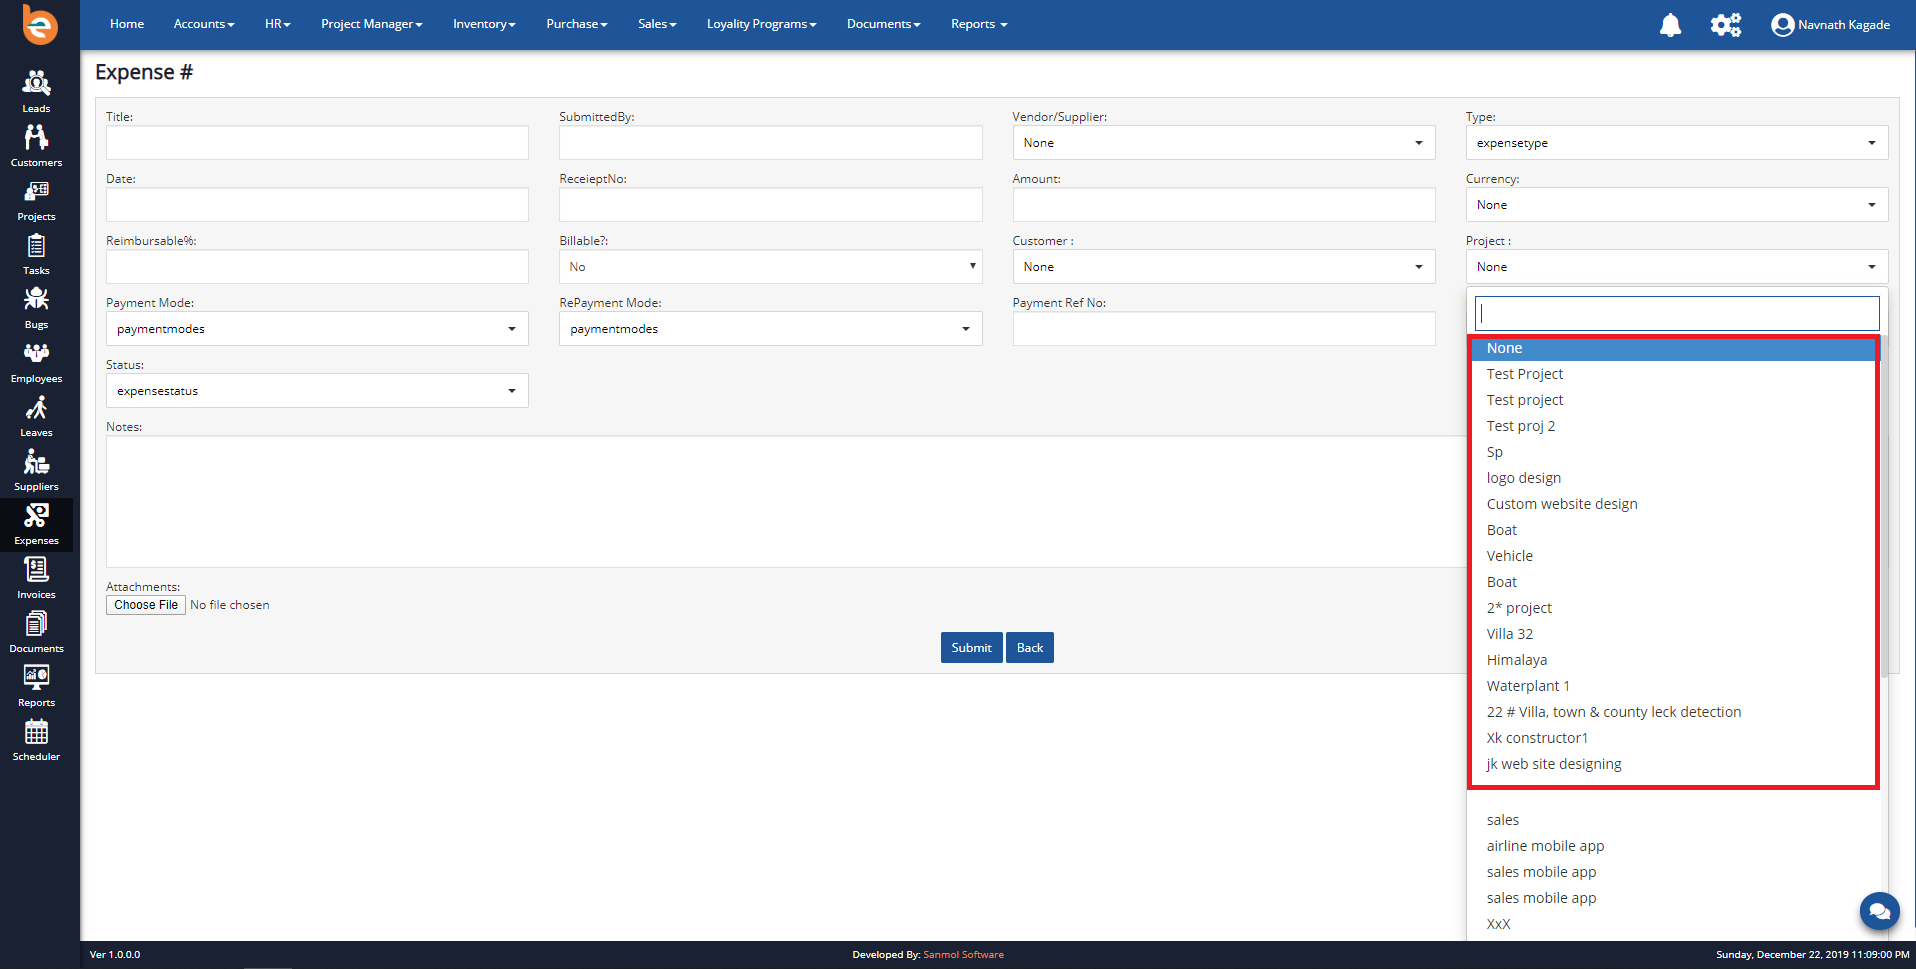
4.4.1.3.1.5 Create Suppliers - Customer and Projects
Customer and Project fields are the extra fields, those you can use if expense is related to particular customer or project. If you added customer or project already from the customer and project option then and then only it will show.
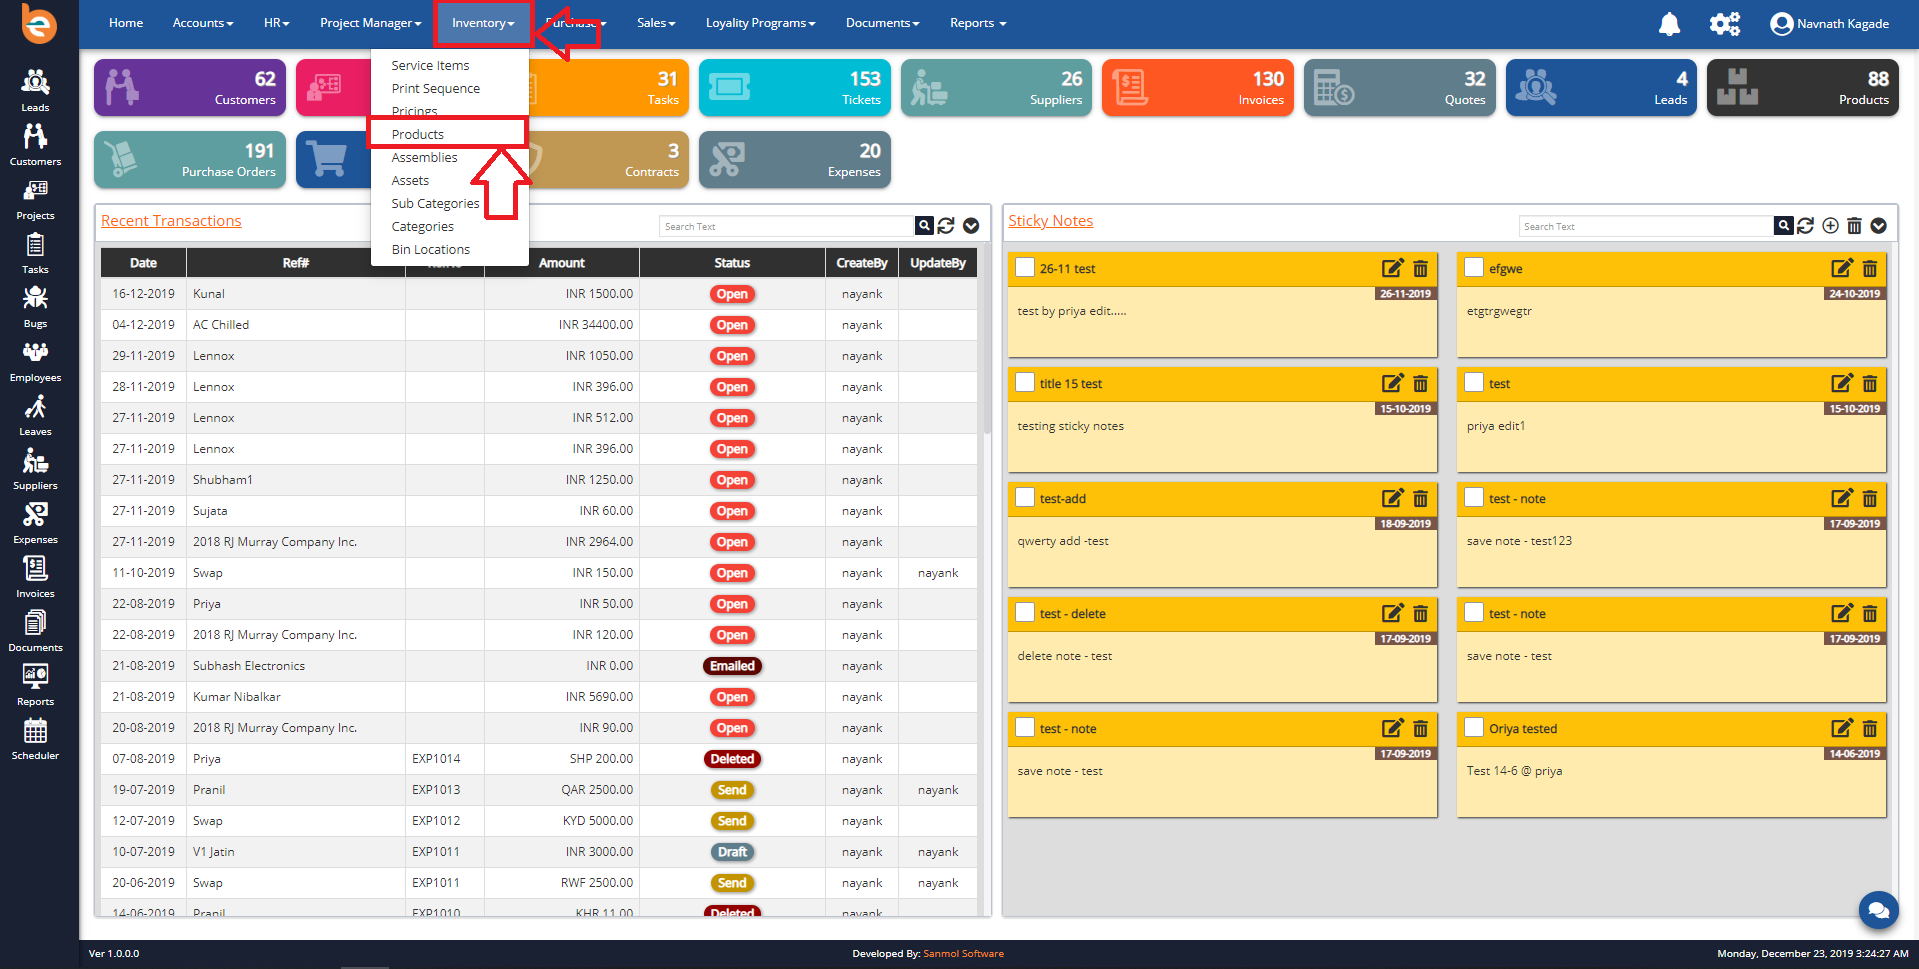
4.5 Products
For adding new products or viewing the inventory you need to click on Inventory option from main menu after that click on Products. Please follow the below screen.
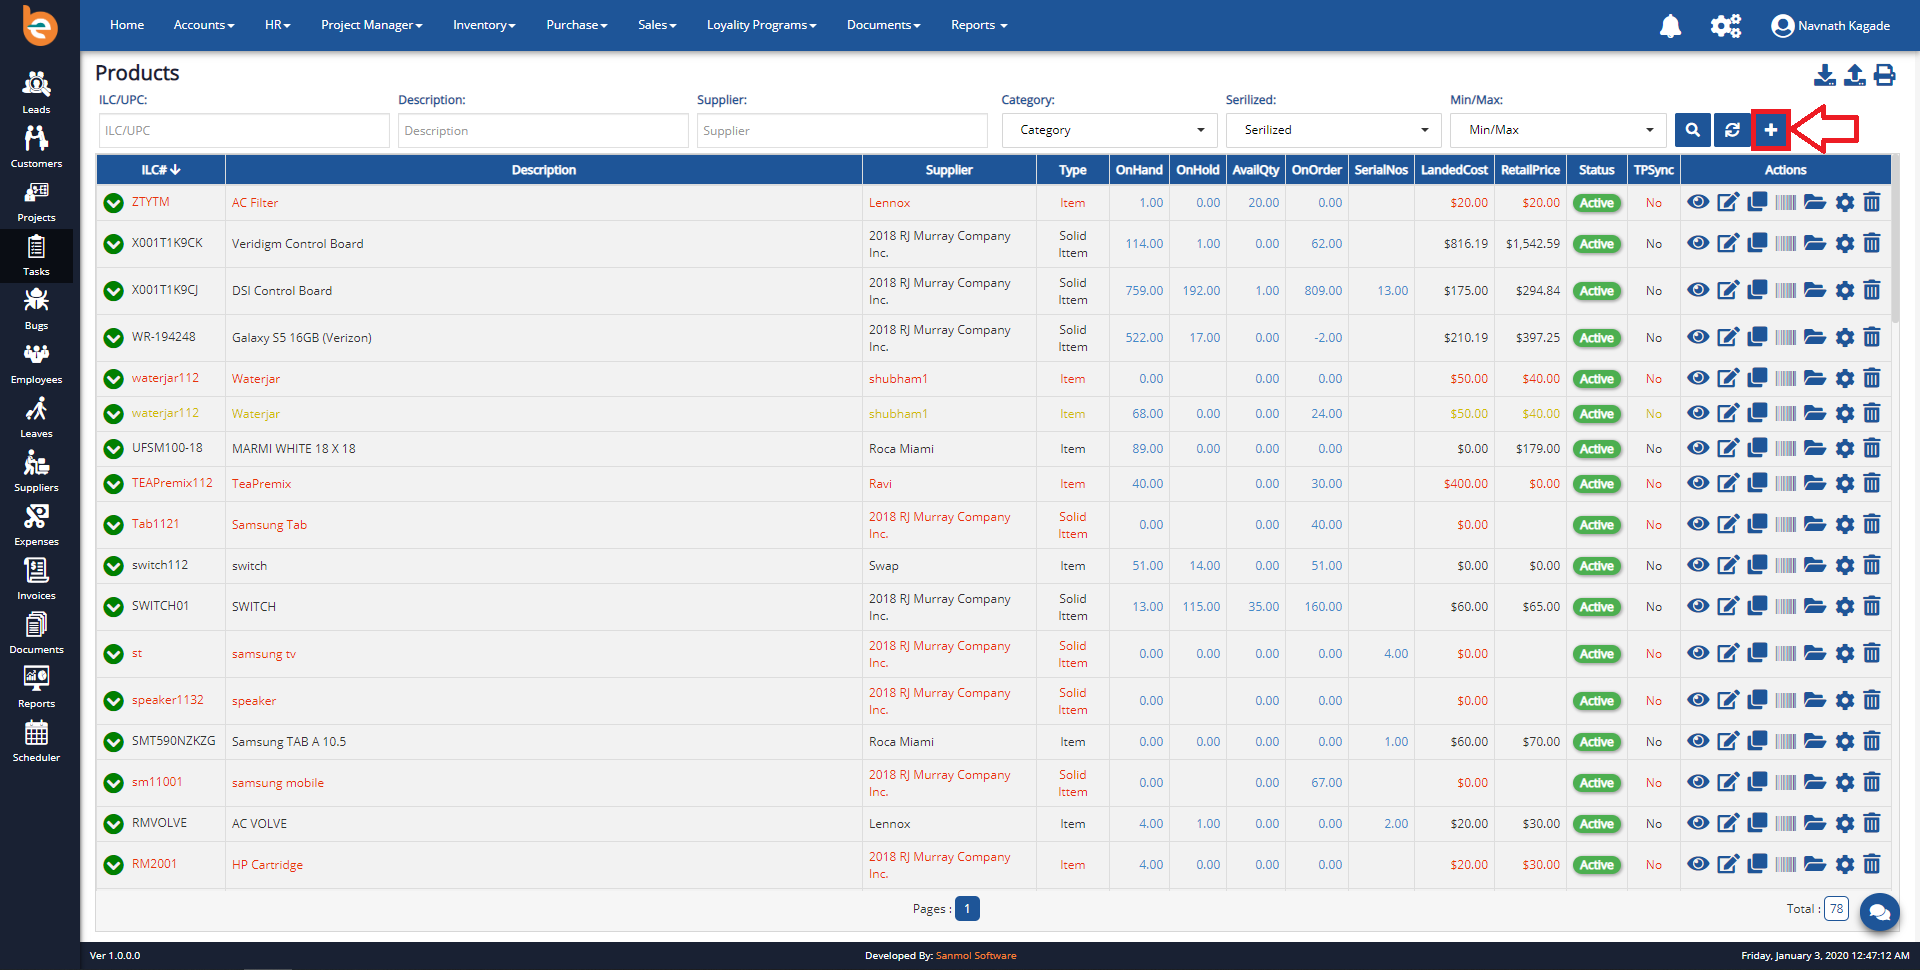
4.5.1 Add Products
For creating new product click on the plus icon from the main screen, shown as per follows.
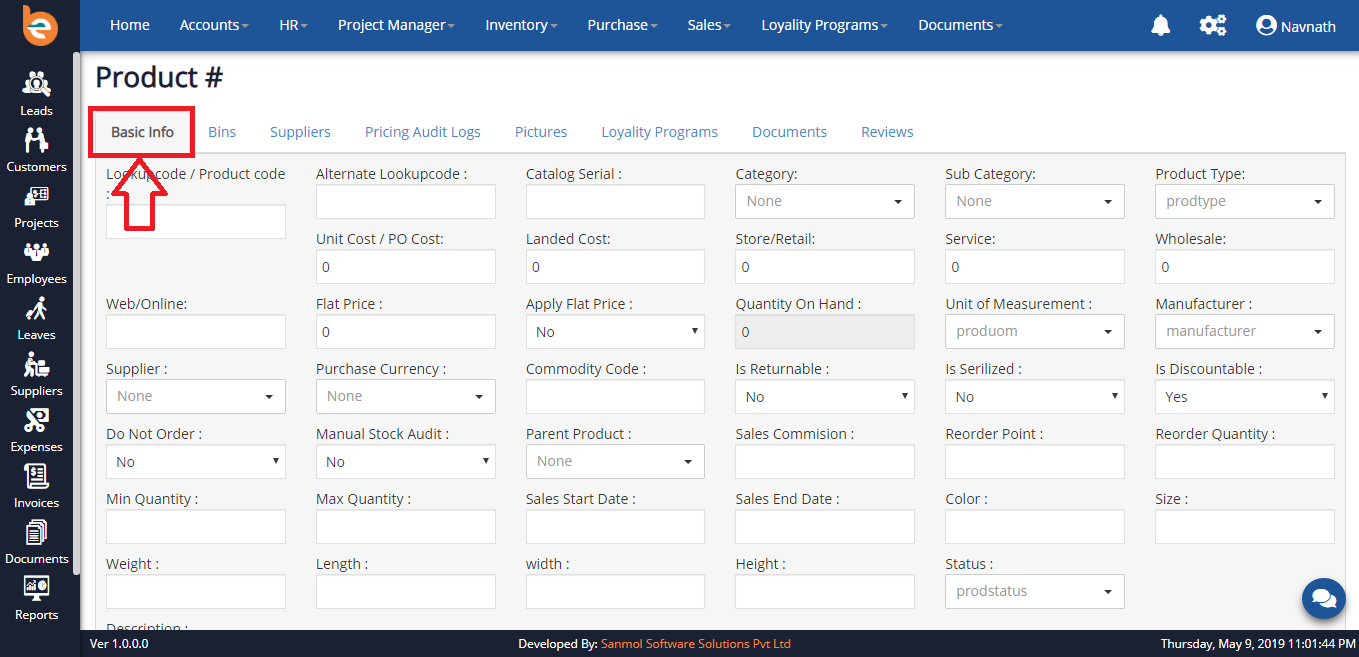
4.5.1 Create Product Form
After click on plus icon product form will show as per follows screen, fill all the mandatory fields and click on submit button.
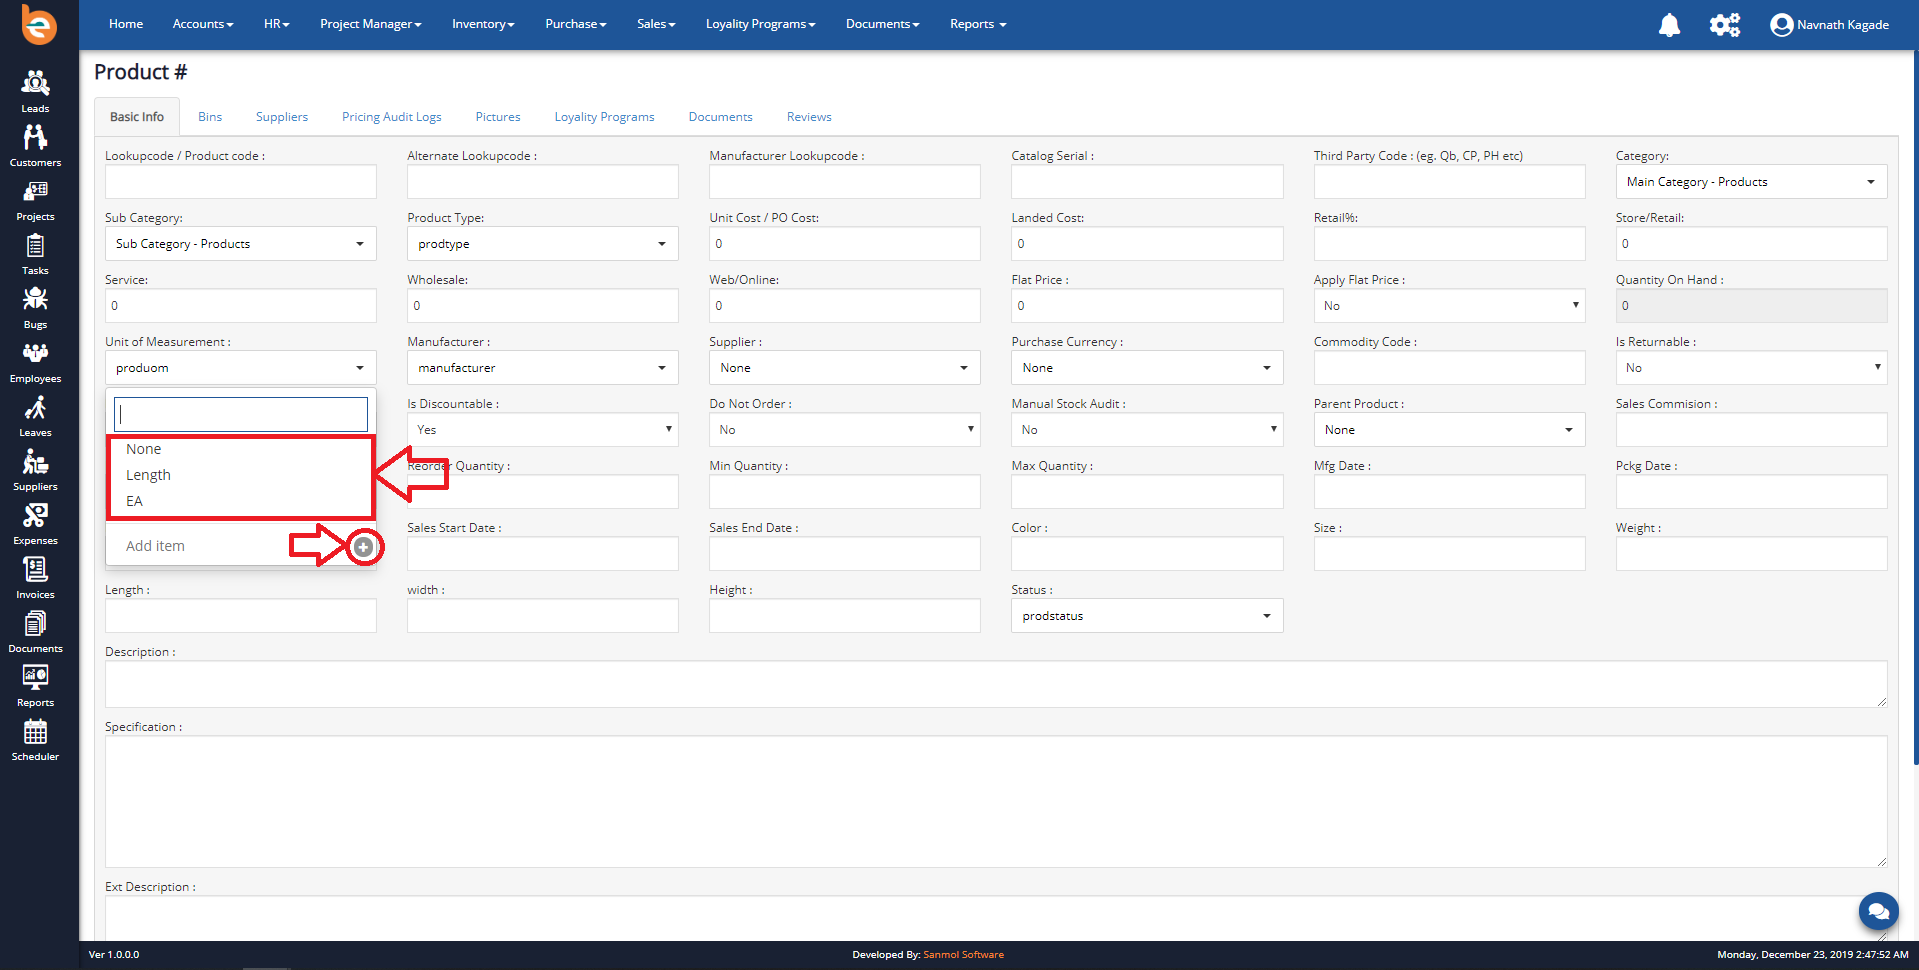
4.5.1.1 Create Product - Unit of Measurement
Initially when you are going to add first product in the Ezybooks you need to add Unit of Measurement as per product, it is just for first time configuration when you add next time automatically it will show.
Example Unit of Measurement Types:
1. Stocked in each : ‘Ea’
2. Purchased in Case : ‘Cases’
3. Vendor priced in Skids : ‘Skid’
As per following screen you have textbox for adding new Unit of Measurement, just put Unit of Measurement in the textbox and click enter or on plus given icon.
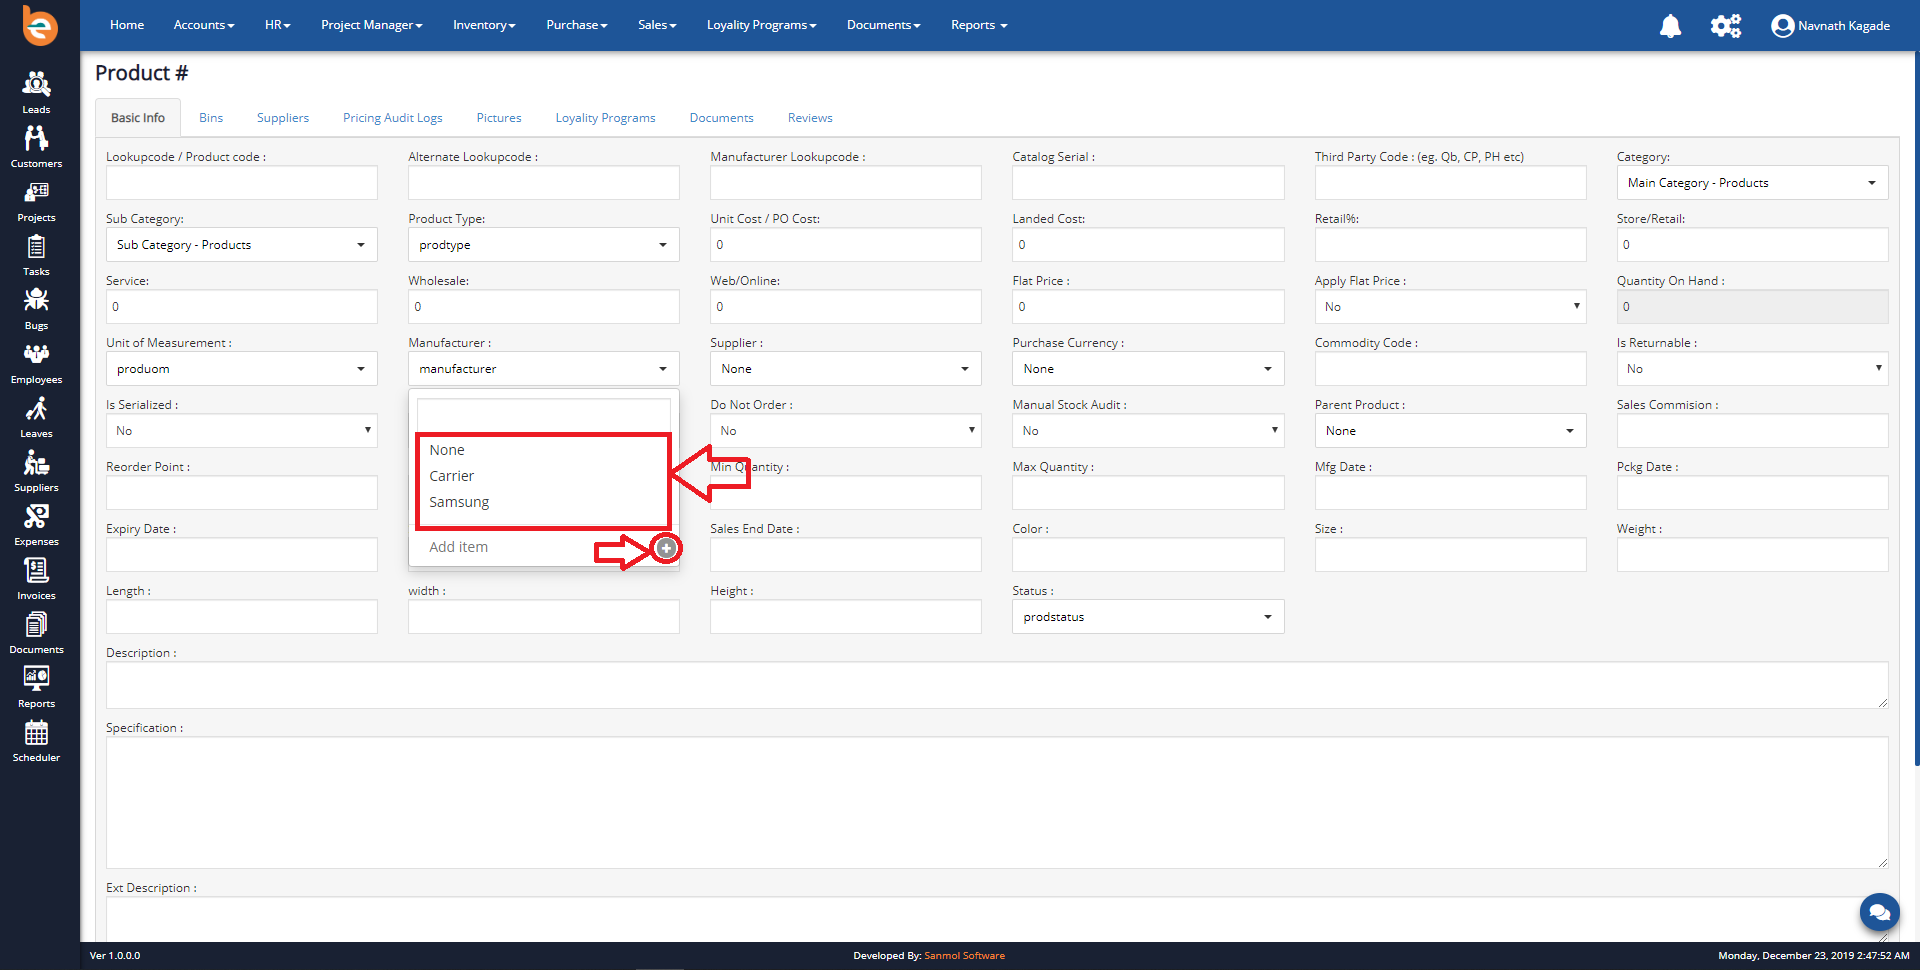
4.5.1.2 Create Product - Manufacturer
Initially when you are going to add first product in the Ezybooks you need to add Manufacturer of the product, it is just for first time of configuration when you add, next time automatically it will show.
As per following screen you have textbox for adding new Manufacturer, just put Manufacturer in the textbox and click enter or on plus given icon.
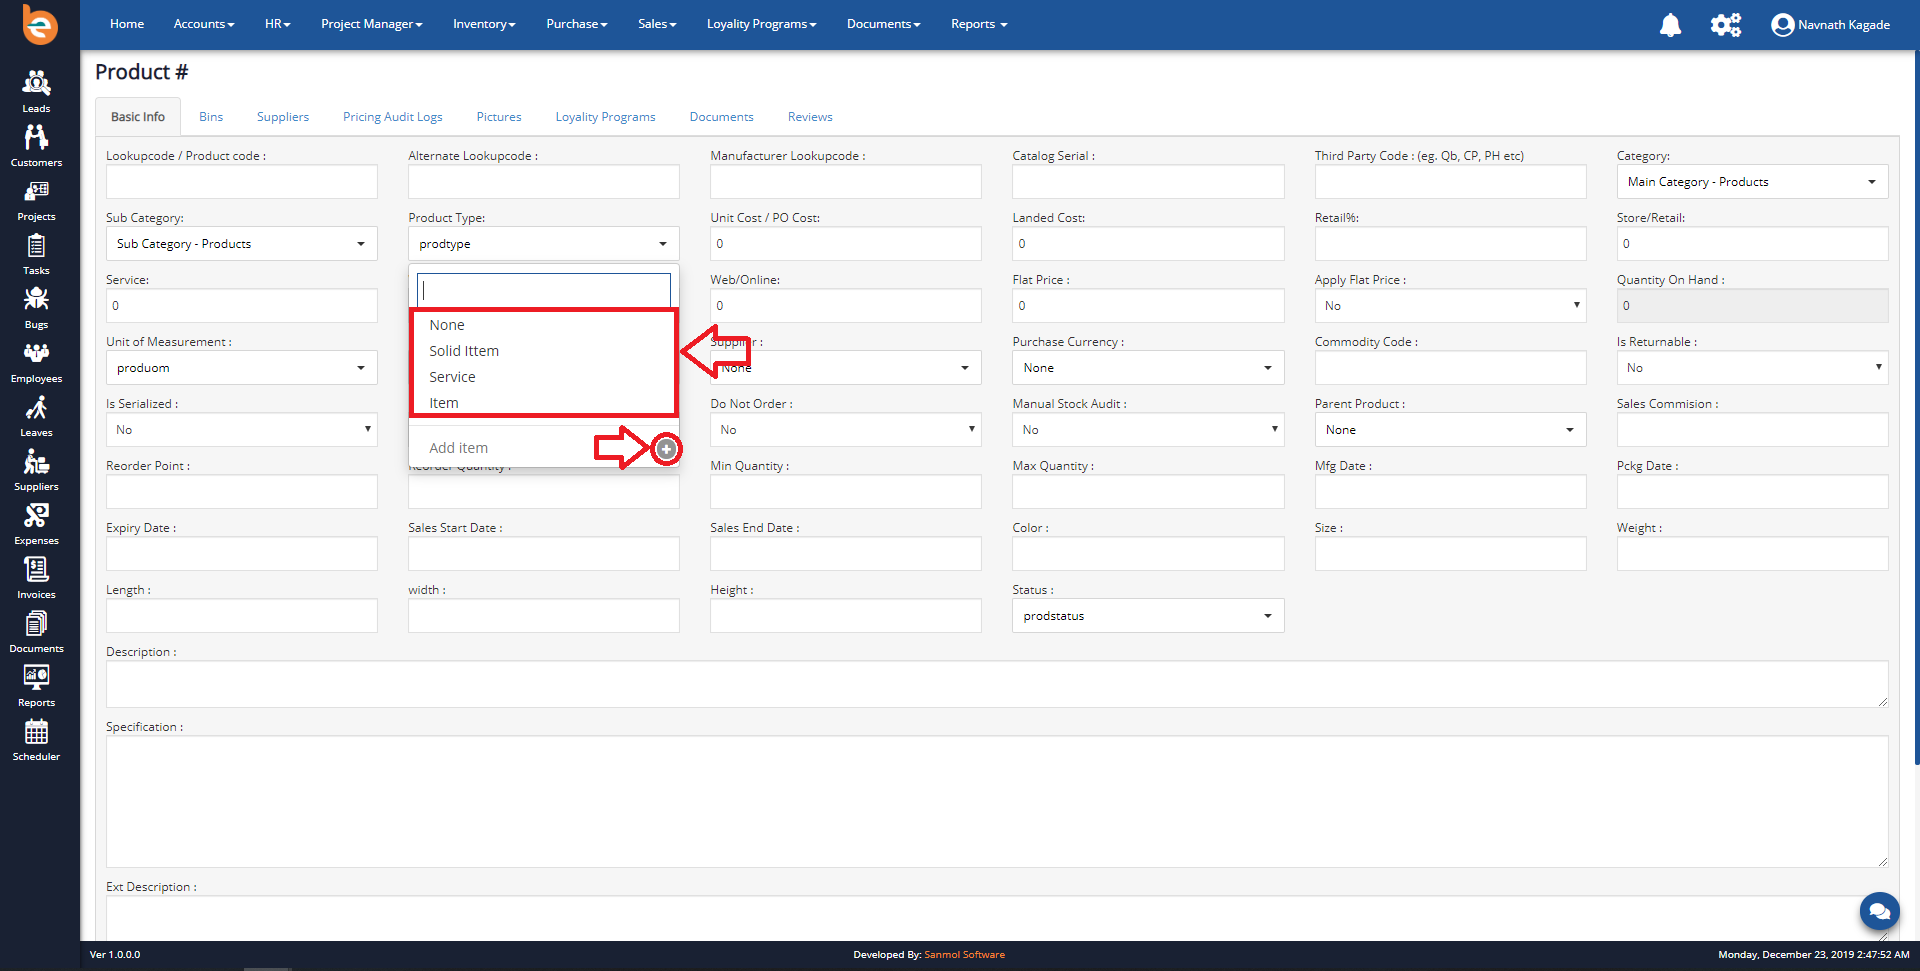
4.5.1.3 Create Product - Product Type
Initially when you are going to add first product in the Ezybooks you need to add product types, it is just for first time of configuration when you add, next time automatically it will show.
Example Product Types:
1. Simple Product
2. Grouped Product
3. Configurable Product
4. Virtual Product
As per following screen you have textbox for adding new Product Types, just put Product Types in the textbox and click enter or on plus given icon.
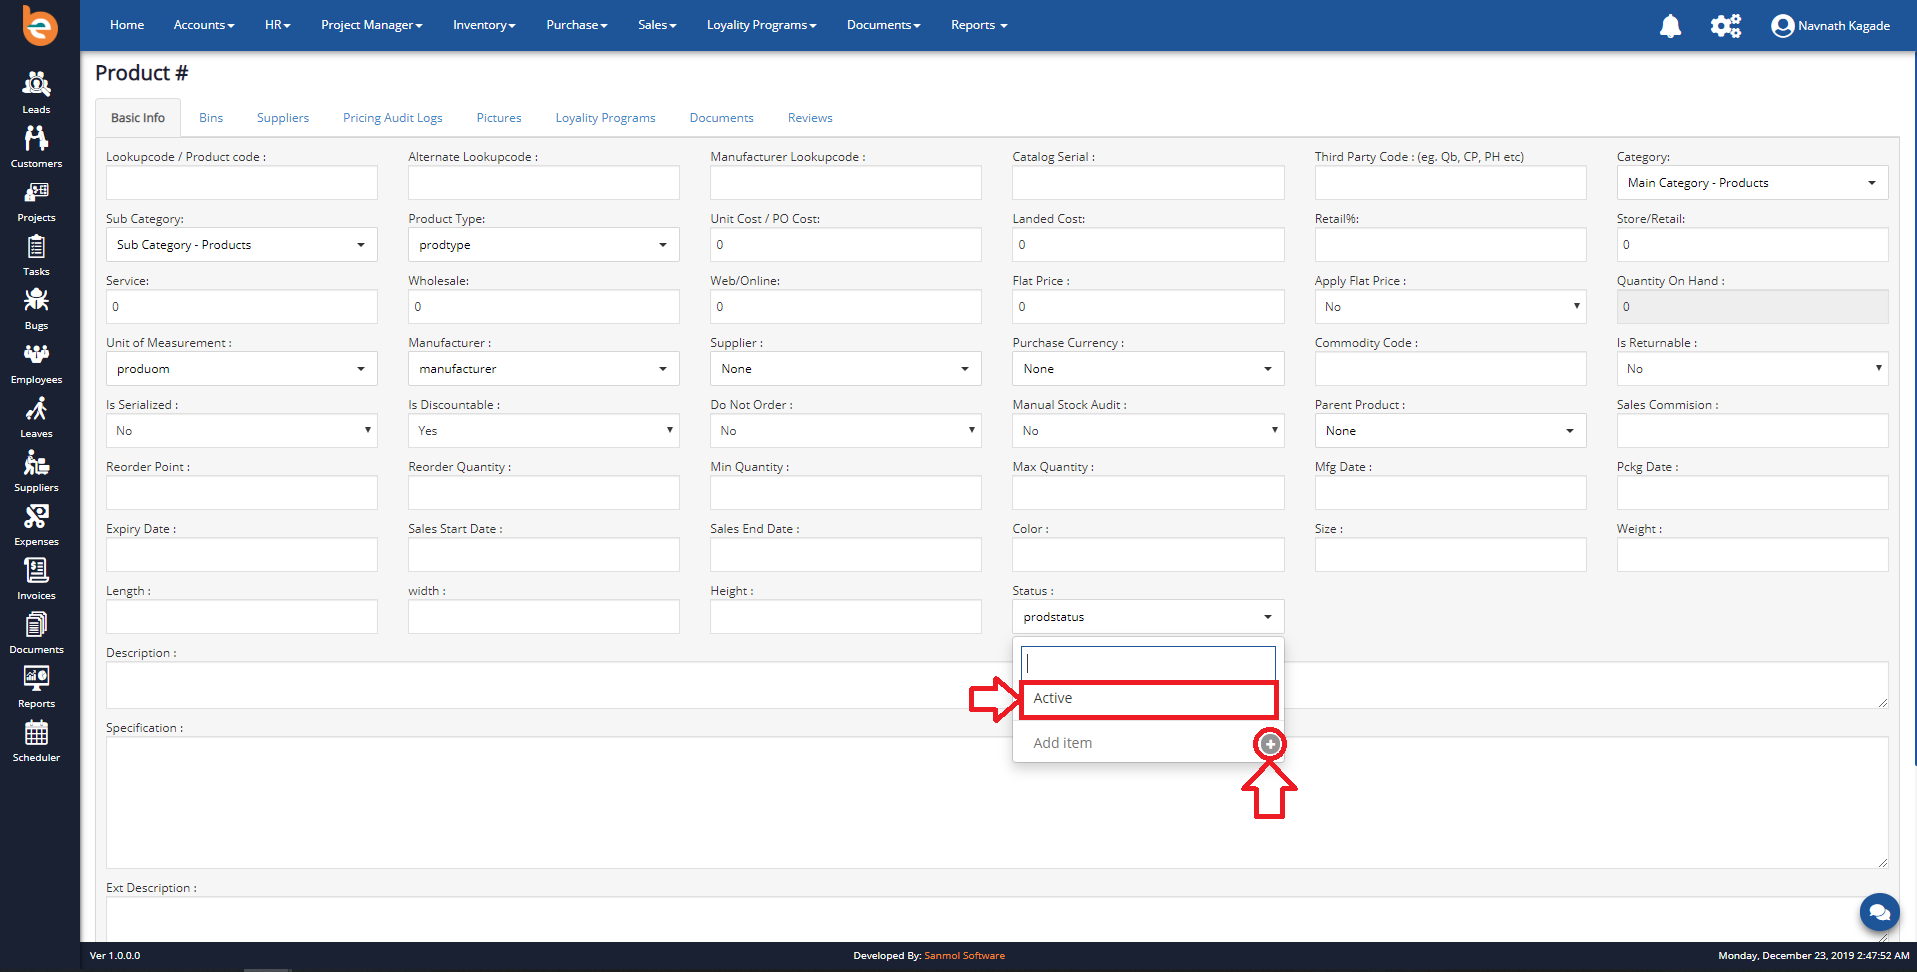
4.5.1.3 Create Product - Status Type
Initially when you are going add first product in the Ezybooks you need to add product status types, it is just for first time configuration when you add next time automatically it will show.
Example Status Types:
1. Active
2. Inactive
3. Hold
4. Draft
As per following screen you have textbox for adding new Status Types, just put Status Types in the textbox and click enter or on plus given icon.
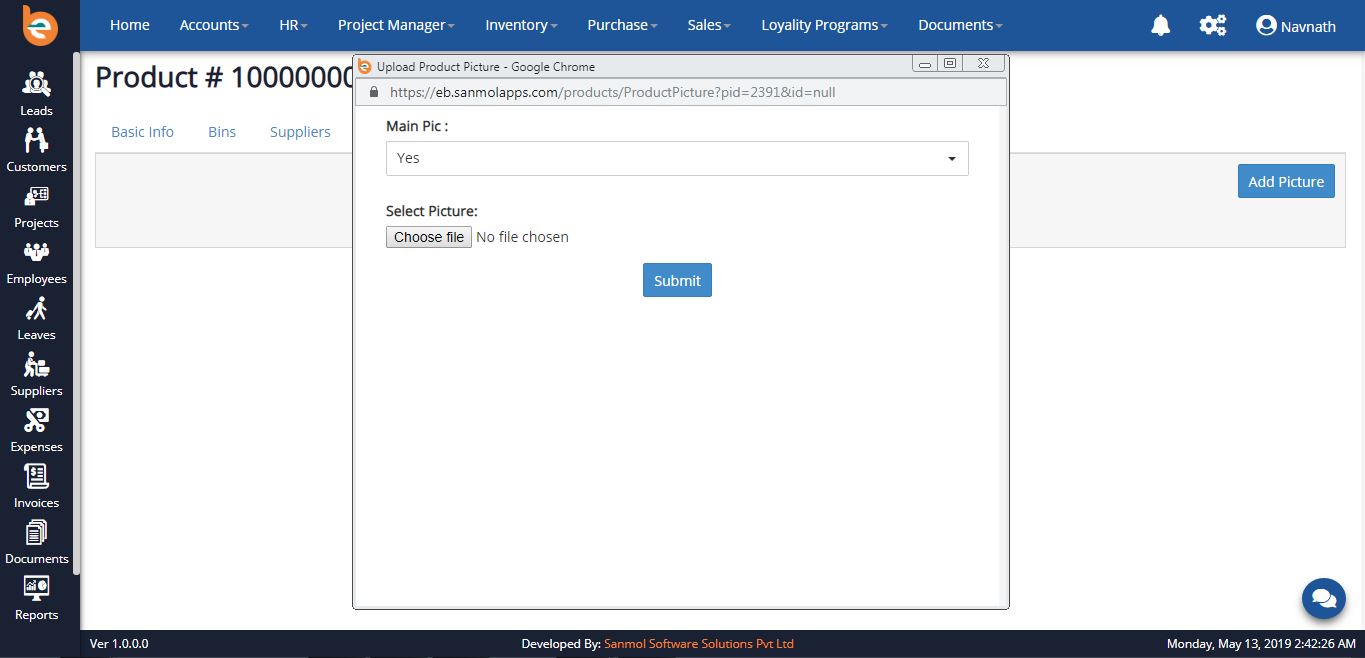
4.5.4 Create Product Form - Pictures
When you click on pictures tab you have option to upload pictures of the product, you can add more than one picture so those pictures will show on various locations.
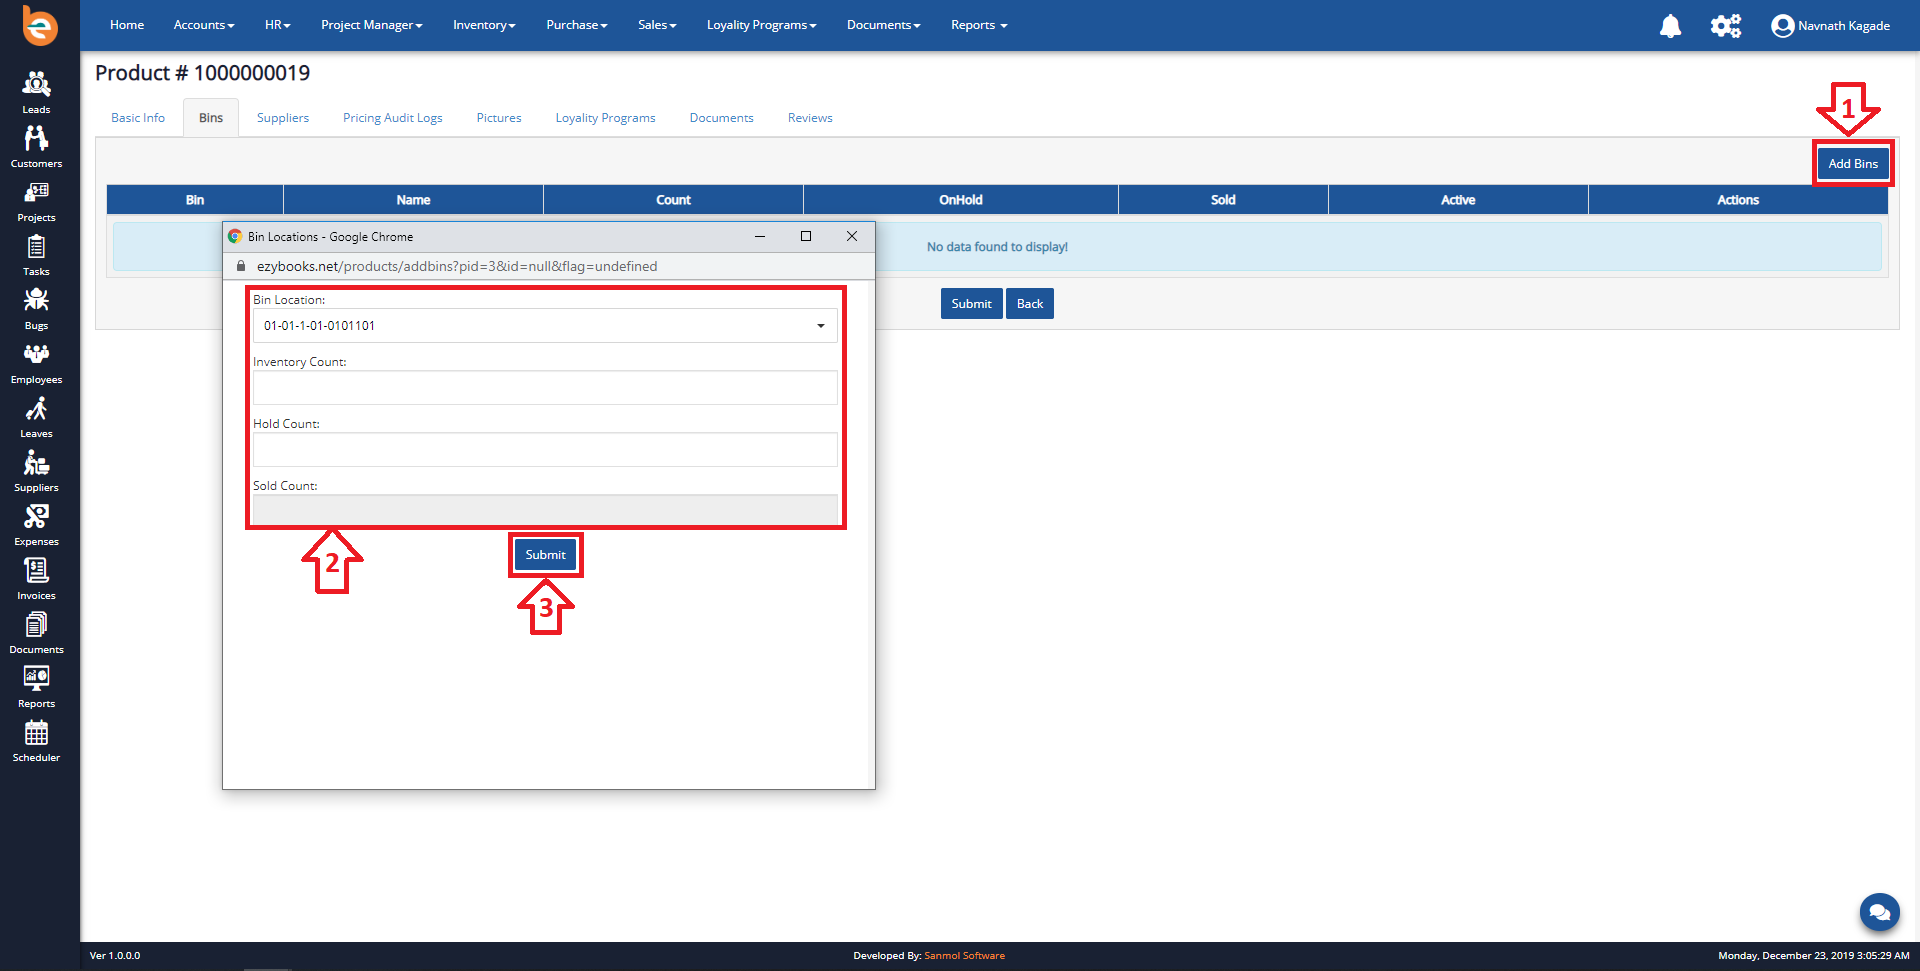
4.5.5 Create Product Form - Bin Location
If you are configuring products which are from the warehouse and already quantities are available at physical location then and then only you can add bin location and there quantity else don't use this option.
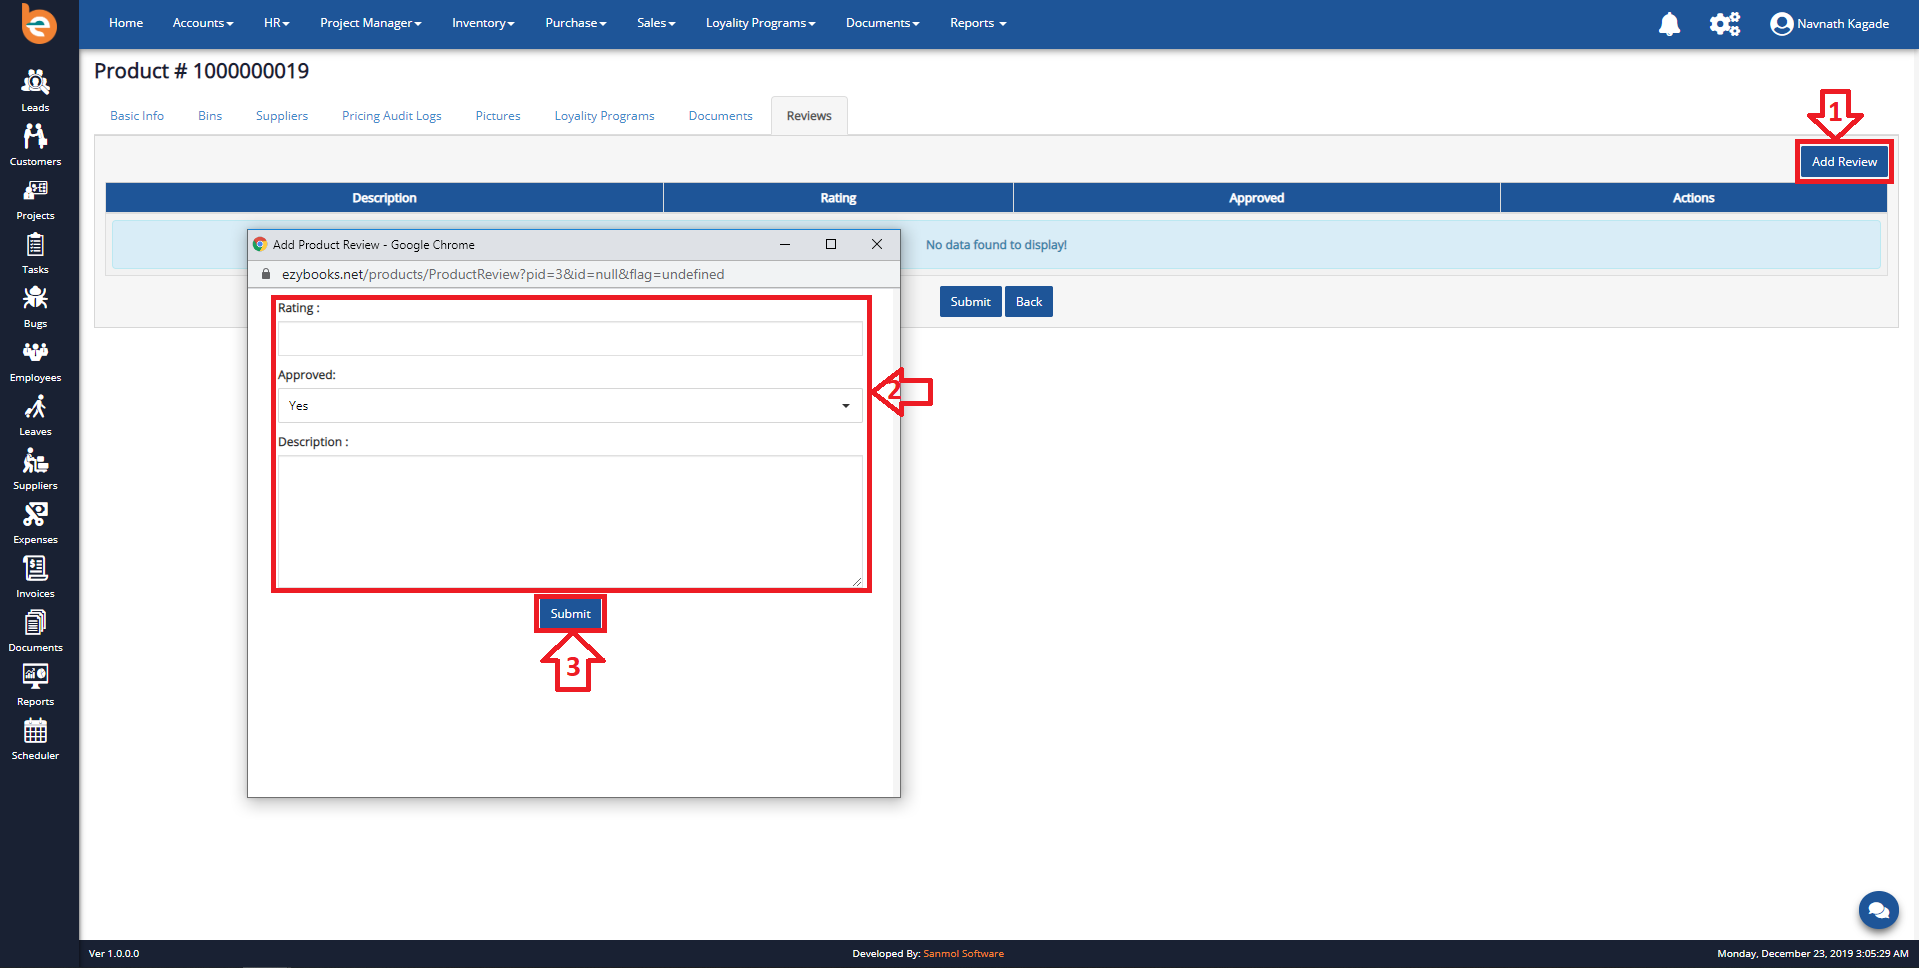
4.5.6 Create Product Form - Reviews
When you click on Review option you can see add review button click on that one pop-up will open for entering review description, you can add reviews so thsese reviews will show on e-commerce site if you have and which is connected with Ezybooks.
4.5.8 Product List
All product list will show in the product grid there you will get option to view, edit and delete product.
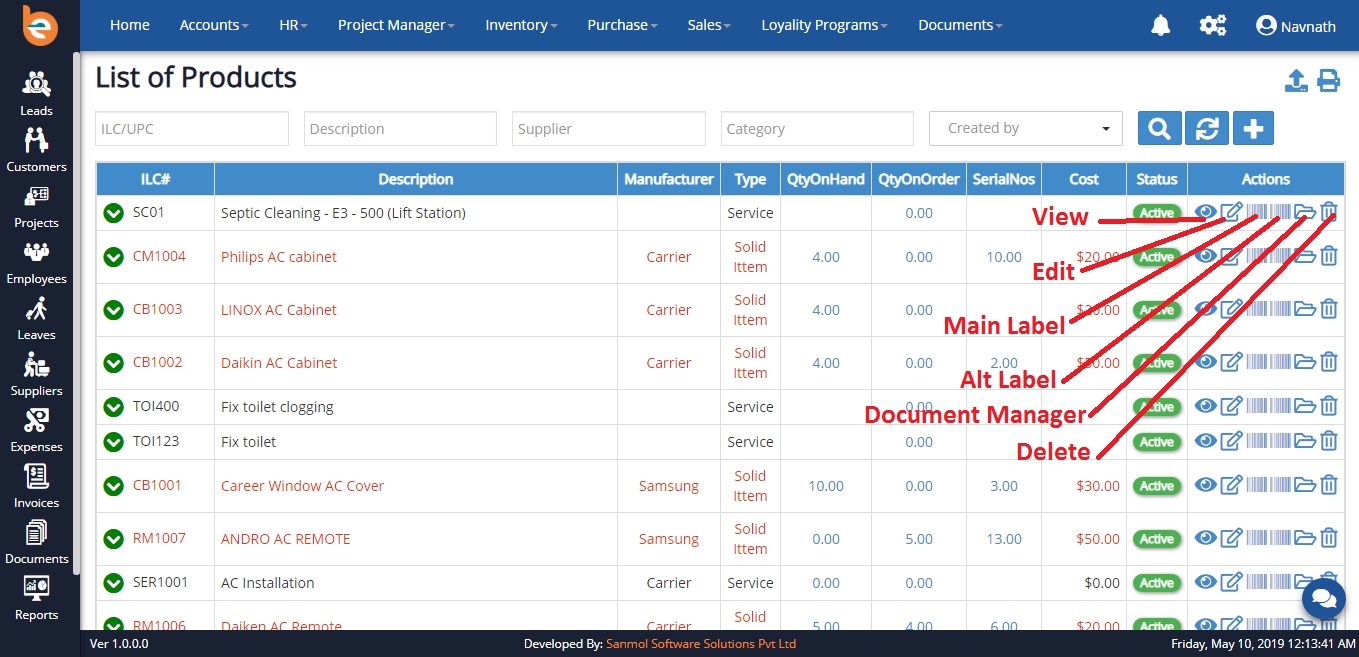
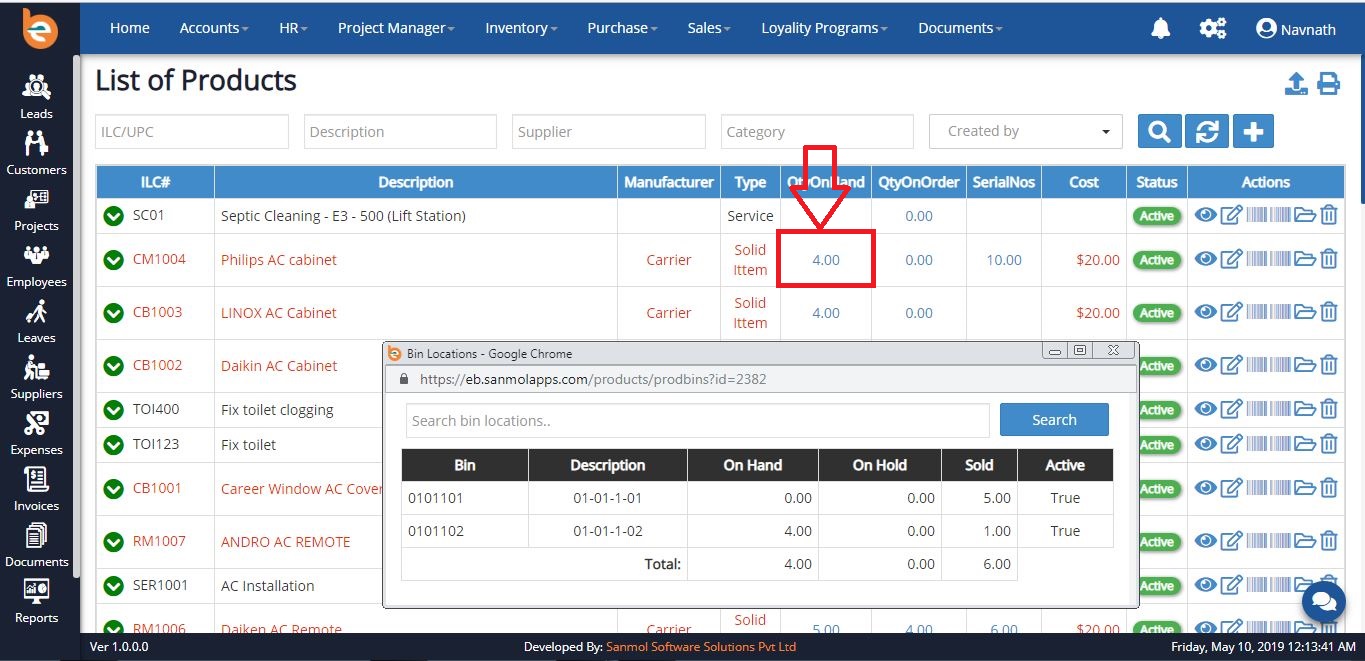
4.5.10 Quantity OnHand
In the all product list you have option to view On Hand quanity from physical bin location, please check the following screen.
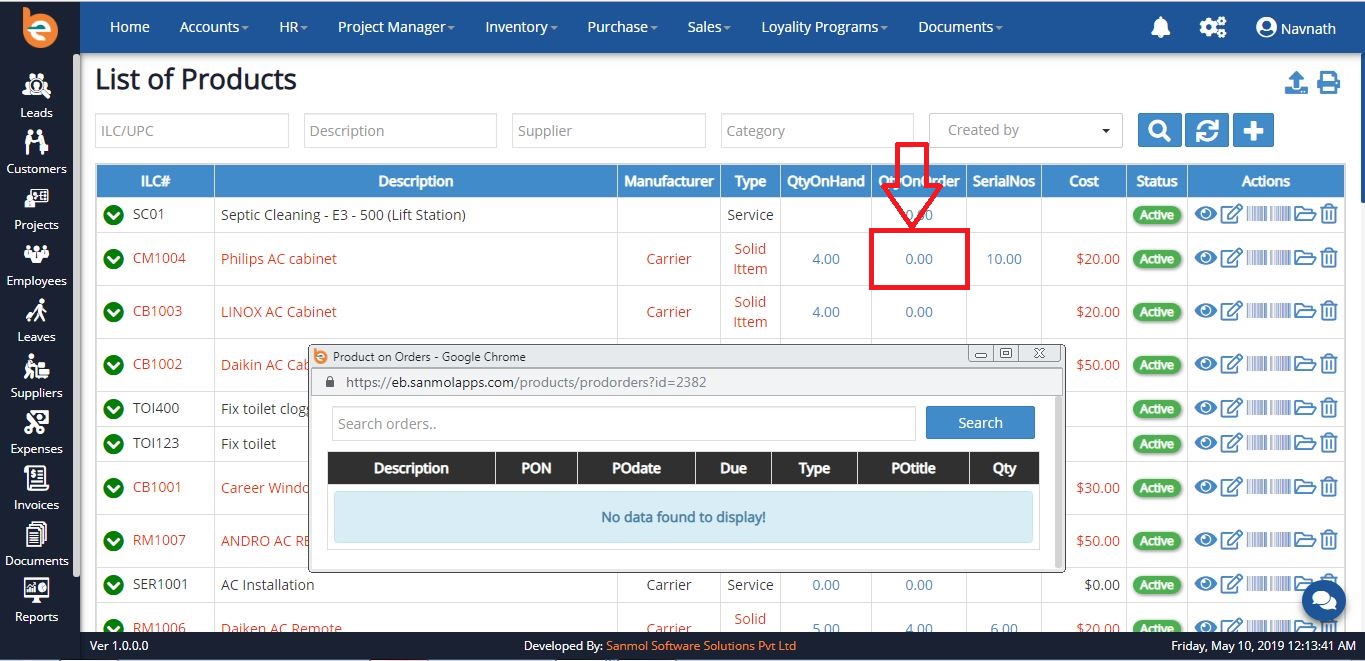
4.5.11 Quantity OnOrder
In the all product list you have option to view On Order quanity from from the open POs, please check the following screen.
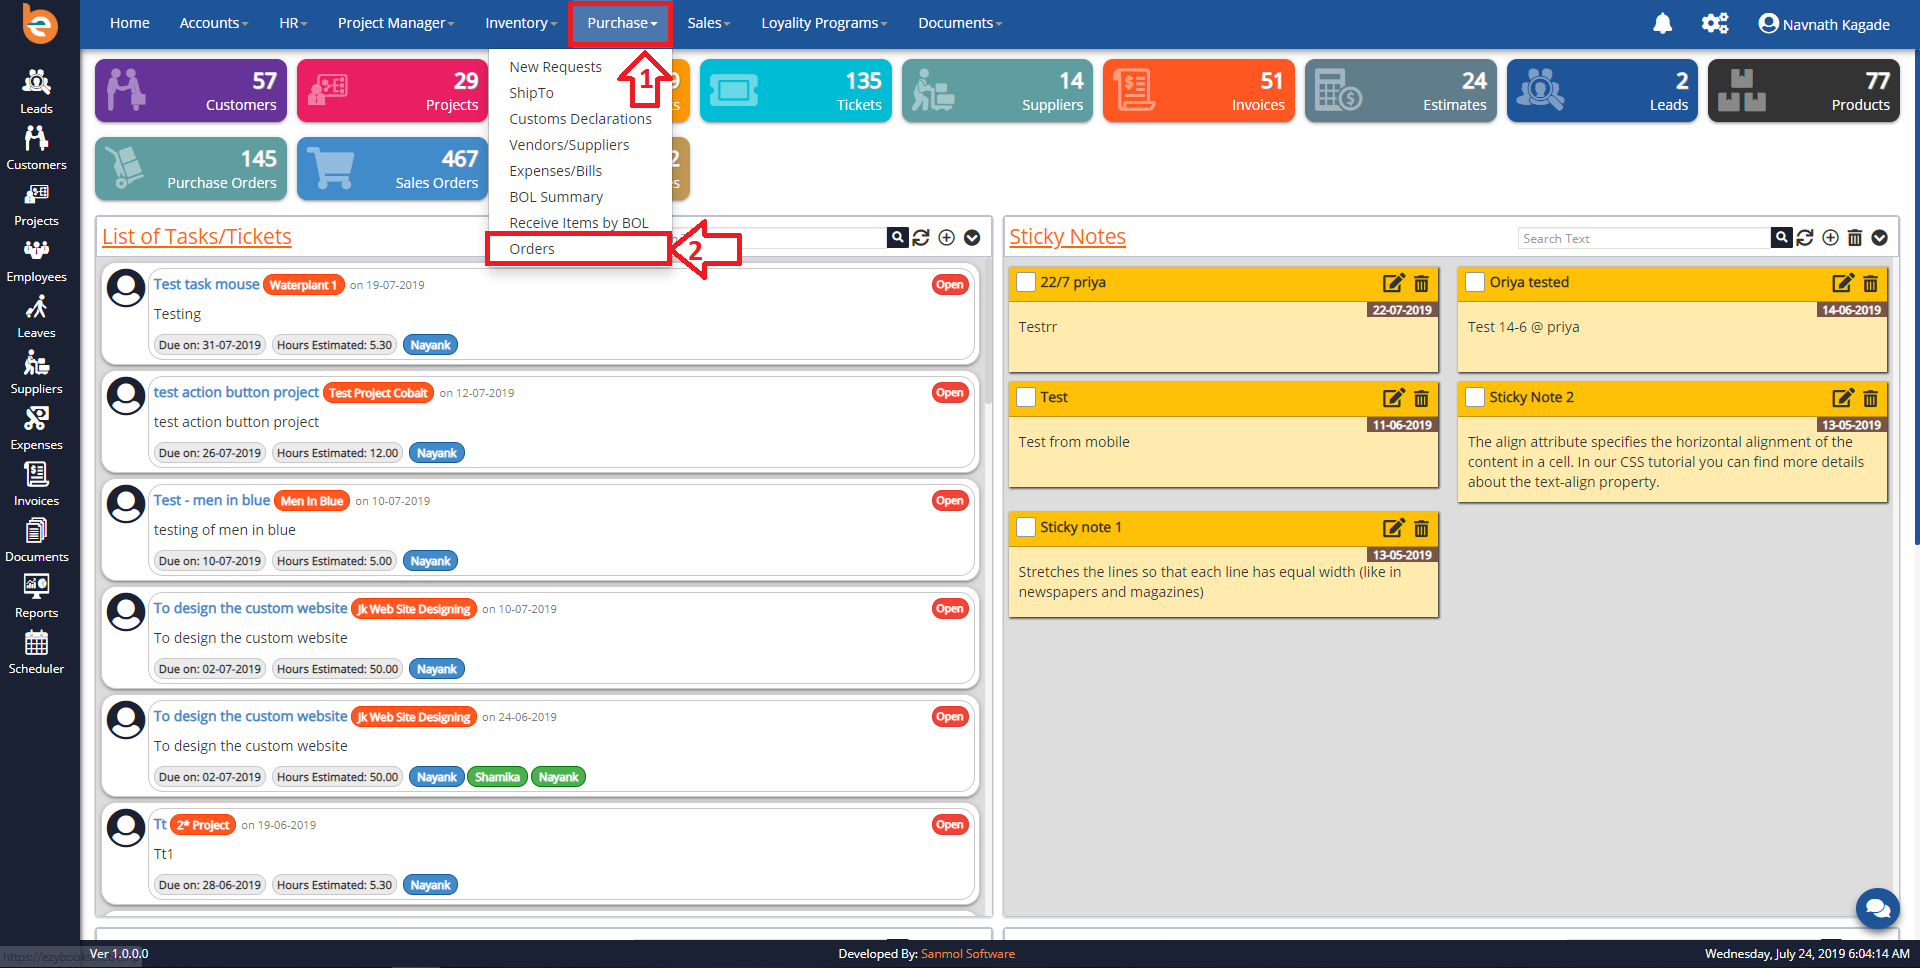
4.6 Purchase Order (PO)
Click on the Purchase main menu, you can see Order option there click on that.
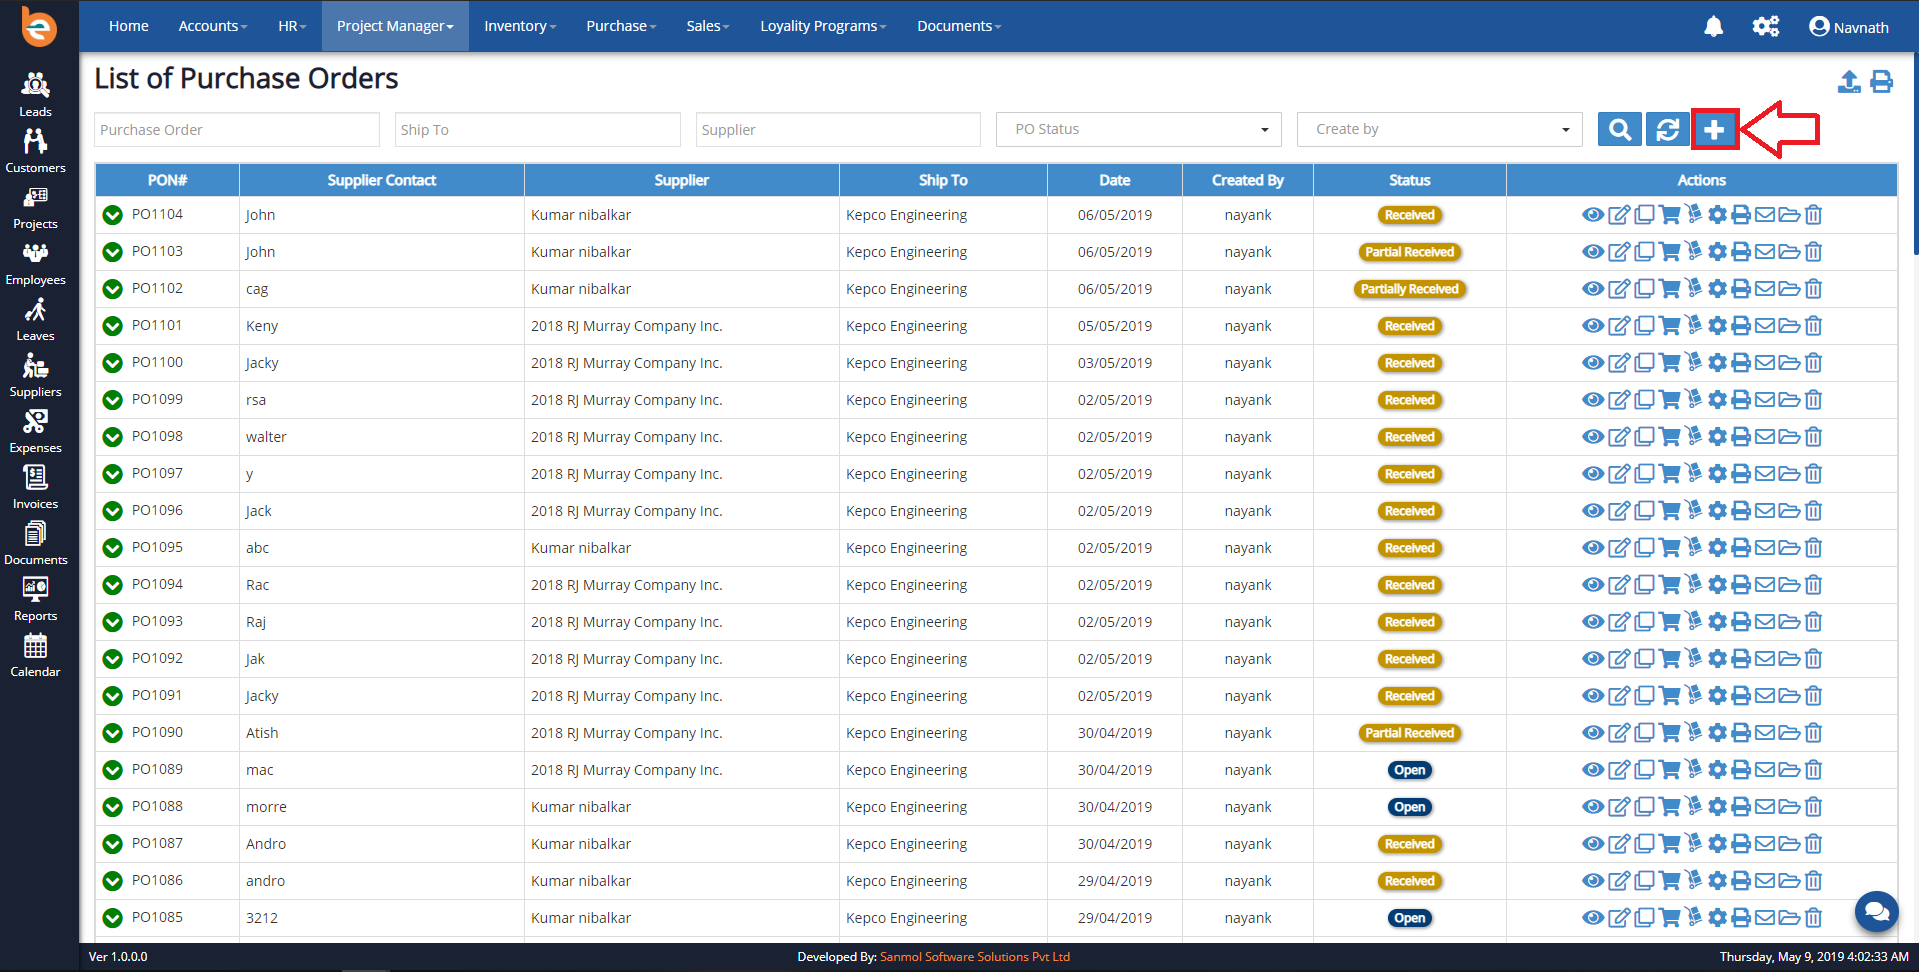
4.6.1 Purchase Order (PO) - Add
For creating new PO click on the plus icon from the main screen as per showing in the following screen.
4.6.1 Purchase Order (PO) - Add Form
When you click on the plus icon you can see PO form as per follows.
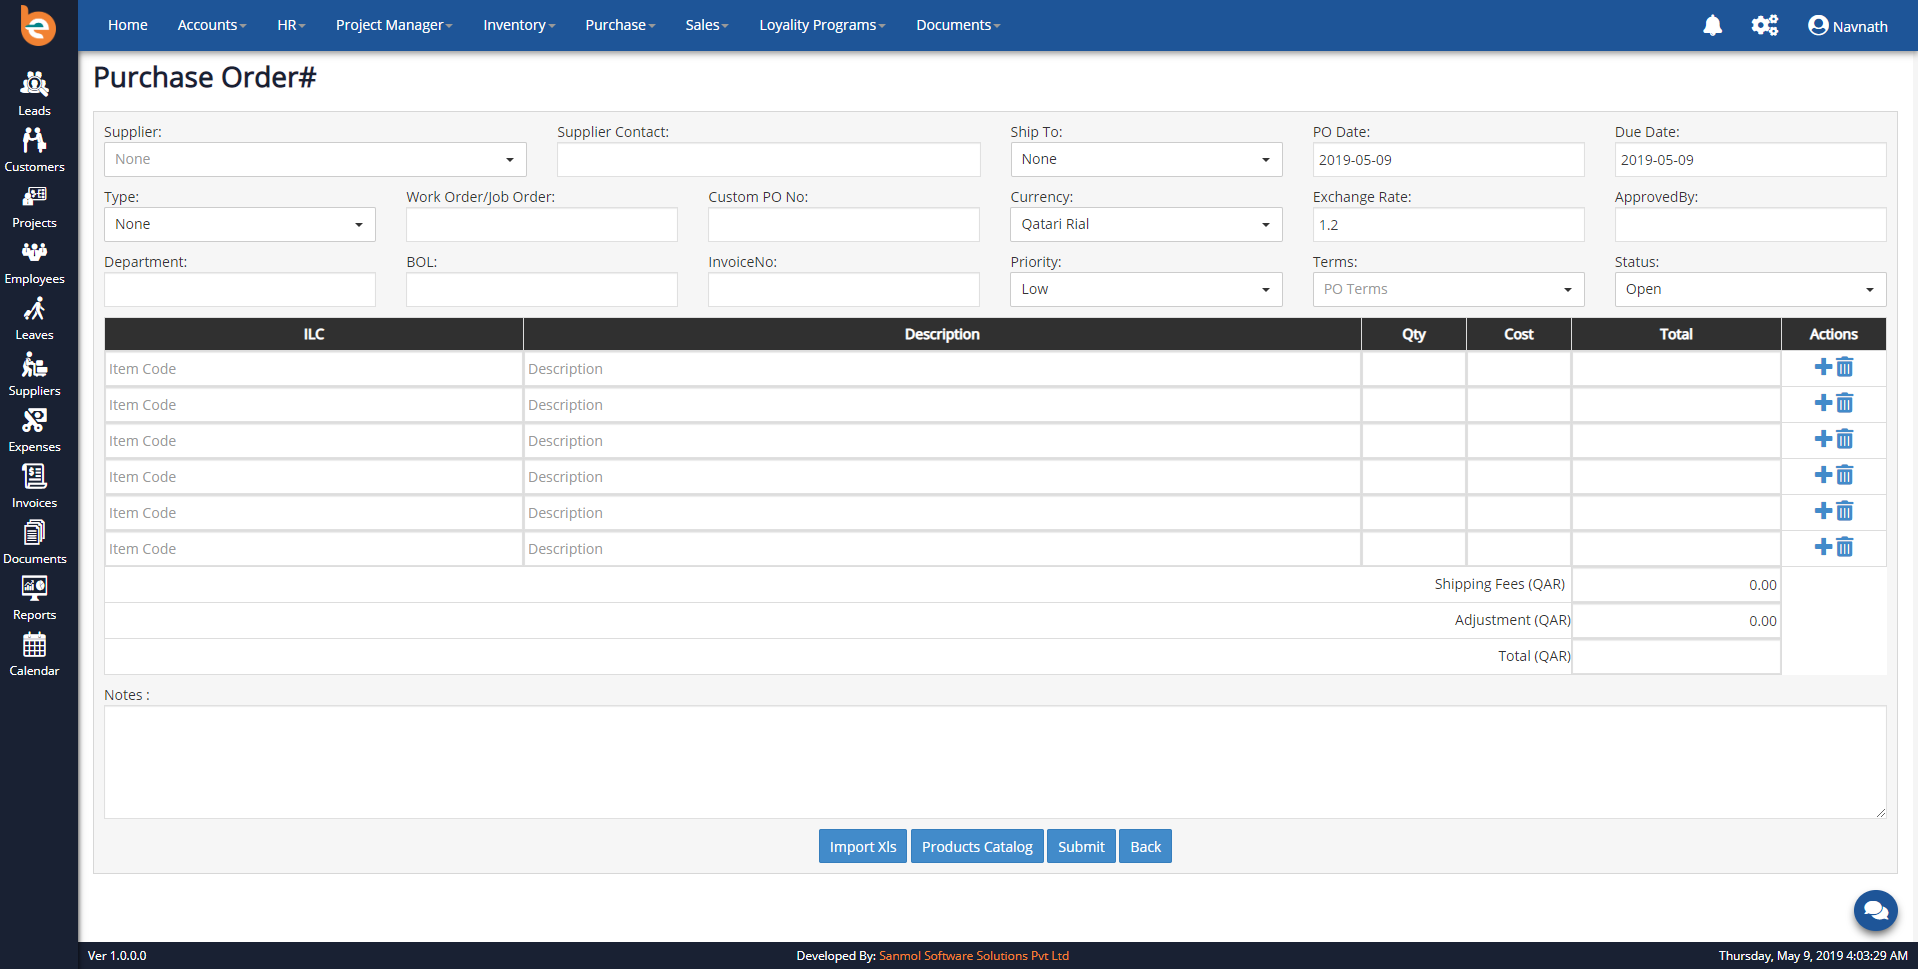
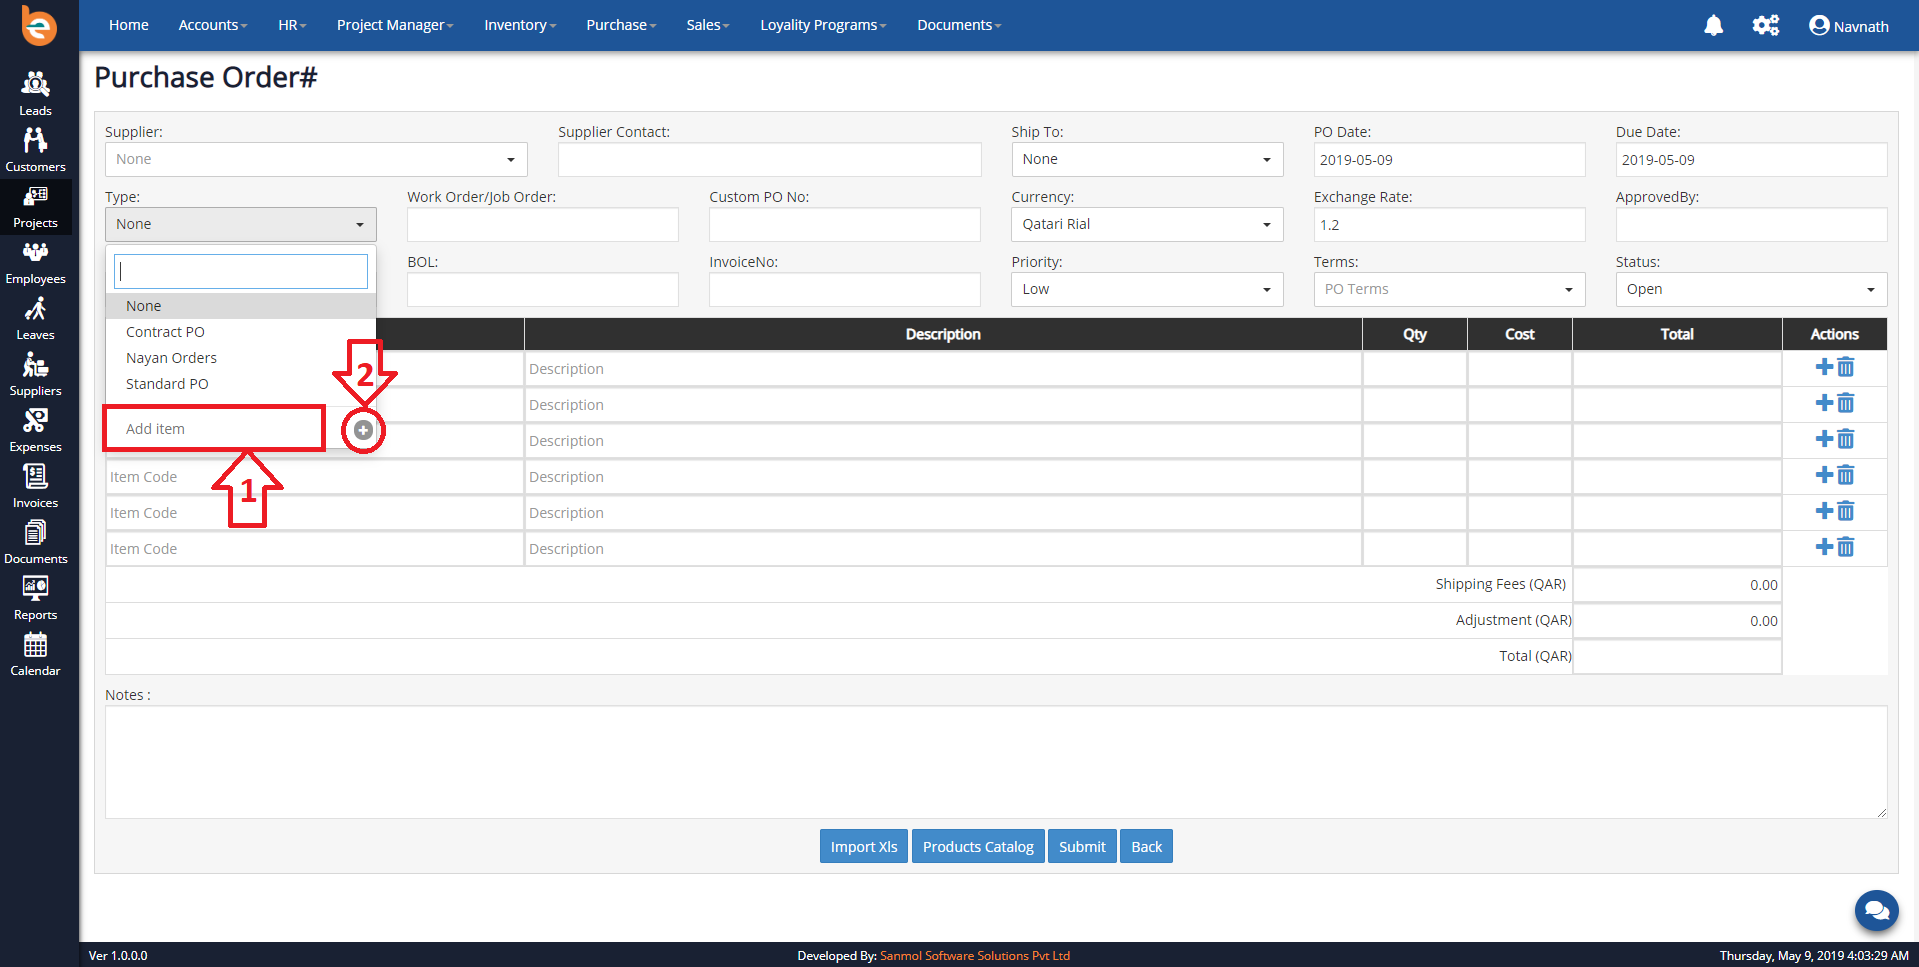
4.6.1.1 Purchase Order (PO) Form - PO Types
Initially when you are going to add first PO in the Ezybooks you need to add PO Types, it is just for first time configuration when you add next time automatically it will show.
Example PO Types:
1. Standard PO
2. Contract PO
3. Blanket PO
4. Planned PO
As per following screen you have textbox for adding new PO Types, just put PO Types in the textbox and click enter or on plus given icon.
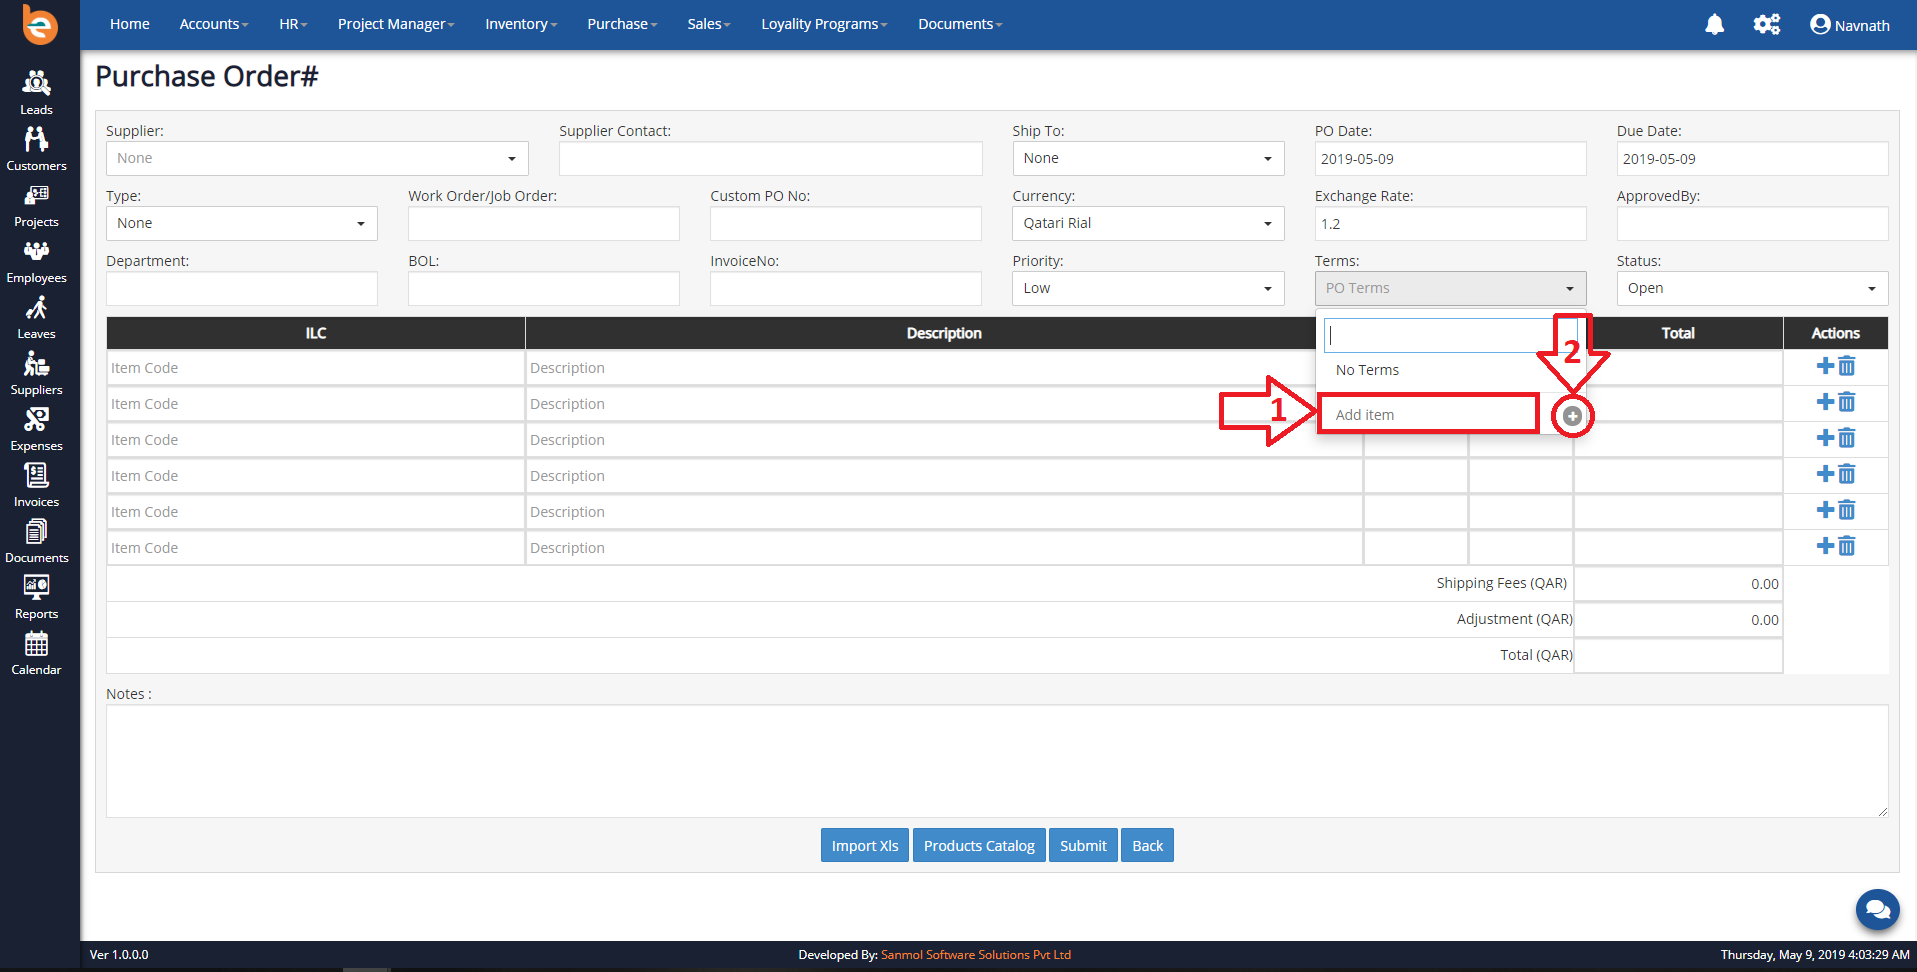
4.6.1.2 Purchase Order (PO) Form - PO Terms
Initially when you are adding first PO in the Ezybooks you need to add PO Terms, it is just for first time configuration when you add next time automatically it will show.
As per following screen you have textbox for adding new PO Terms, just put PO Terms in the textbox and click enter or on plus given icon.
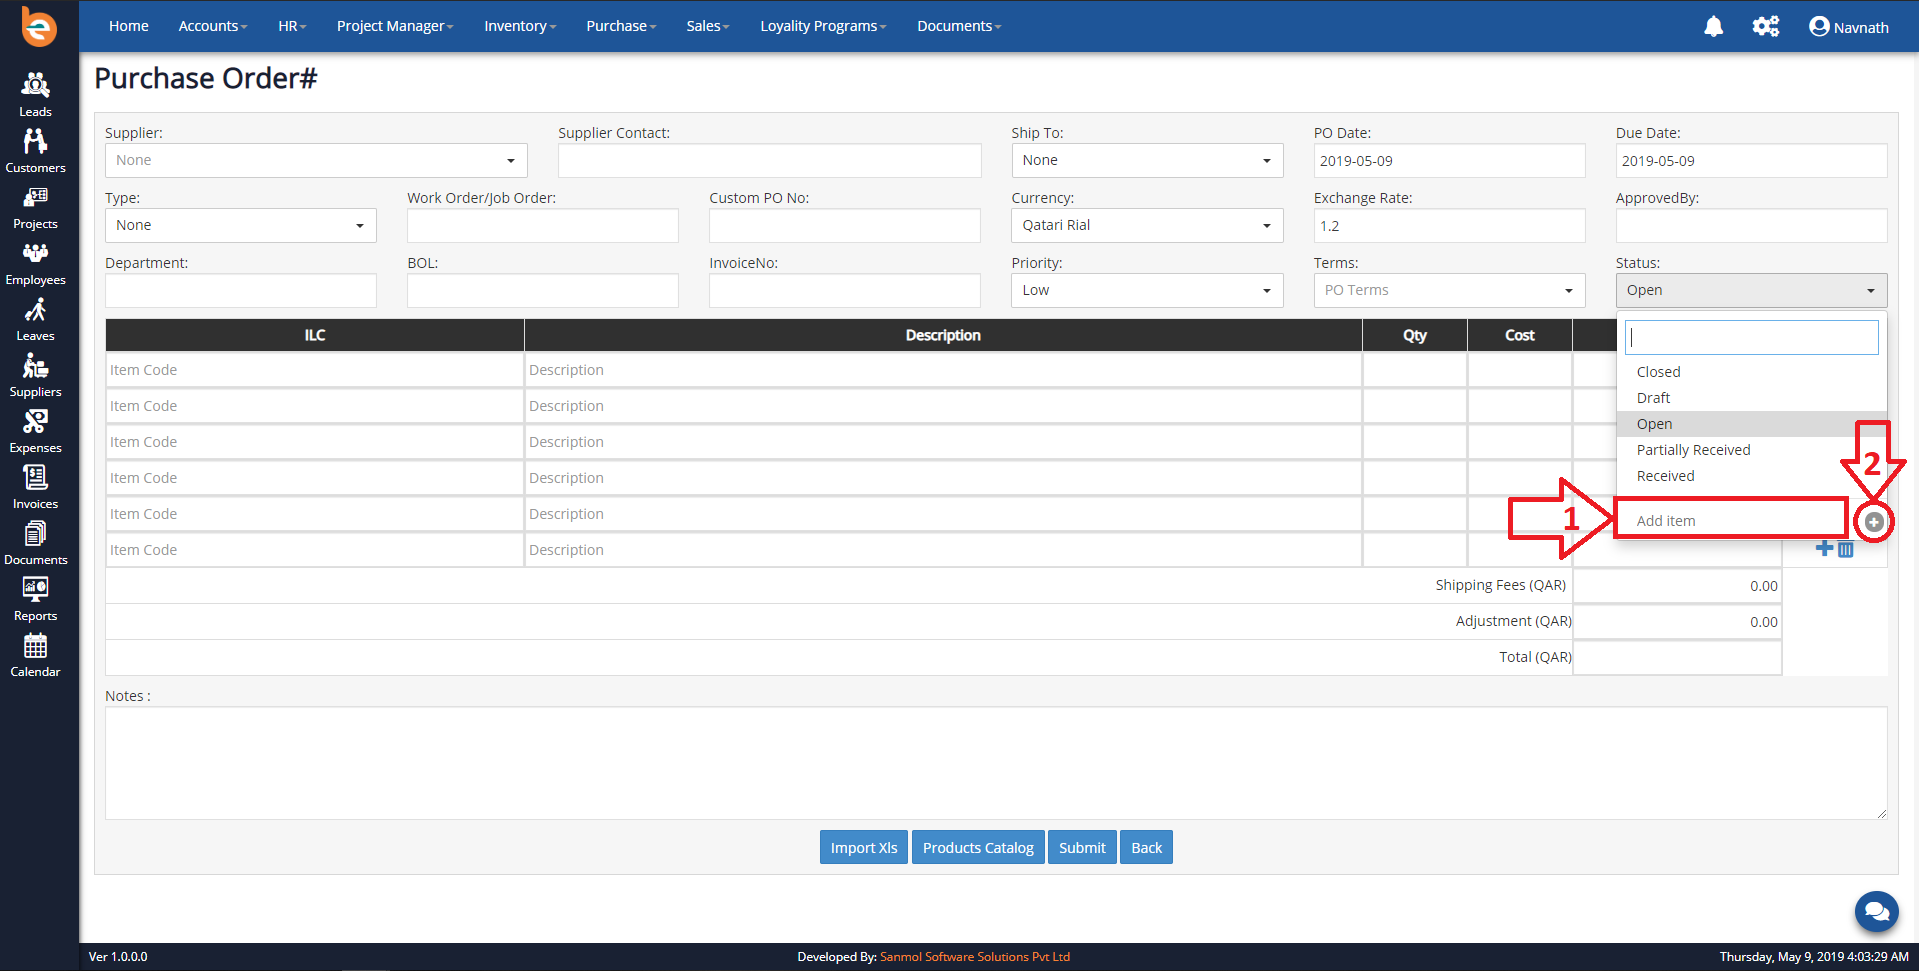
4.6.1.3 Purchase Order (PO) Form - PO Status Types
Initially when you are going to add first PO in the Ezybooks you need to add PO Status Types, it is just for first time configuration when you add next time automatically it will show.
Example PO Status Types:
1. Incomplete
2. Open
3. Review
4. Ready
5. Submitted
6. Acknowledged
7. Failed
8. Receiving
9. Complete
10. Canceled
As per following screen you have textbox for adding new PO Status Types, just put PO Status Types in the textbox and click enter or on plus given icon.
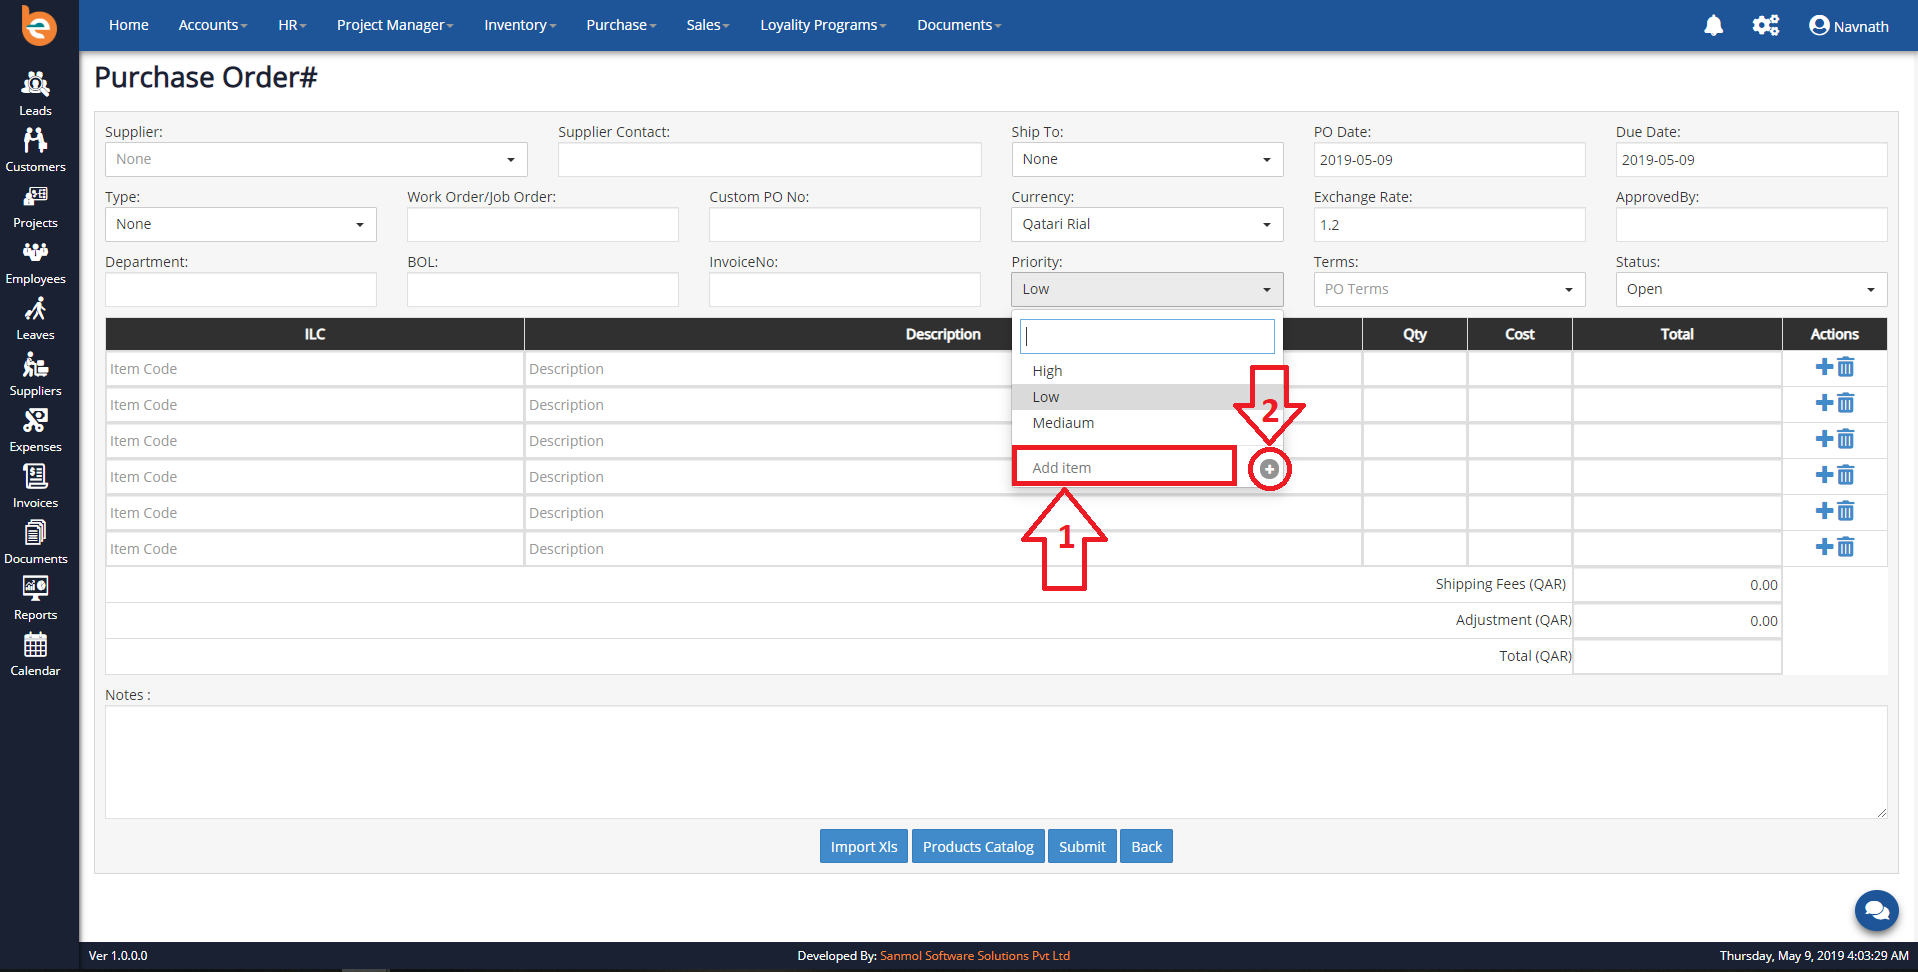
4.6.1.4 Purchase Order (PO) Form - Priority Types
Initially when you are going to add first PO in the Ezybooks you need to add Priority Types, it is just for first time configuration when you add next time automatically it will show.
Example Priority Types:
1. High
2. Medium
3. Low
As per following screen you have textbox for adding new Priority Types, just put Priority Types in the textbox and click enter or on plus given icon.
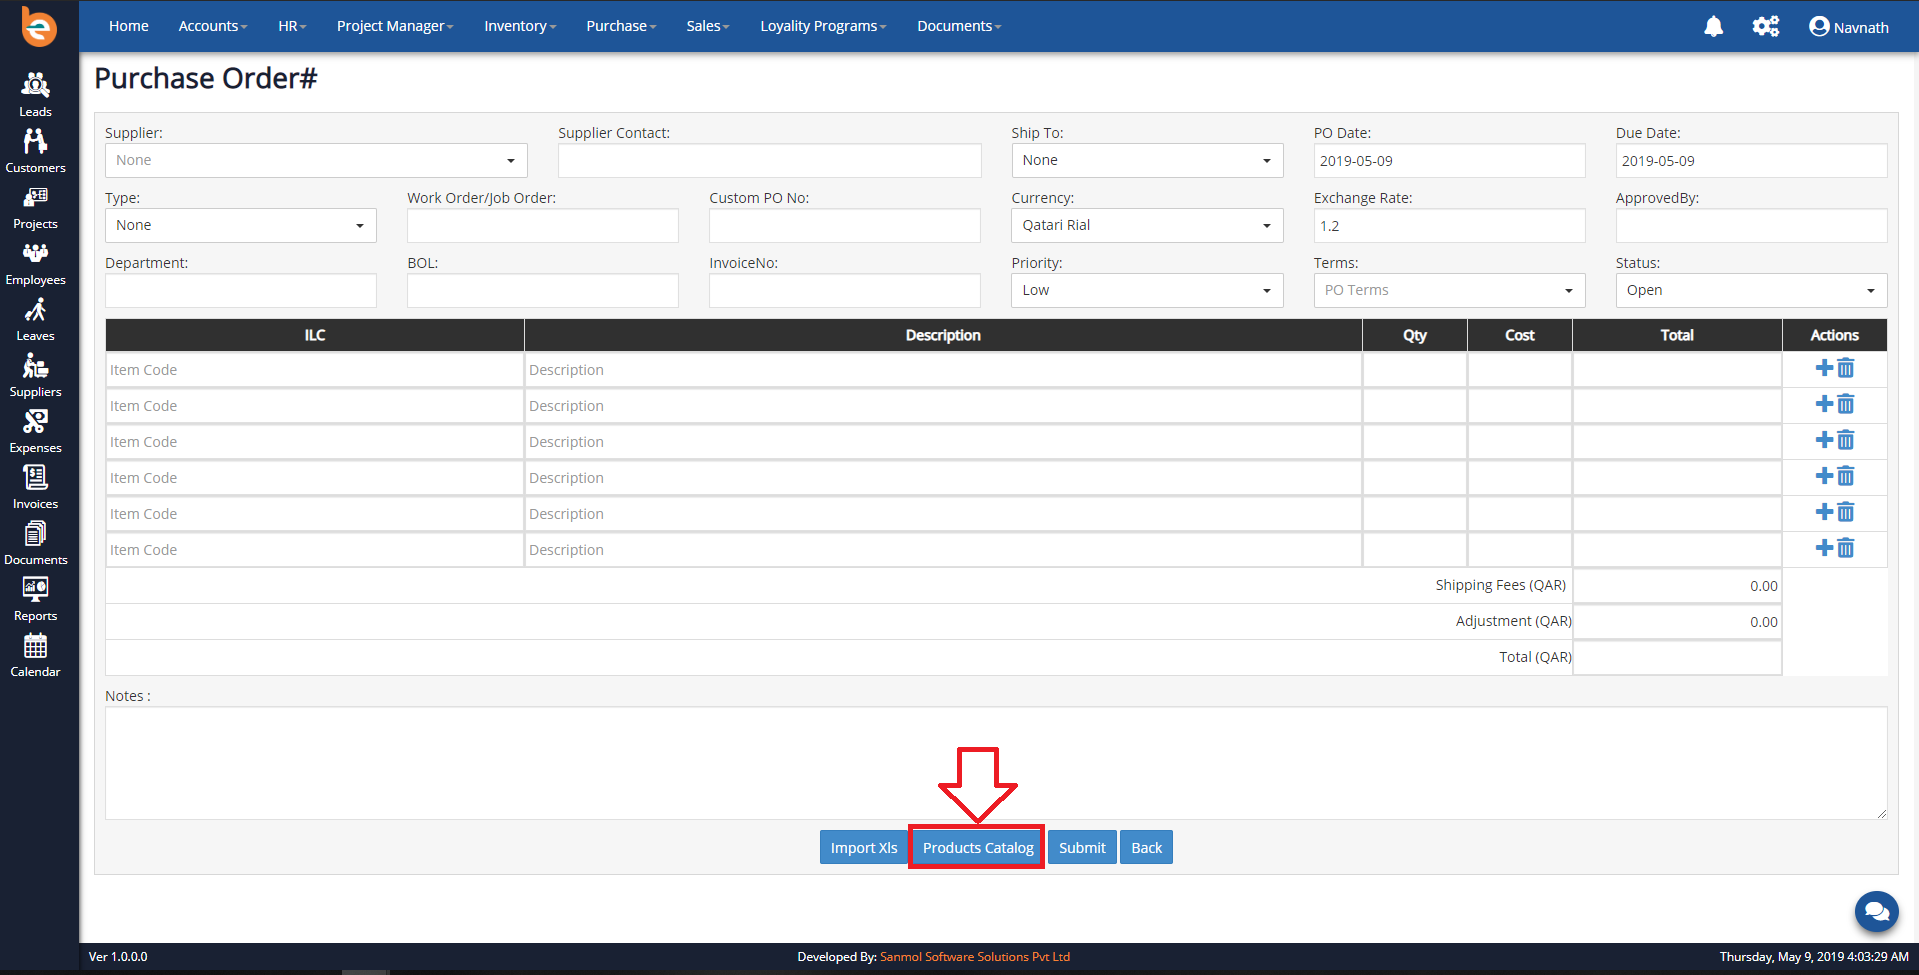
4.6.1.5 Purchase Order (PO) Form - Add Products
For adding the products in PO click on Product Catalog button which is at the botton, please check the following screen.
4.6.1.5.1 Purchase Order (PO) Form - Select Products
For selecting product as per require quantity click on search button from the pop-up. All available products will show with image, instock quantity. You need to add order quantity and click on Add to PO button, please check the following screen.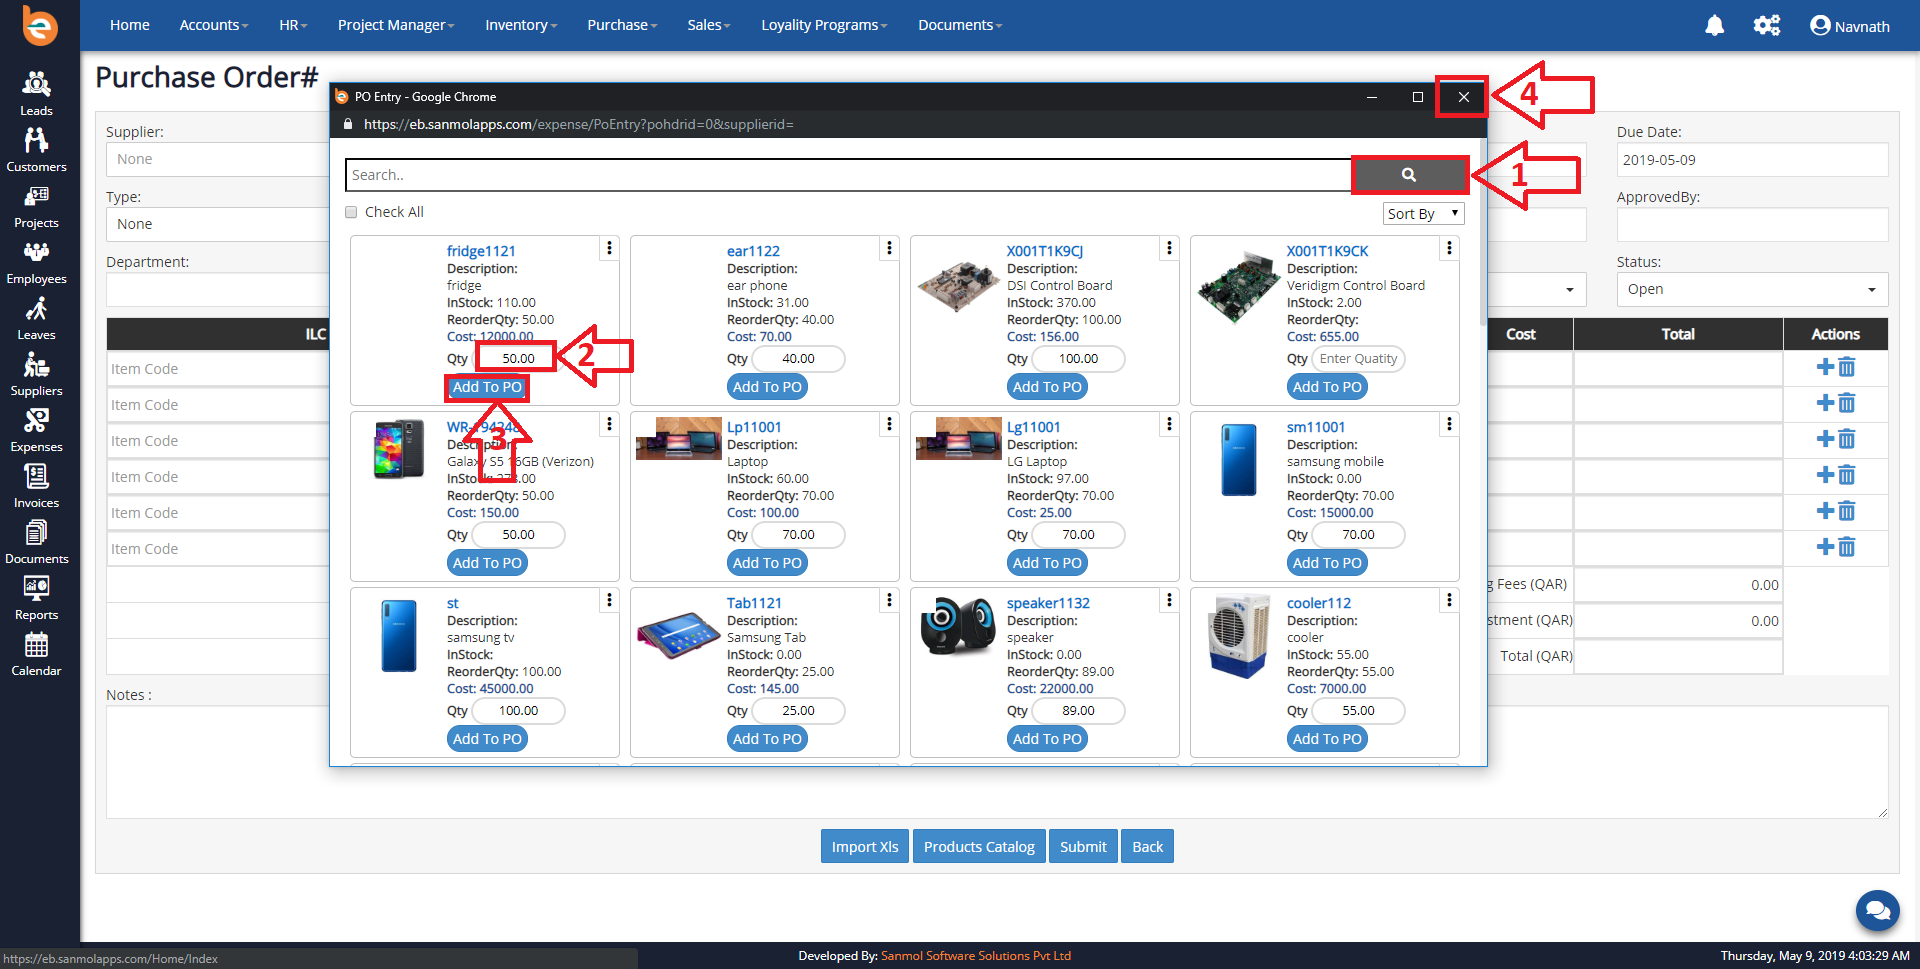
4.6.1.5.2 Purchase Order (PO) Form - Selected Products
You can see selected products also you can update the quantity if you want, finally click on the submit button, please check the following screen.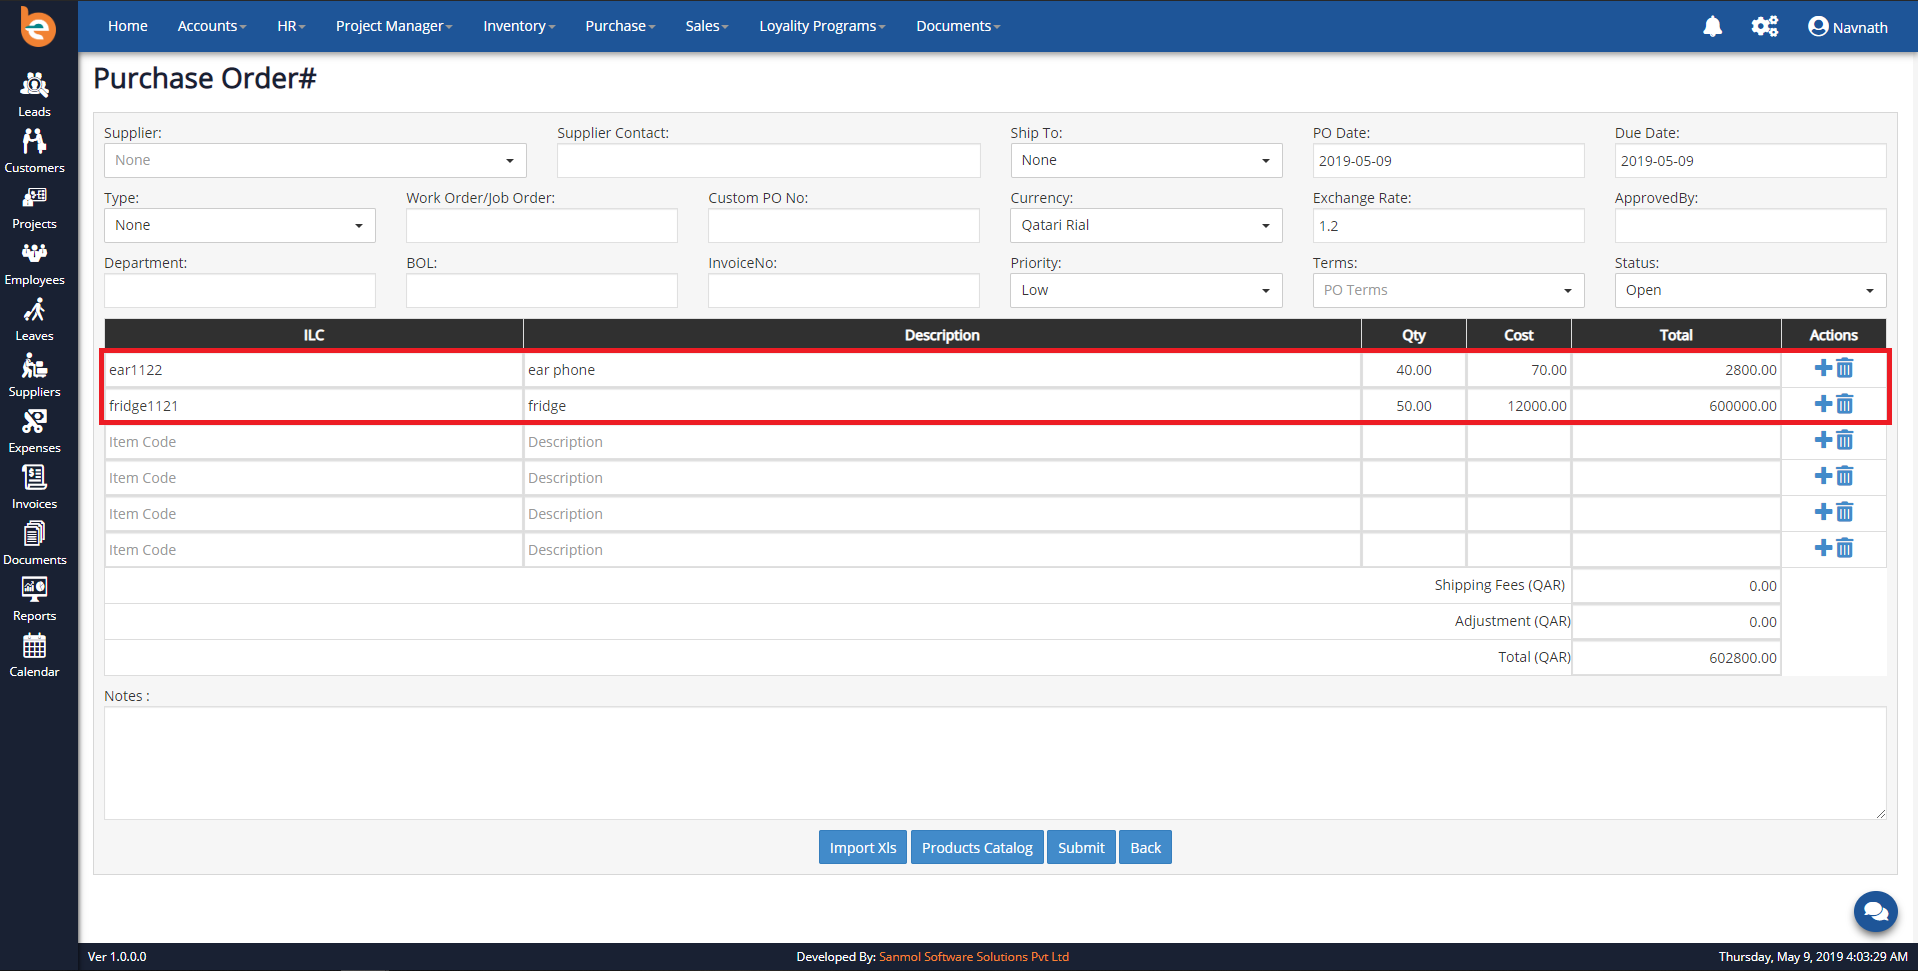
4.6.1.6 Purchase Order (PO) Form - PO List Action
You can see all created PO here, you can see action buttons View, Edit, Receive PO, Quick Update, Print PO, Email PO, Print Barcode, Delete PO.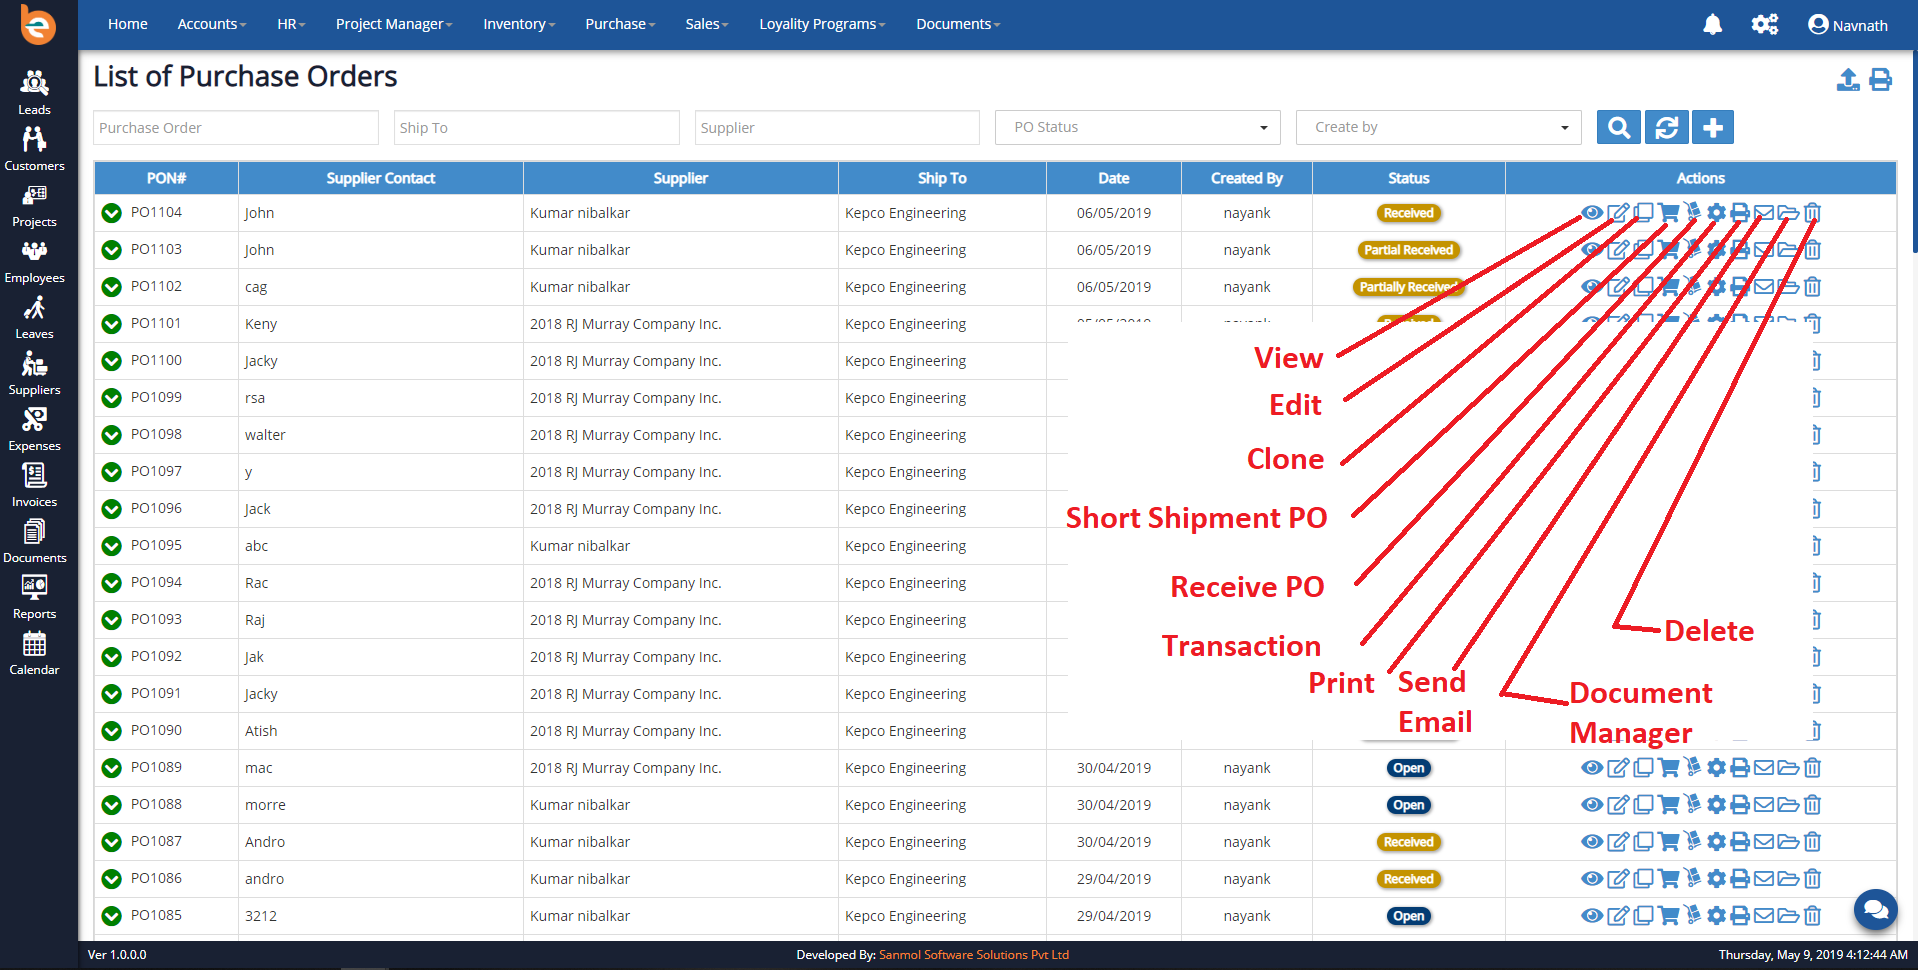
4.6.1.7 Purchase Order (PO) Form - Receive PO
After receiving PO you need to click Receive PO after that you can see following form you need to check all received quantities and update as per that also change the status of PO to received, finally click on submit button.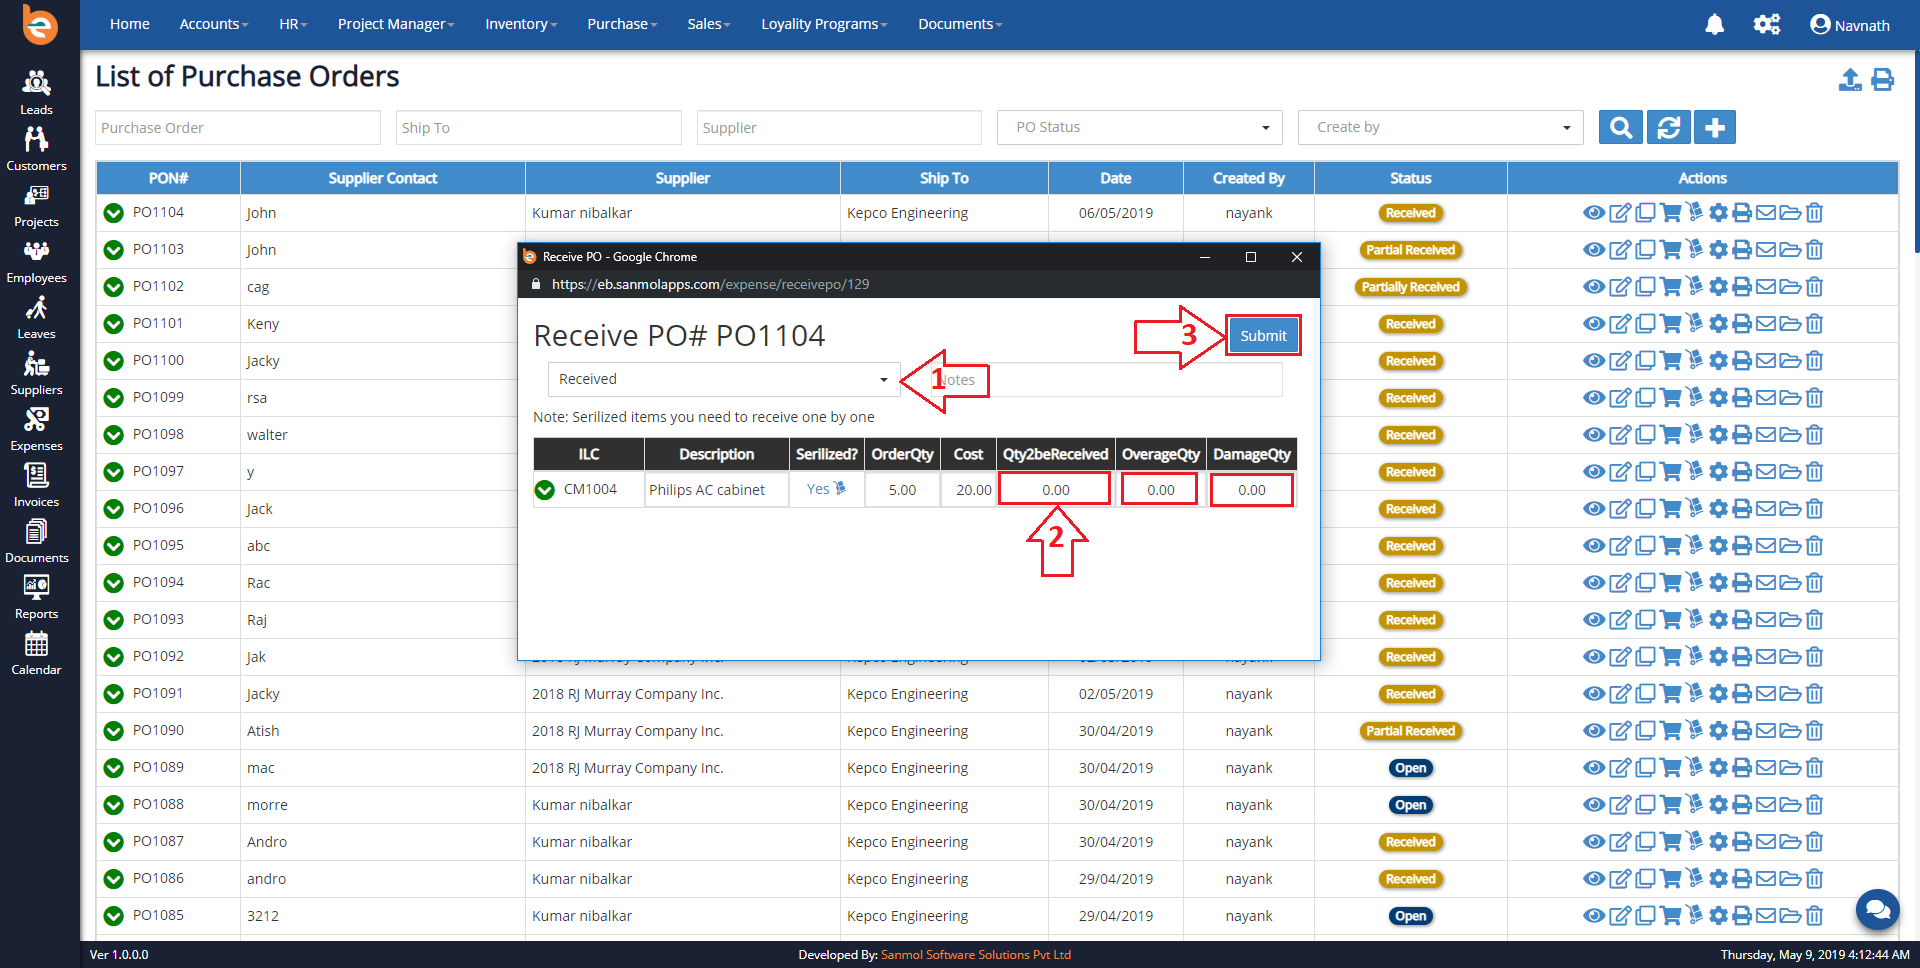
4.6.1.8 Purchase Order (PO) Form - Transactions
When you click on Transaction you can see transaction pop-up, you can update transaction status also you can attach any file related to that transaction.
4.6.1.9 Purchase Order (PO) Form - Print PO
When you click on Print PO action button PO will open in print mode.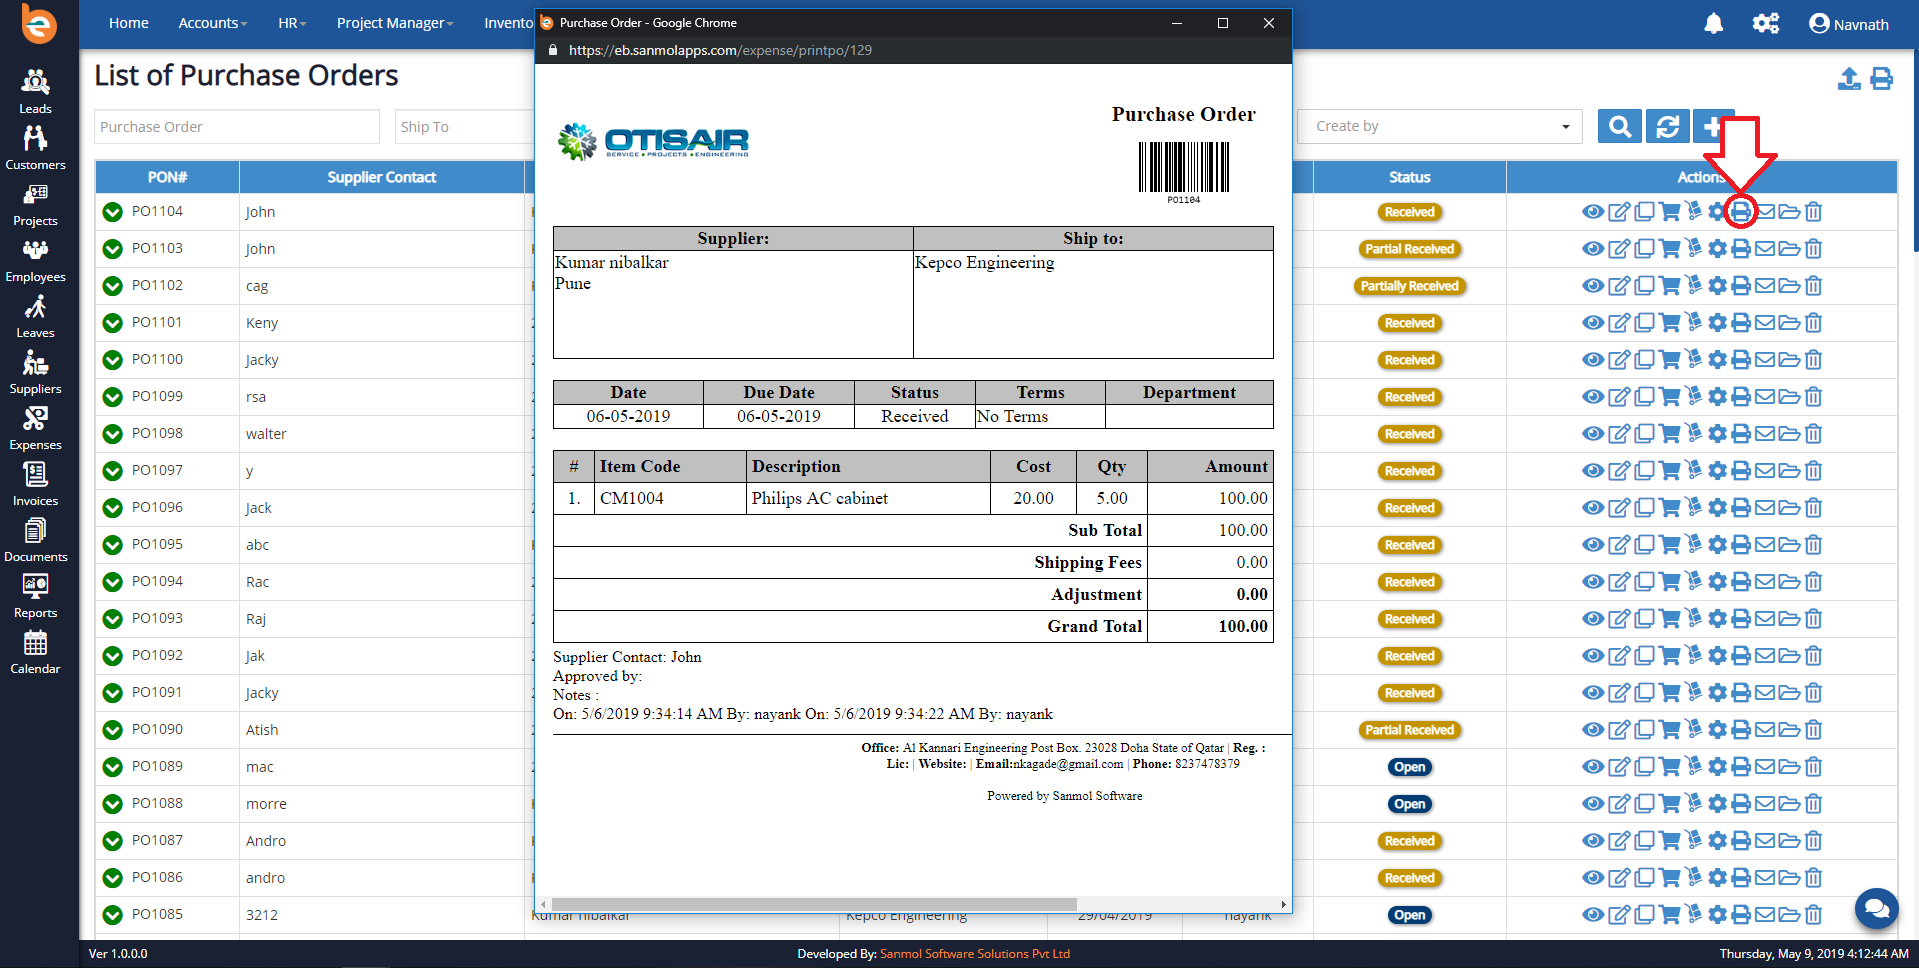
4.6.1.10 Purchase Order (PO) Form - Email PO
When you click on Email PO action button, email pop-up will open where you send PO through email to supplier.
4.6.1.10 Purchase Order (PO) Form - Delete PO
When you click on Delete PO action button it will show the pop-up for final confirmation for delete.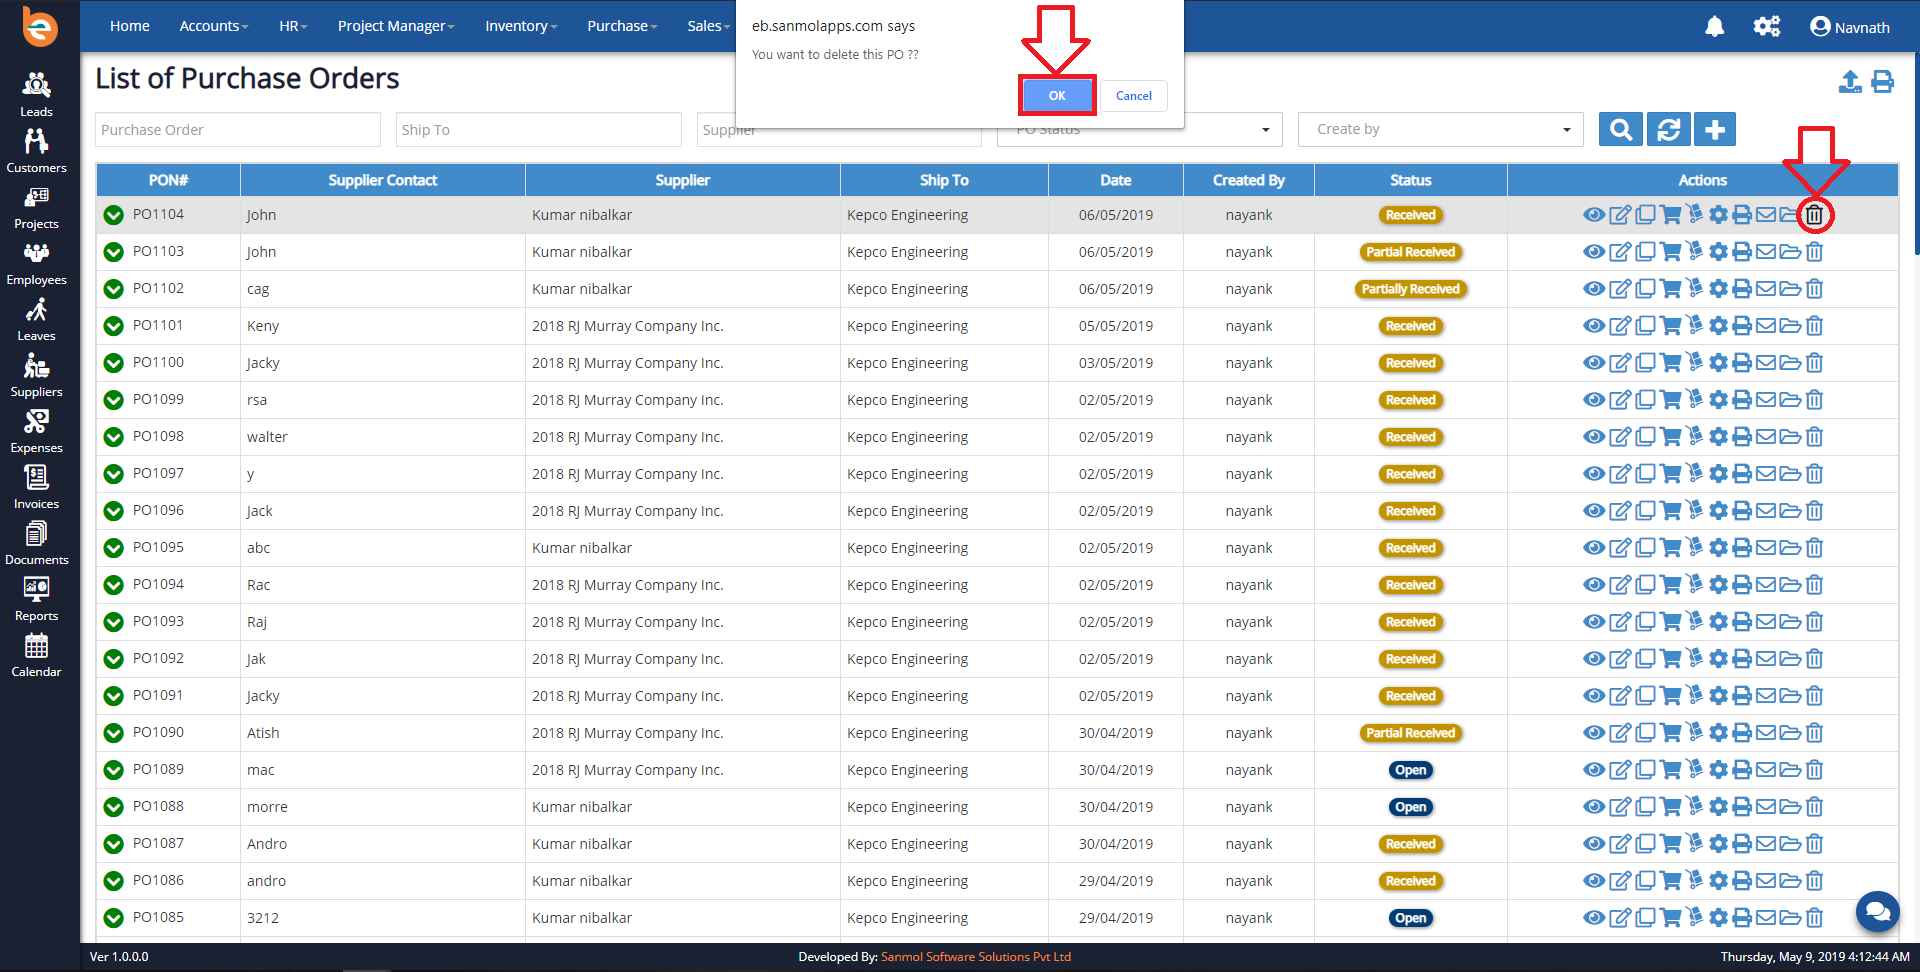
4.7 Customers
Click on Sales main menu you can see Customers option is there, please check the following screen.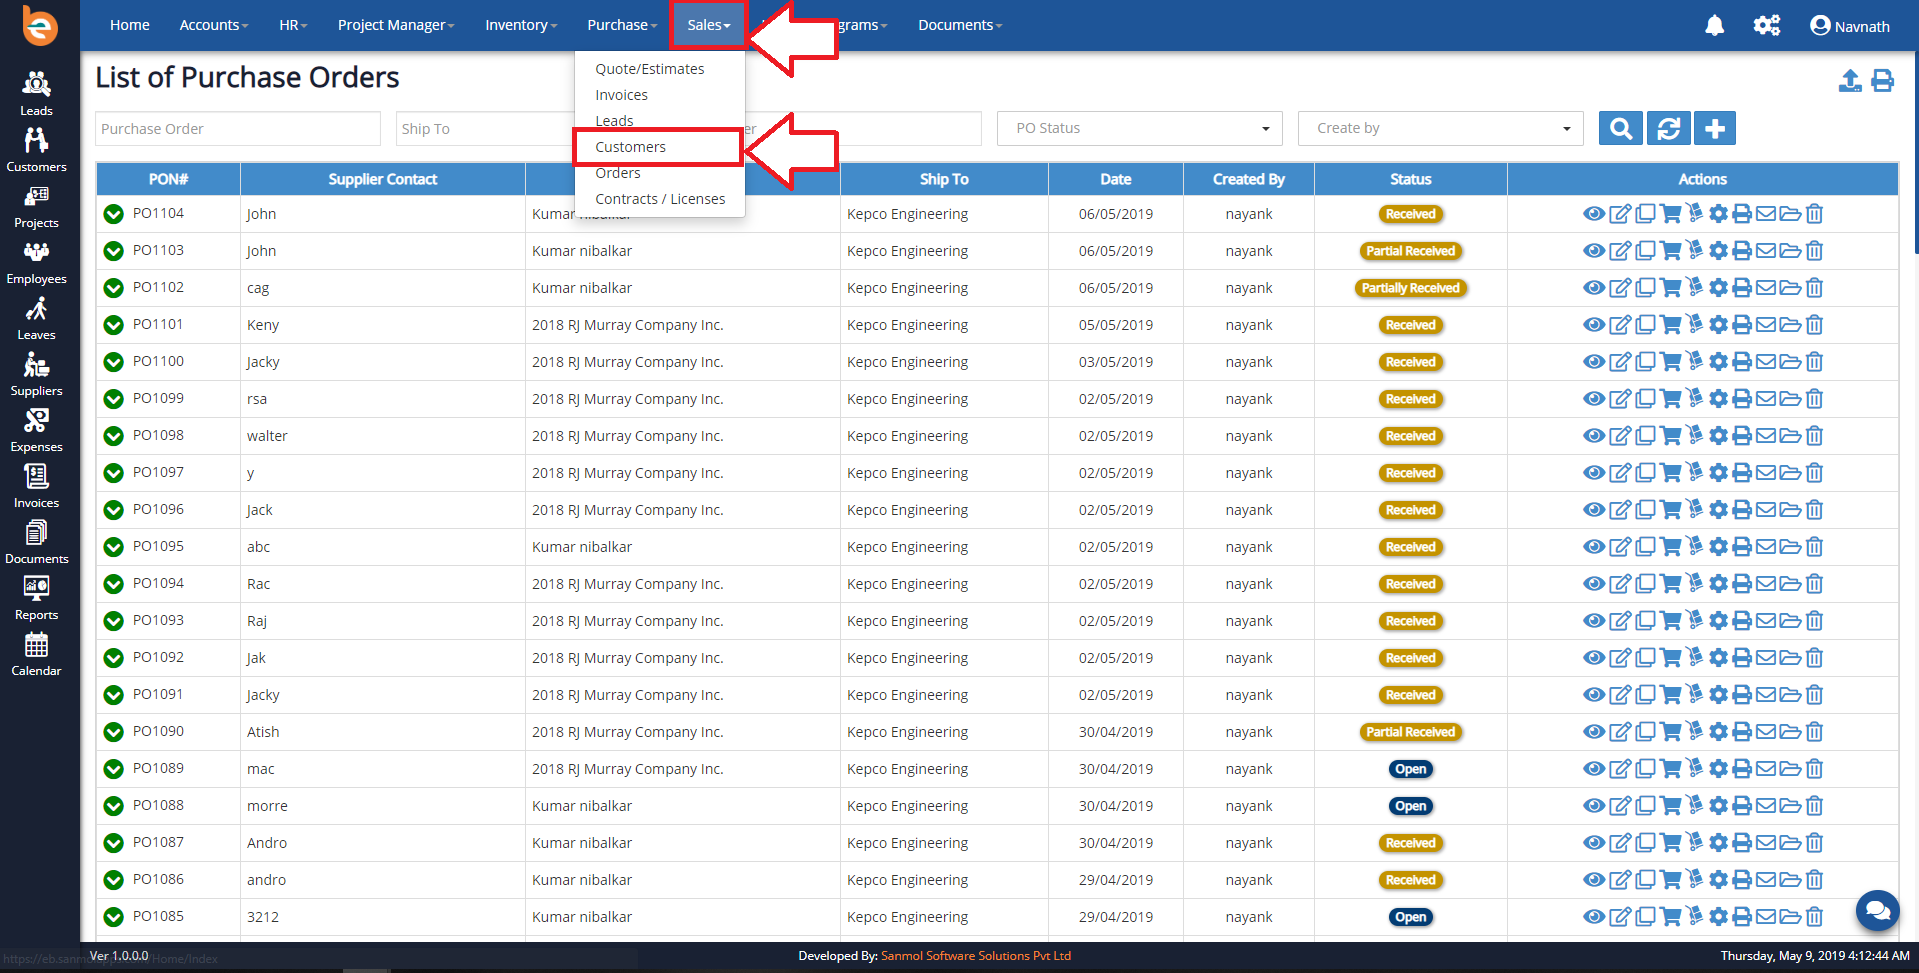
4.7.1 Add Customers
When you click on the Customers option, you can see there is plus icon on main screen, click on that button for adding new customer.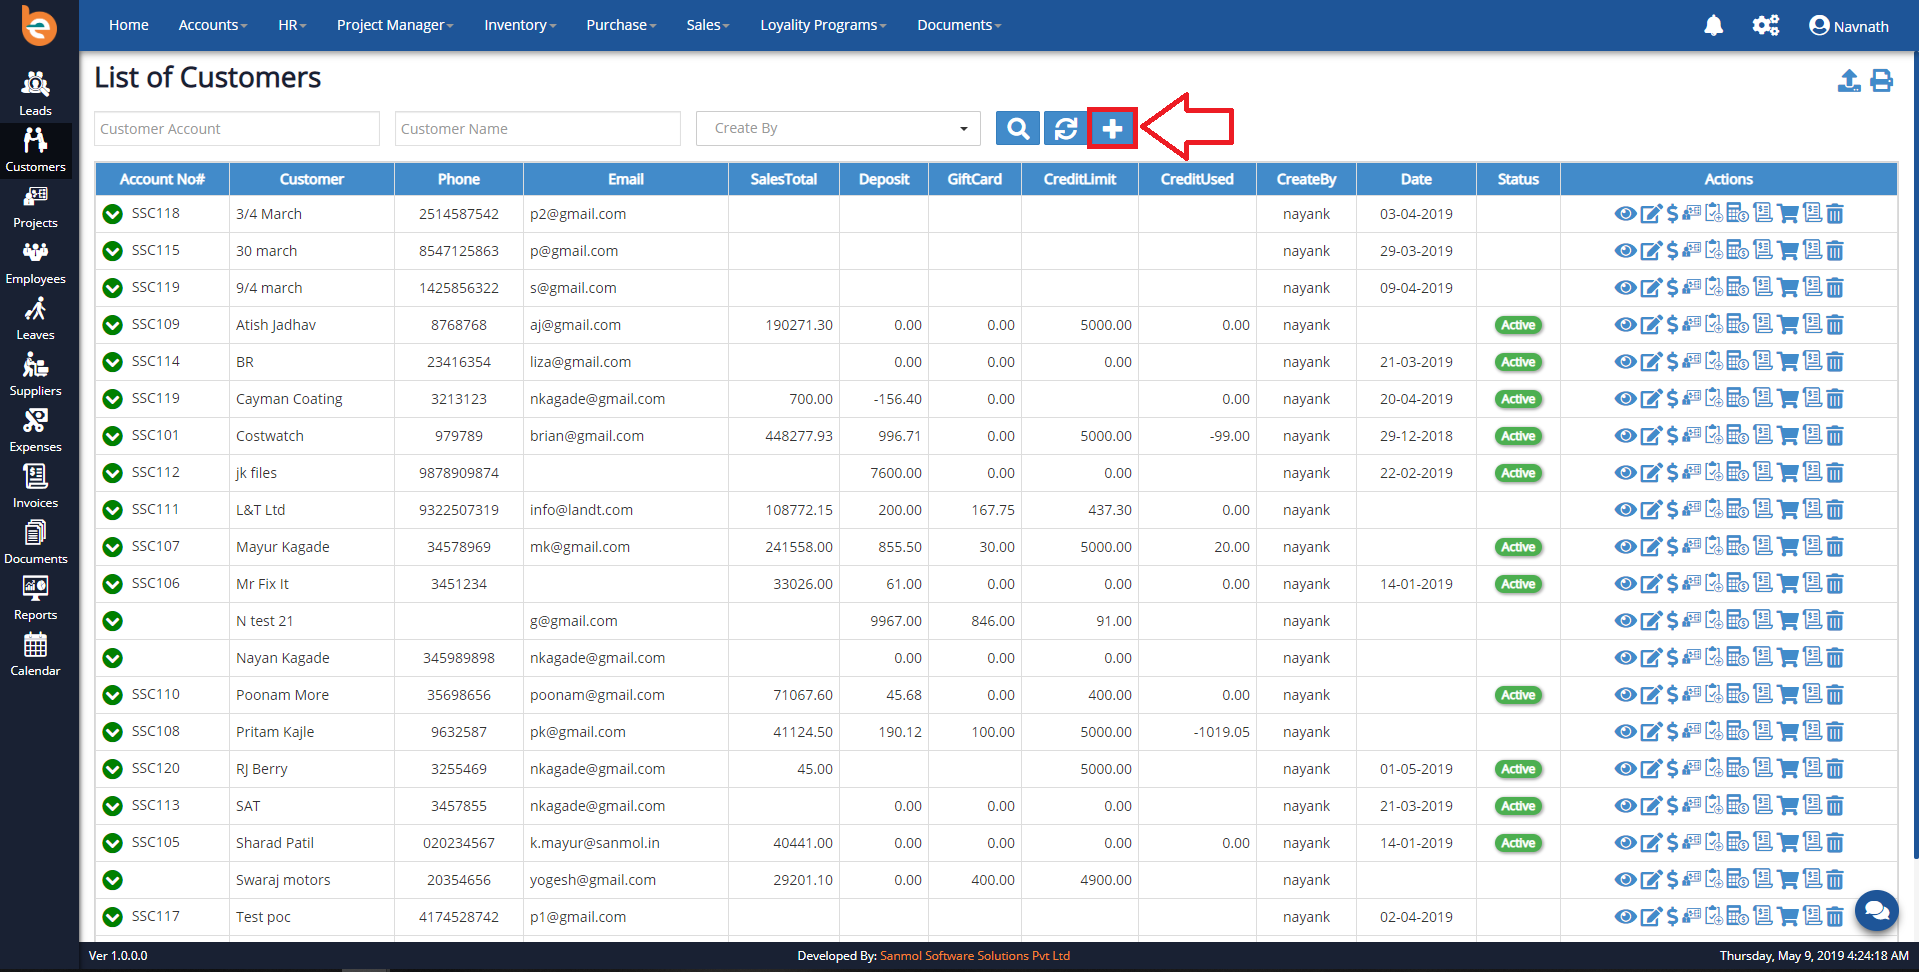
4.7.2 Create New Customers
When you click on the plus icon, create customer form will open, you need to fill all mandatory fields and submit.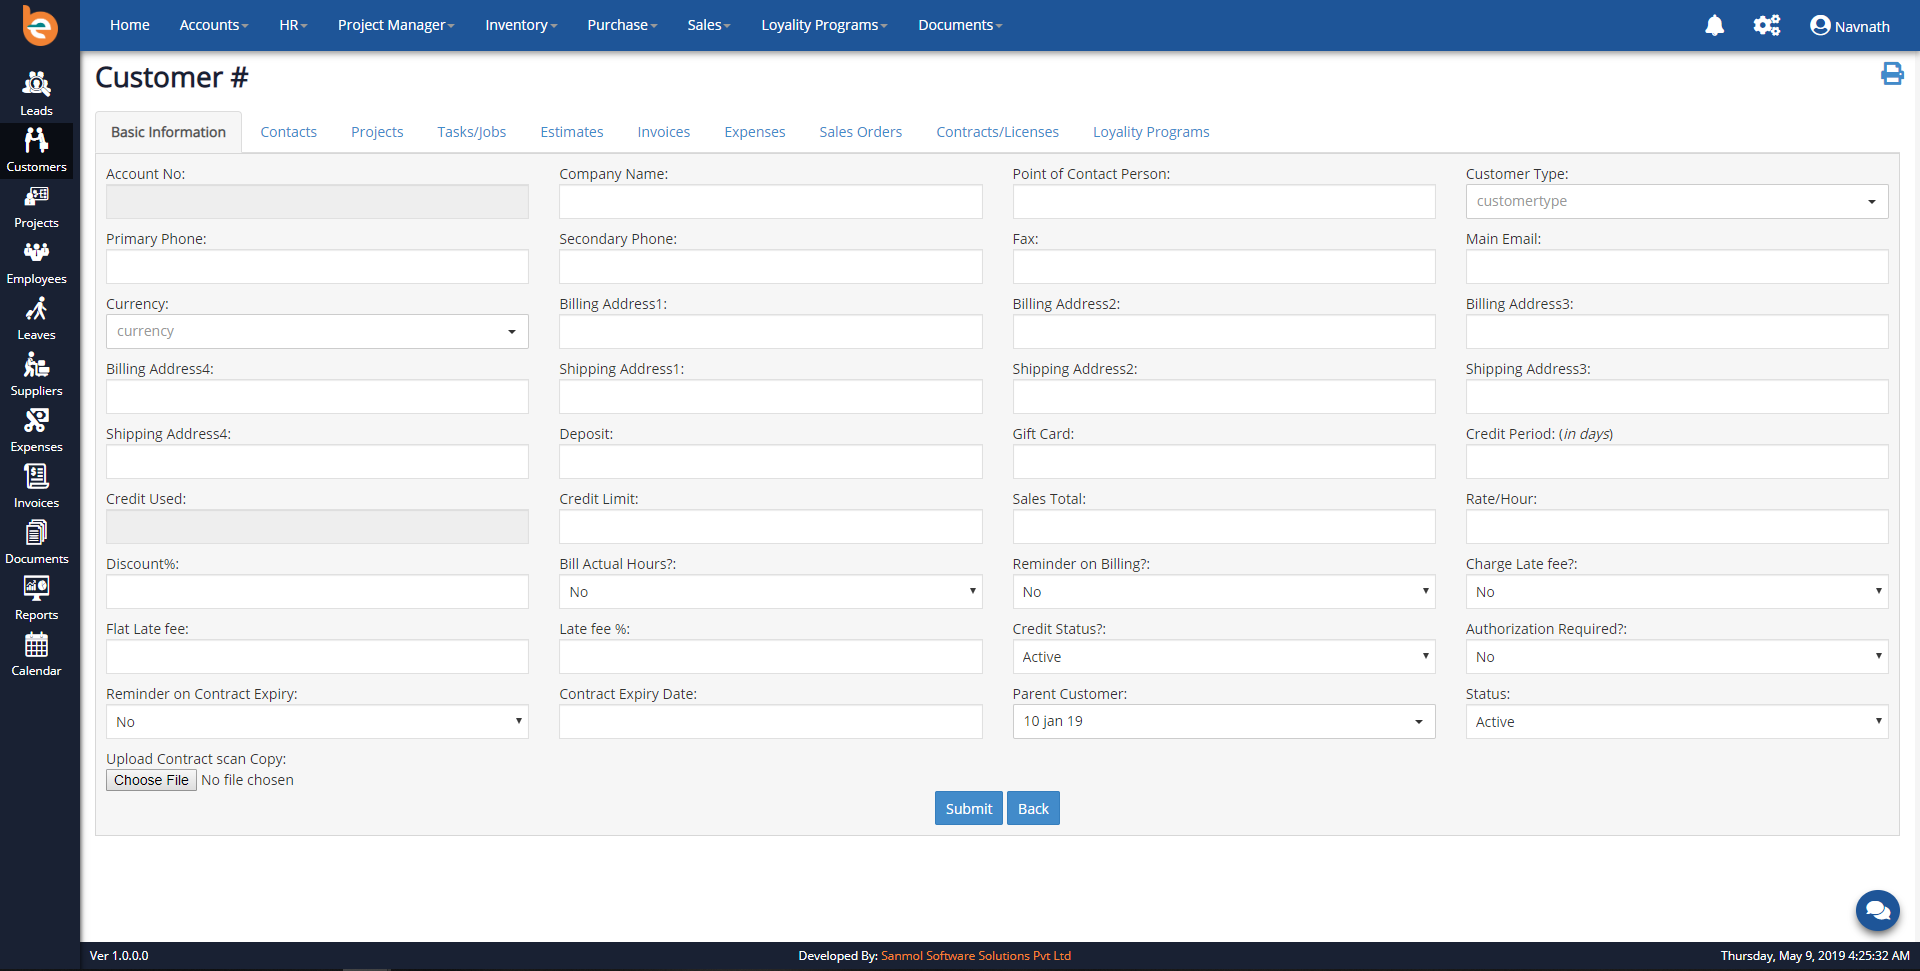
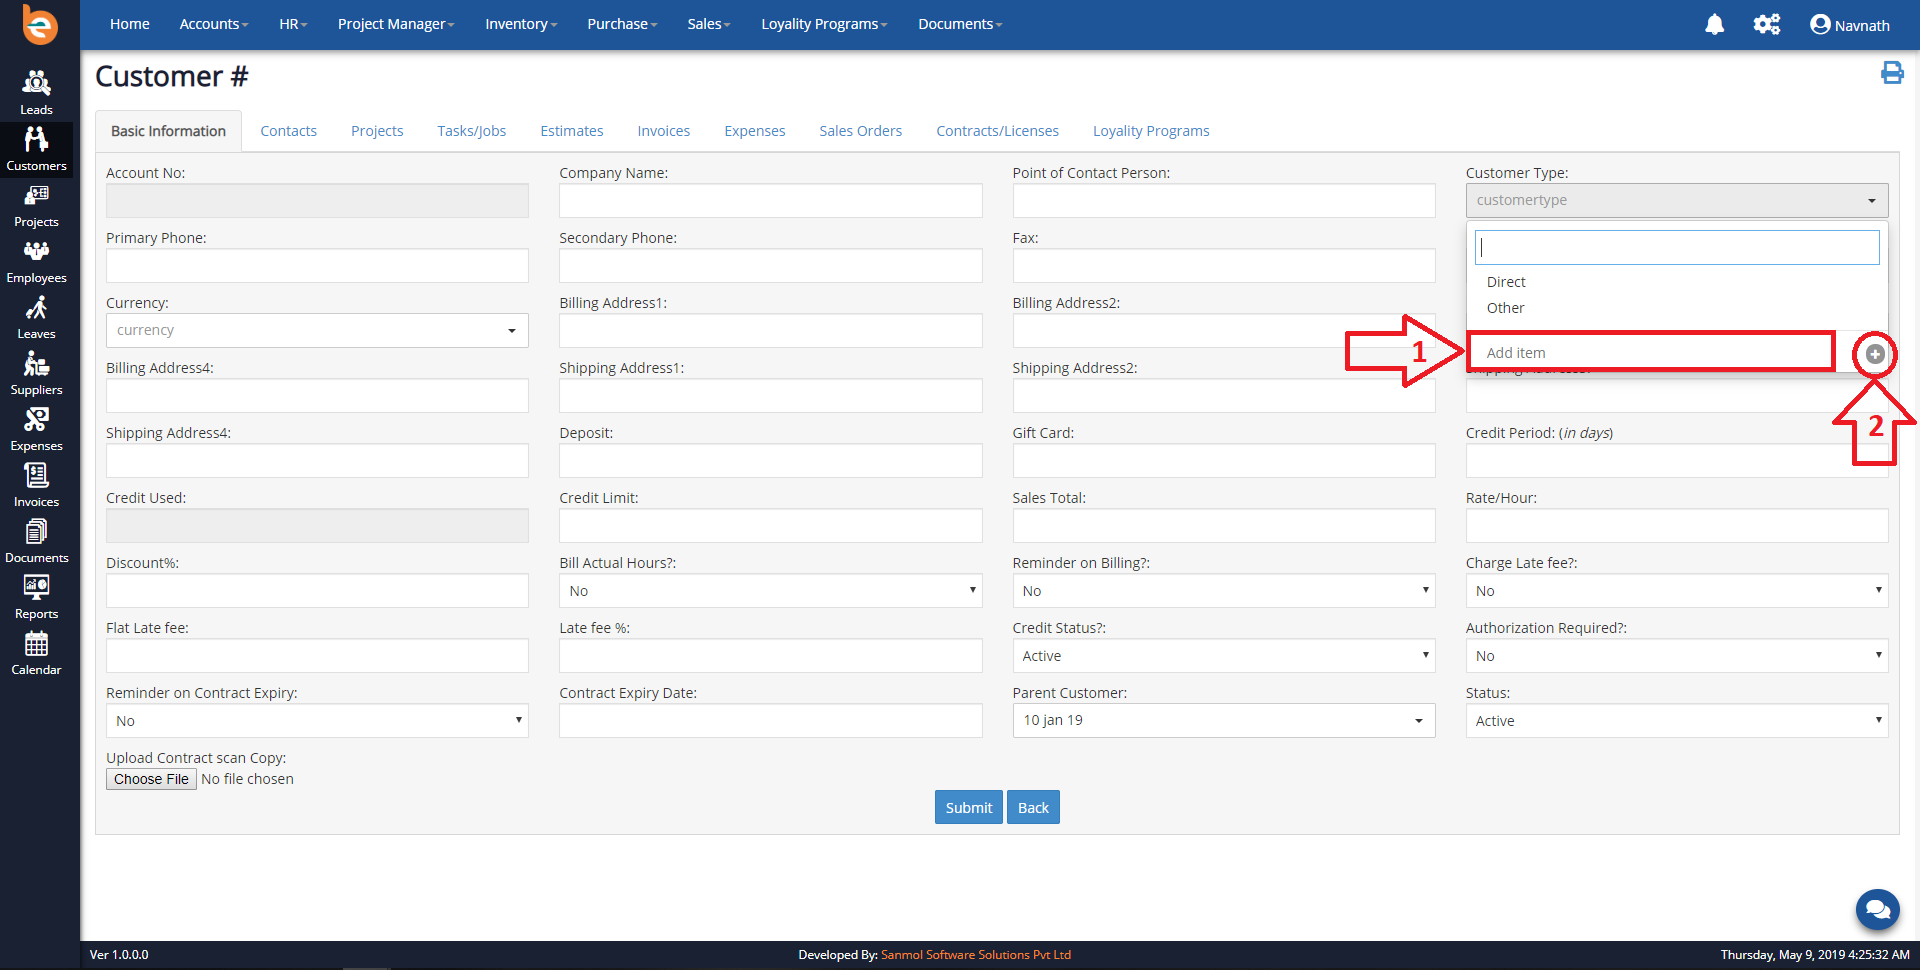
4.7.3 Create New Customers - Customer Types
Initially when you are going to add first Customer in the Ezybooks you need to add Customer Types, it is just for first time configuration when you add next time automatically it will show.Example Customer Types:
1. Direct
2. Consultant
3. Partner
4. Other
As per following screen you have textbox for adding new Customer Types, just put Customer Types in the textbox and click enter or on plus given icon.
4.7.4 Customers - Contact
Click on the contact option after that click on Add Contact you will get Add Contact pop-up fill the mandatory information and submit, you can add multiple contact.
4.7.5 Customers List
On the customer main screen you can see all added contacts where you can View, Edit, Delete, Add Project, Add Task, Add Estimate, Add Invoice and Delete.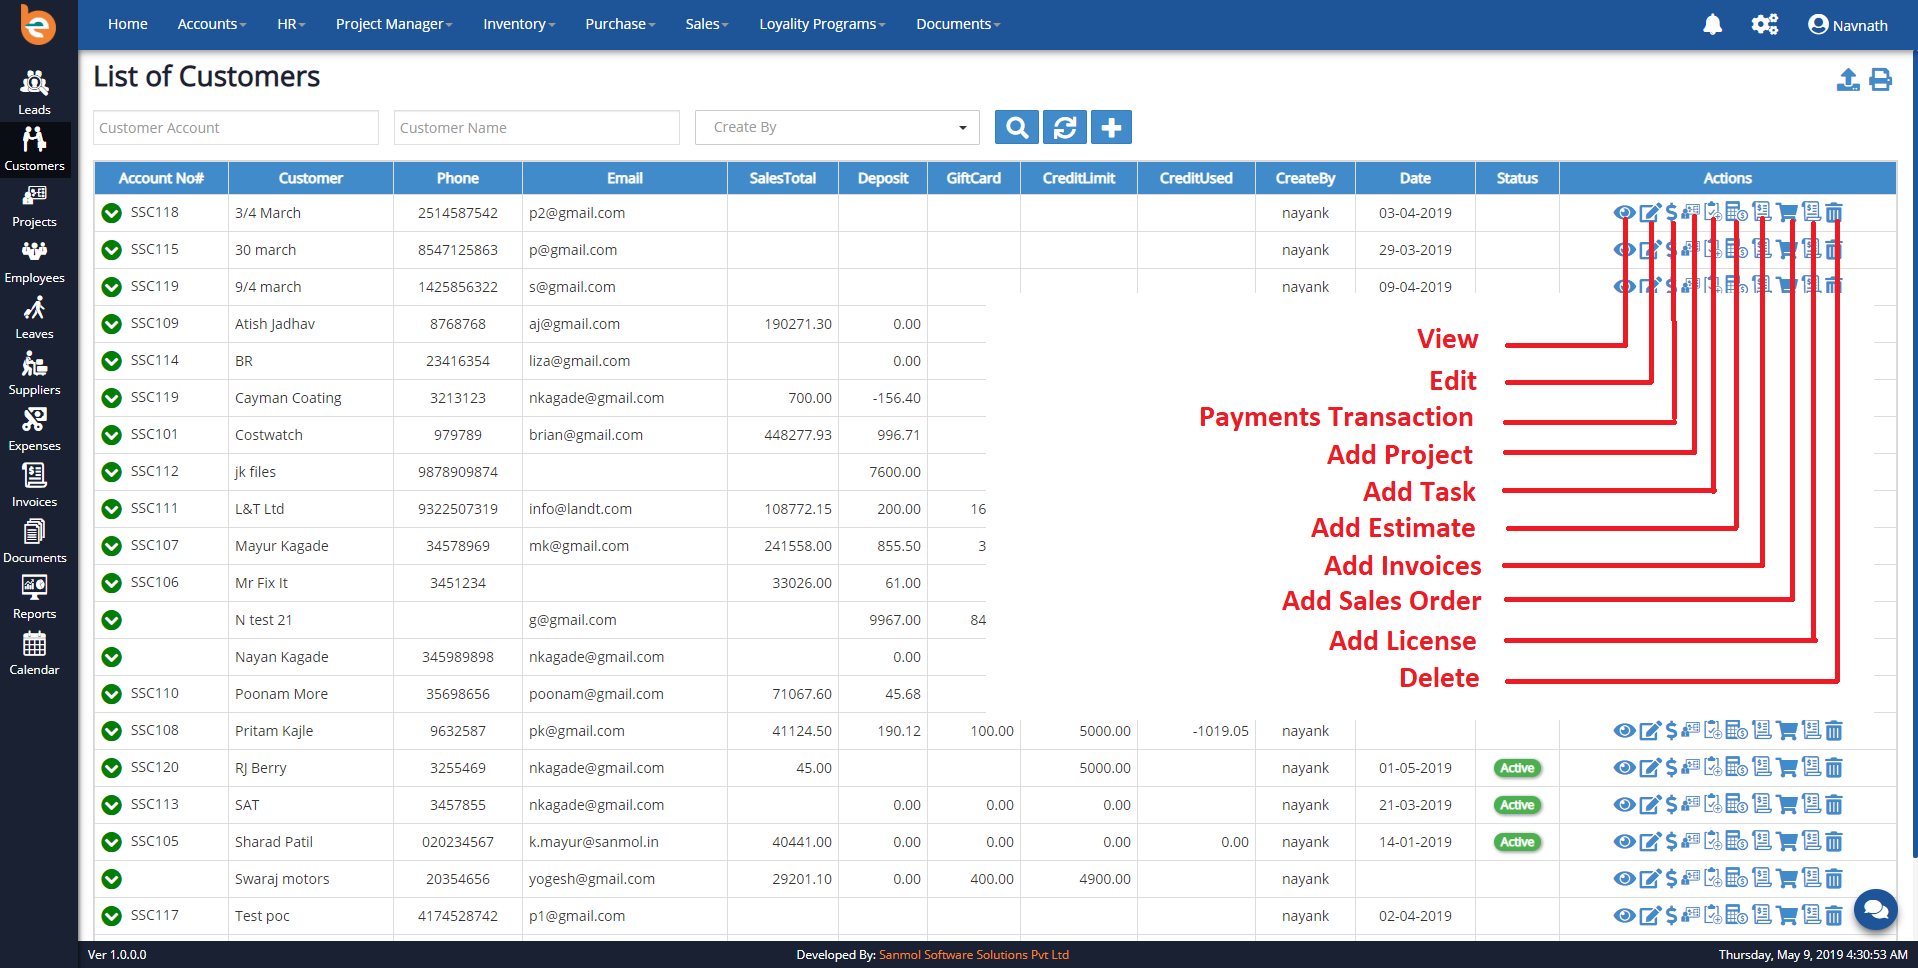
4.8 Sales Orders
Click on Sales option from main menu you can see Orders option click on that.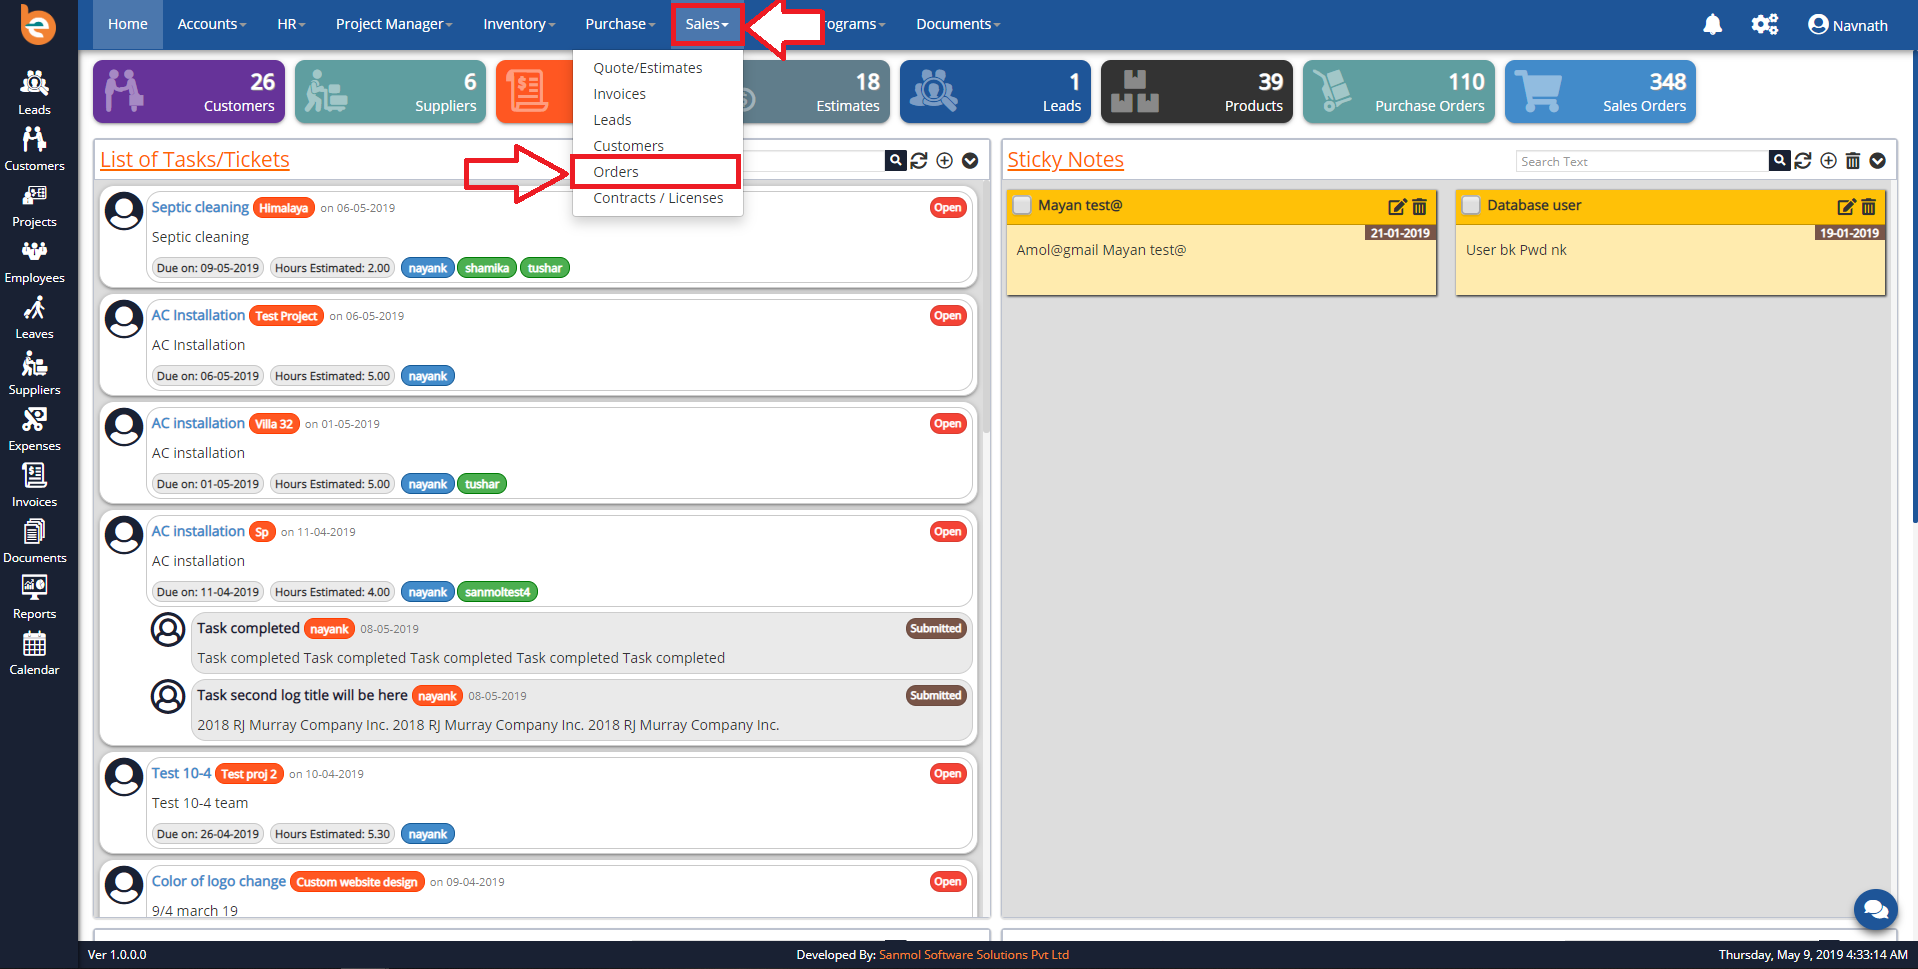
4.8.1 Add Sales Orders
You can see plus icon on the main screen click for creating new sales order.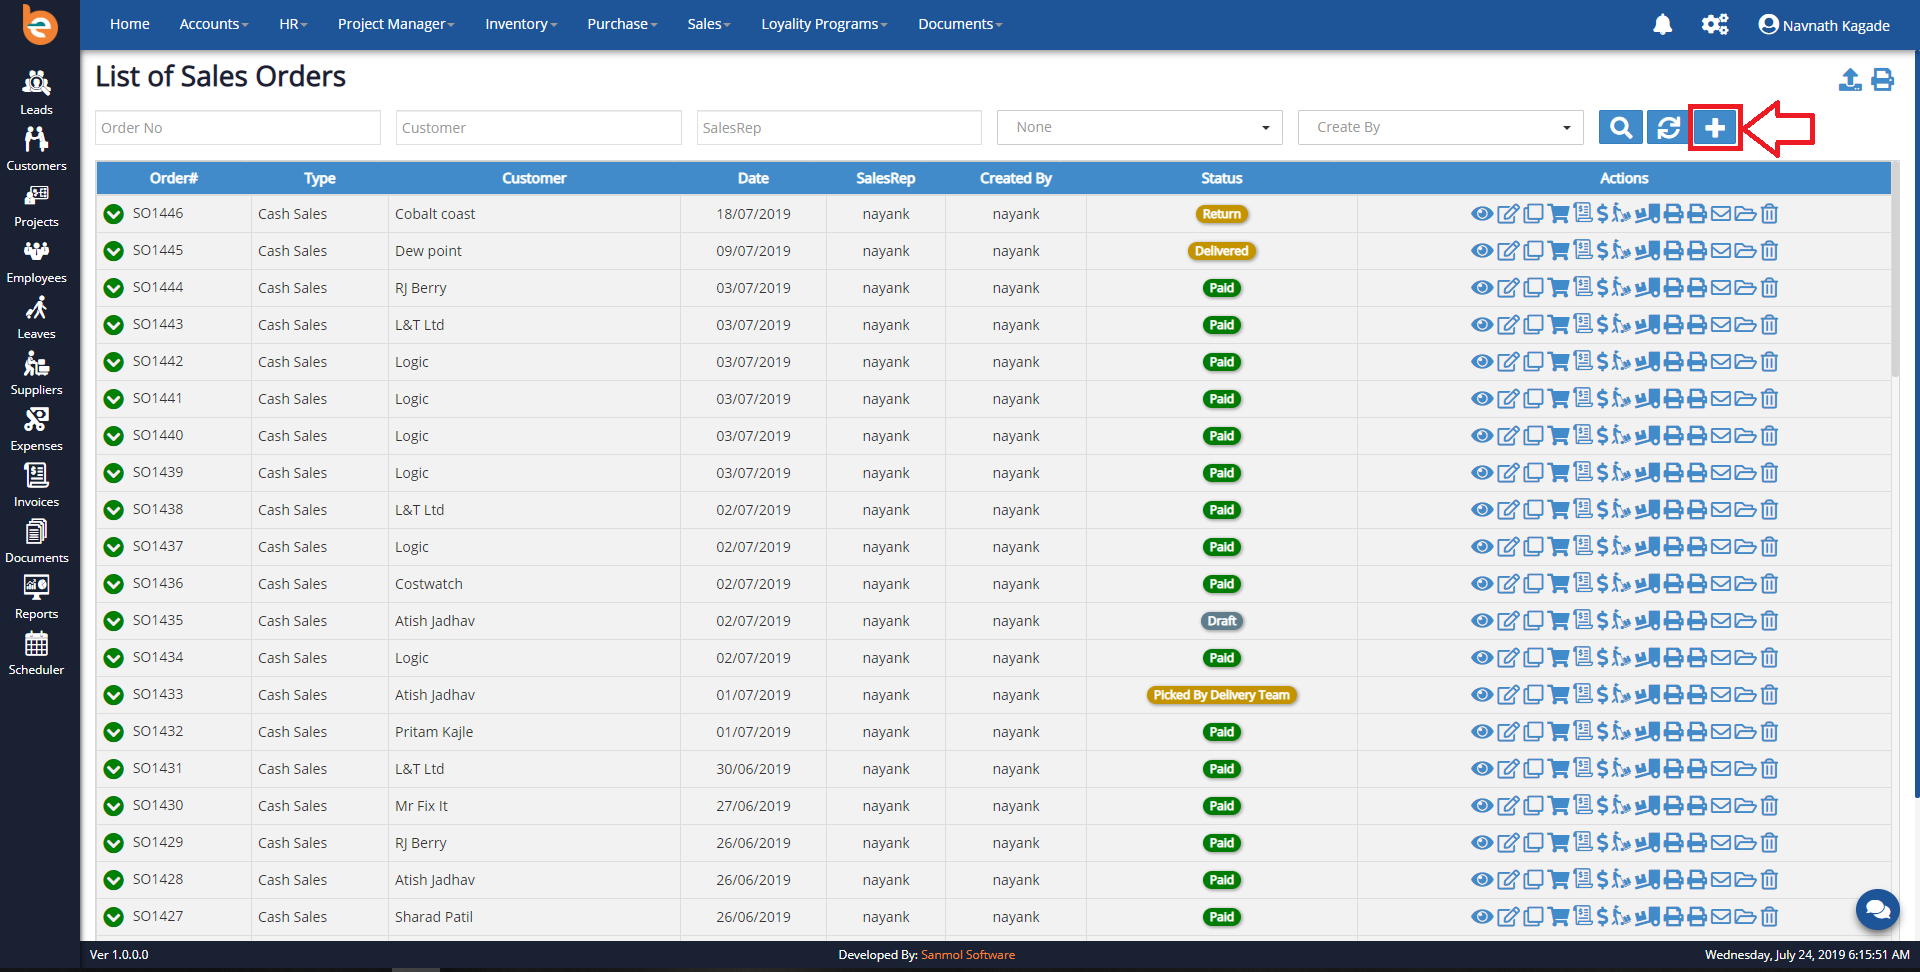
4.8.2 Create Sales Orders
After click on plus icon you can see sales order creation form.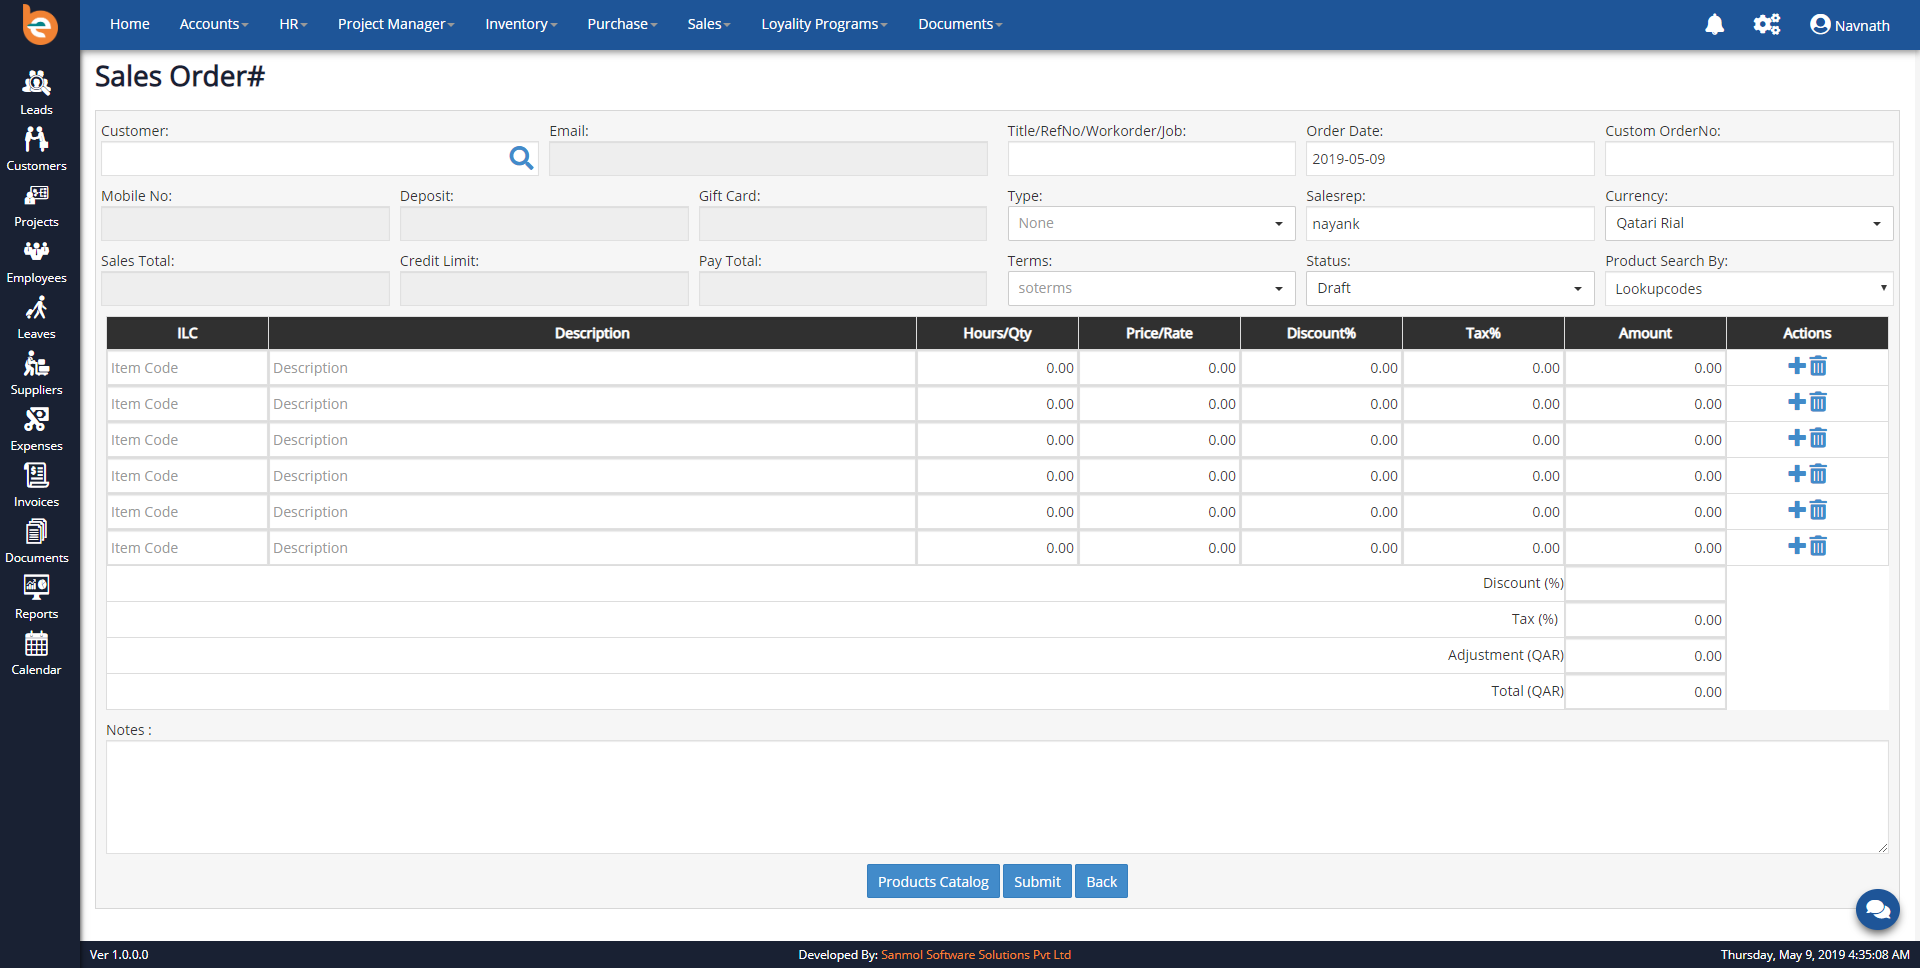
4.8.3 Sales Order Form - Select Customer
You can see search icon in the customer textbox click on that, you can see customer list pop-up, you have the option to search customer. Click on the particular customer for which you are going to add sales order.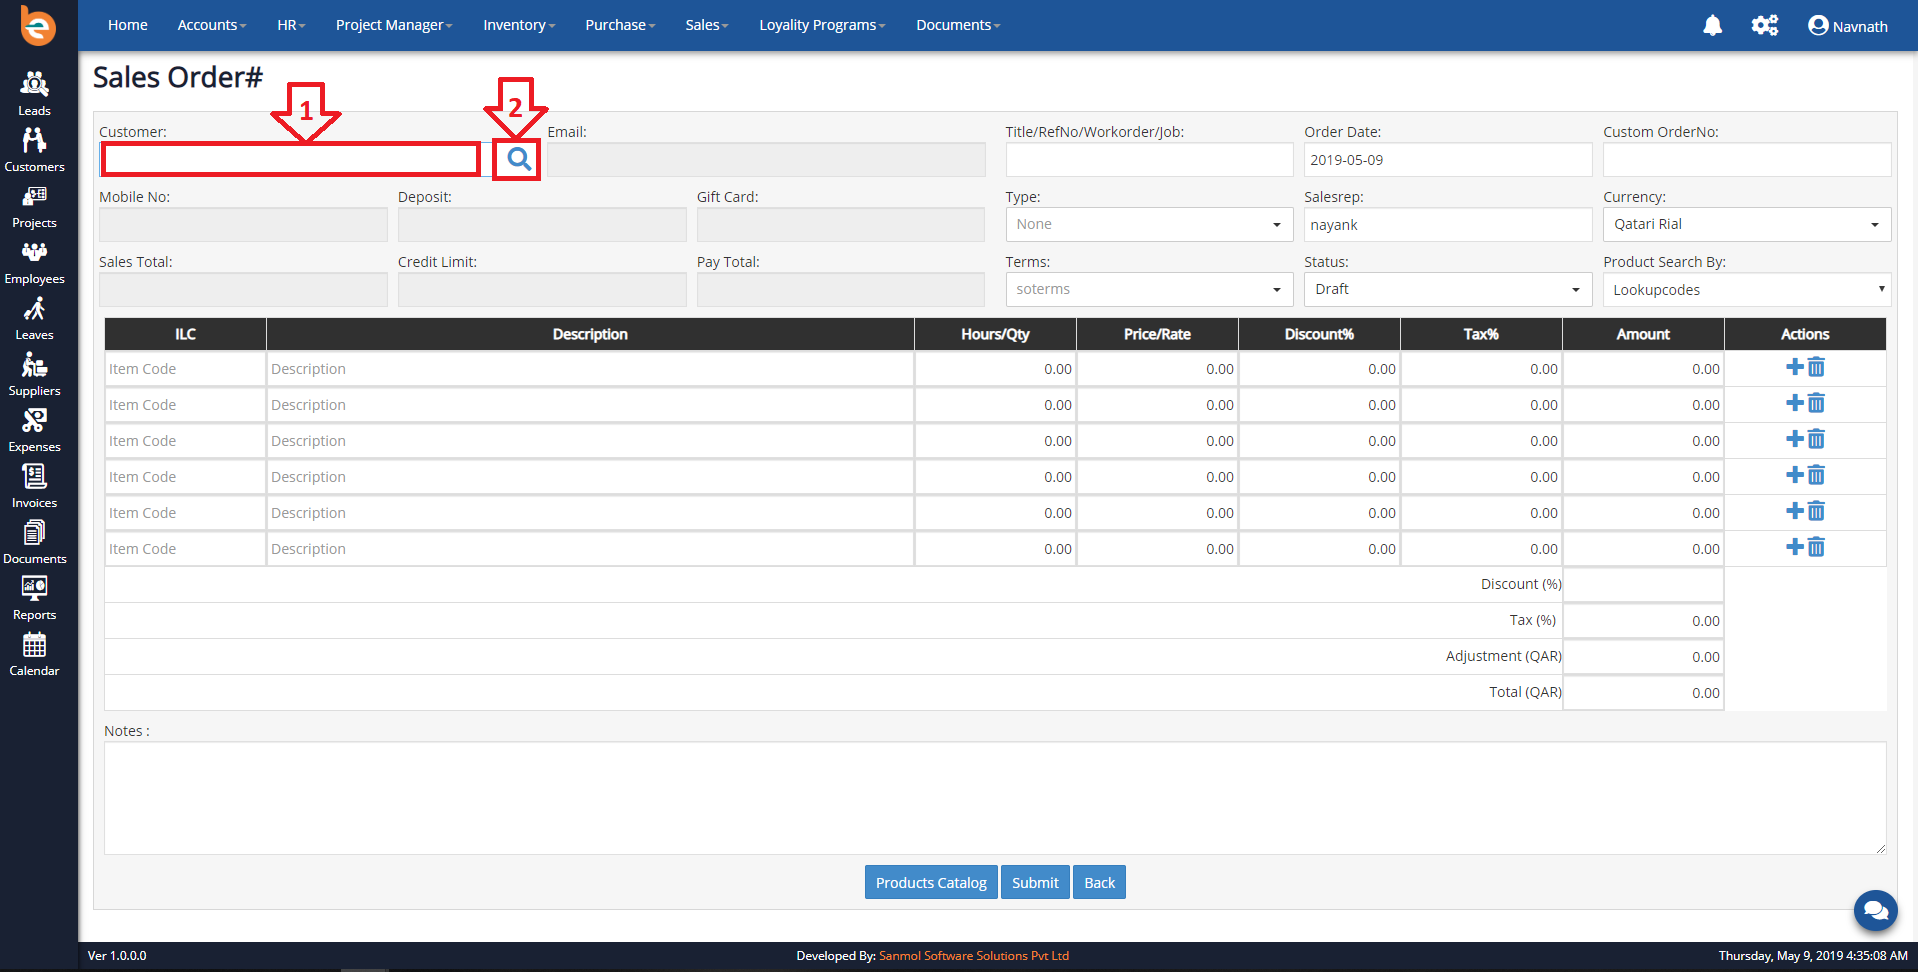
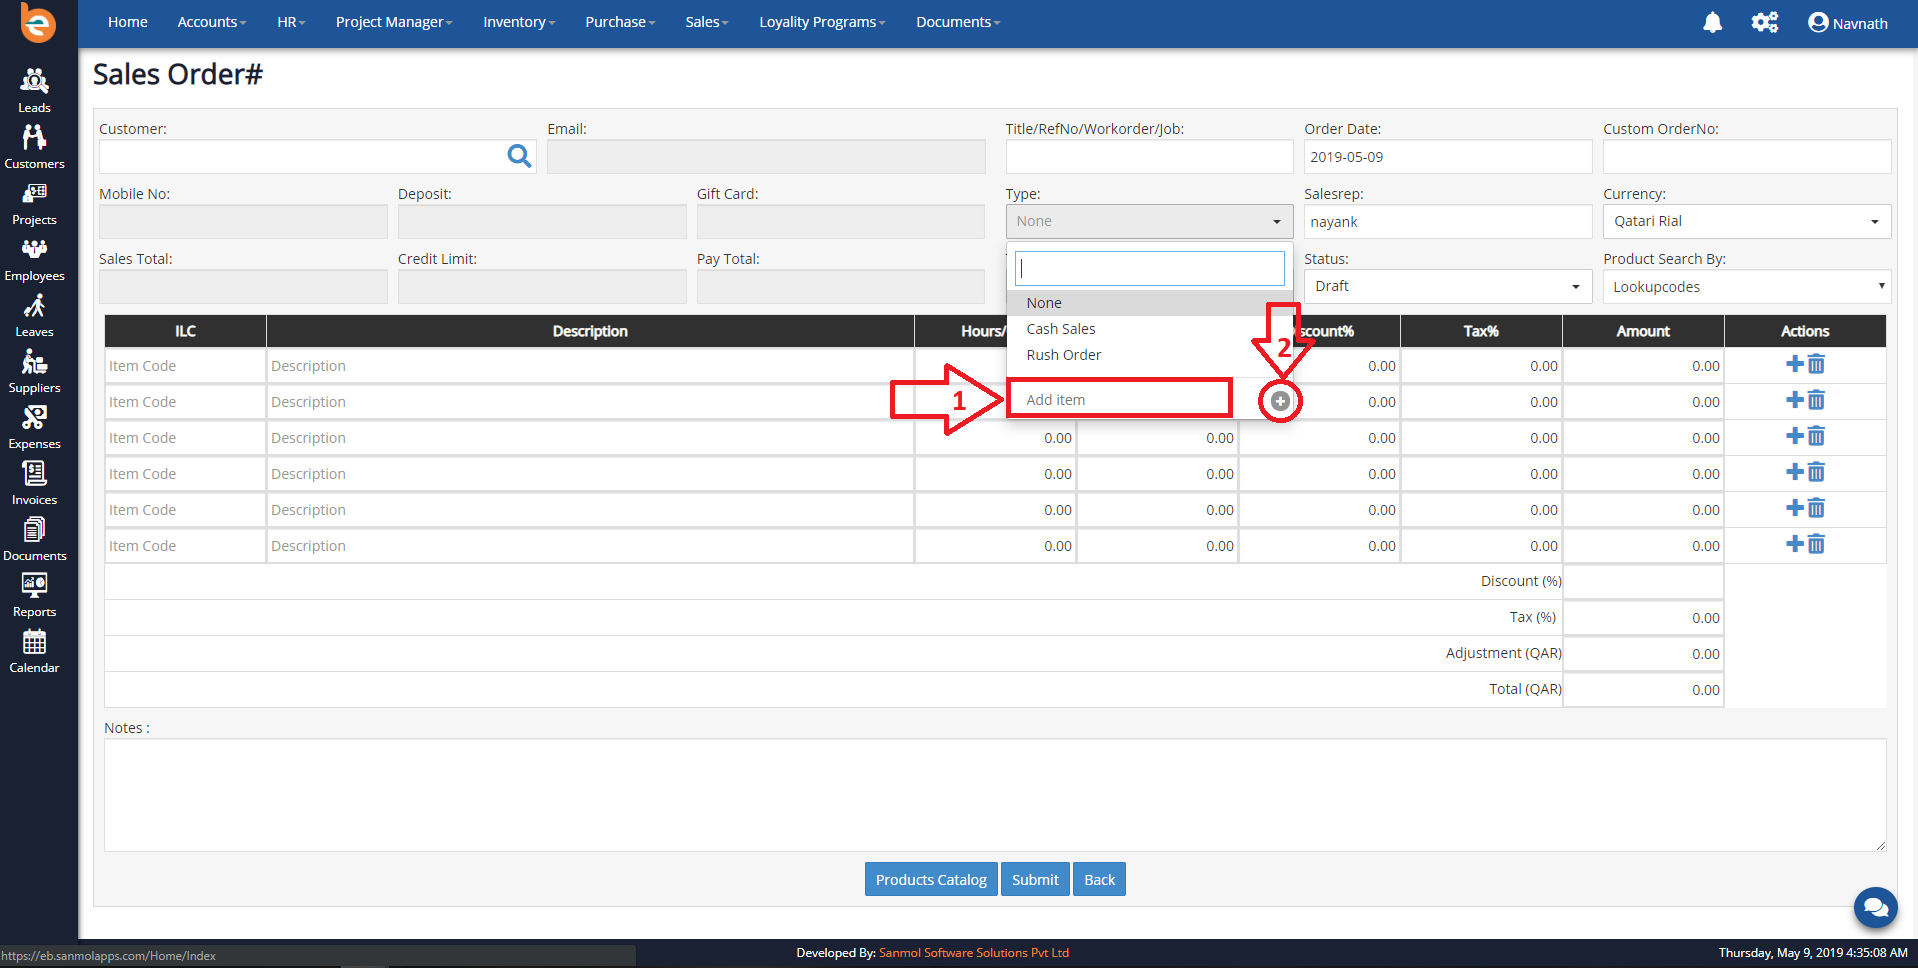
4.8.4 Sales Orders Form - Sales Order Types
Initially when you are going to add first Sales Order in the Ezybooks you need to add Sales Order Types, it is just for first time configuration when you add next time automatically it will show.Example Sales Order Types:
1. Standard Order
2. Contract
3. Cash Sales
4. Rush Order
5. Free of Charge Delivery
6. Returns
7. Consignment Order
As per following screen you have textbox for adding new Sales Order Types, just put Sales Order Types in the textbox and click enter or on plus given icon.
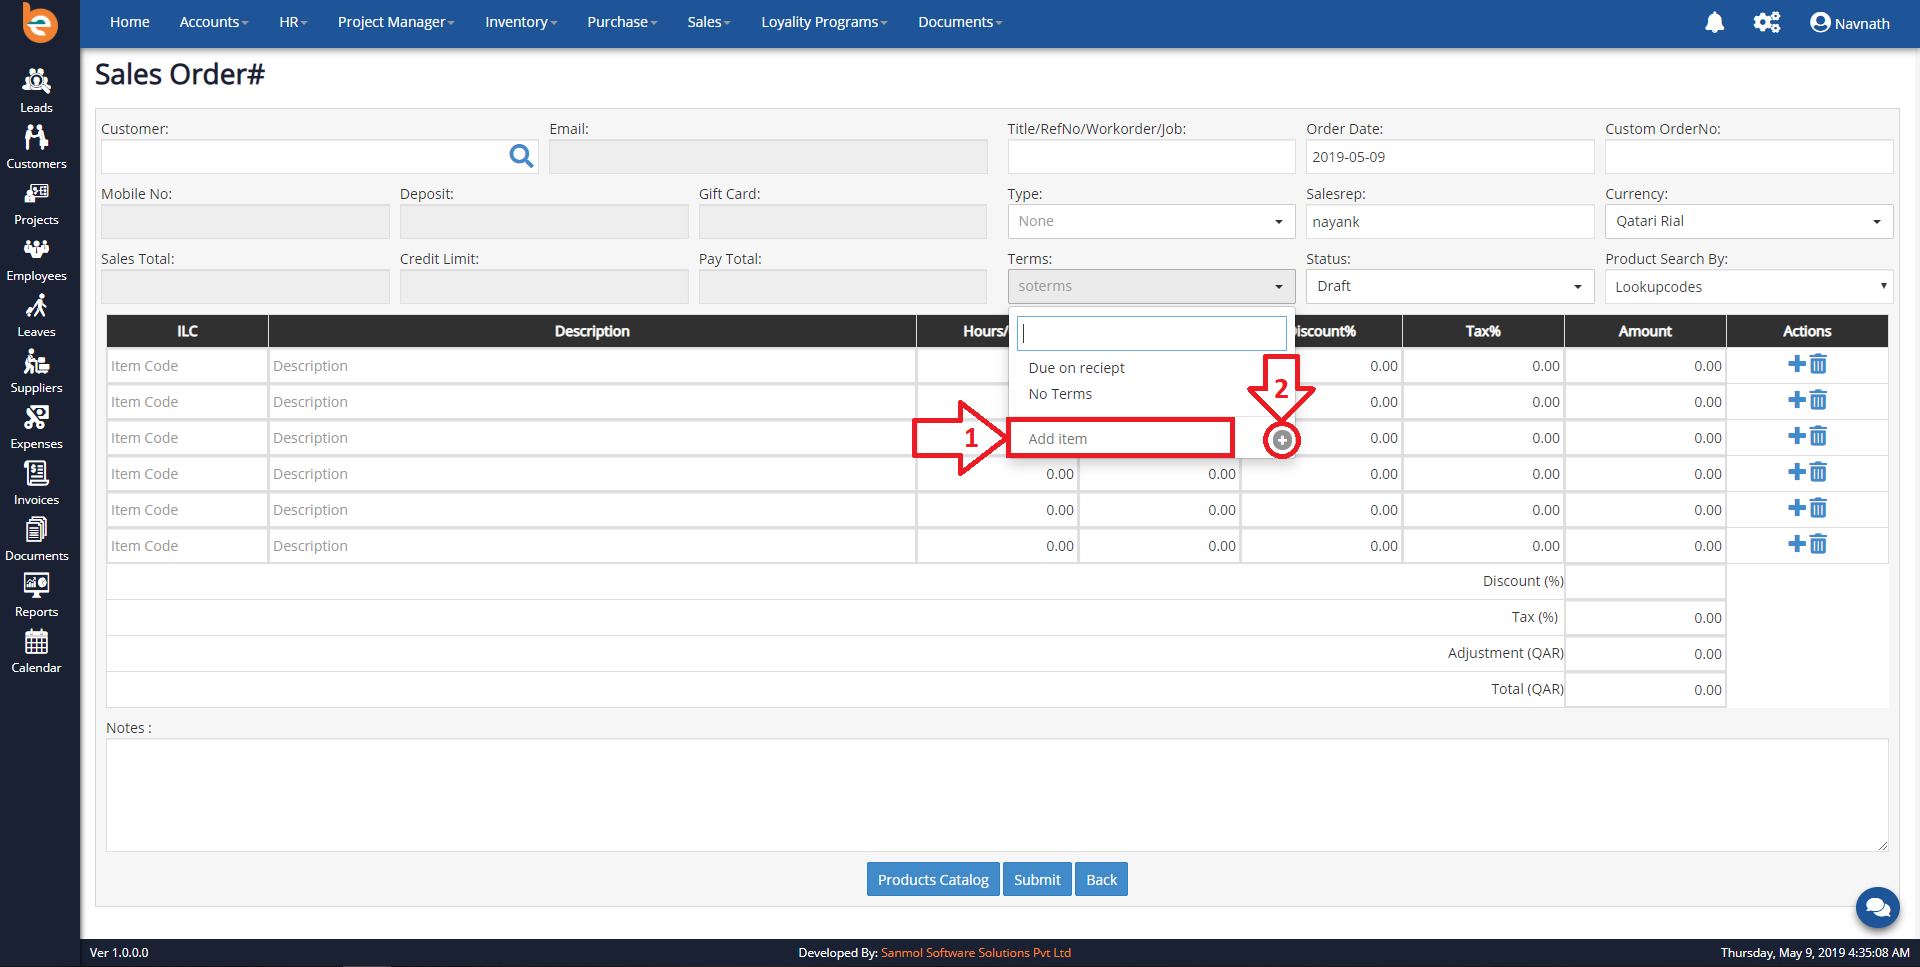
4.8.5 Sales Order Form - Terms
Initially when you are going to add first Sales Order in the Ezybooks you need to add Sales Order Terms, it is just for first time configuration when you add next time automatically it will show.As per following screen you have textbox for adding new Sales Order Terms, just put Sales Order Terms in the textbox and click enter or on plus given icon.
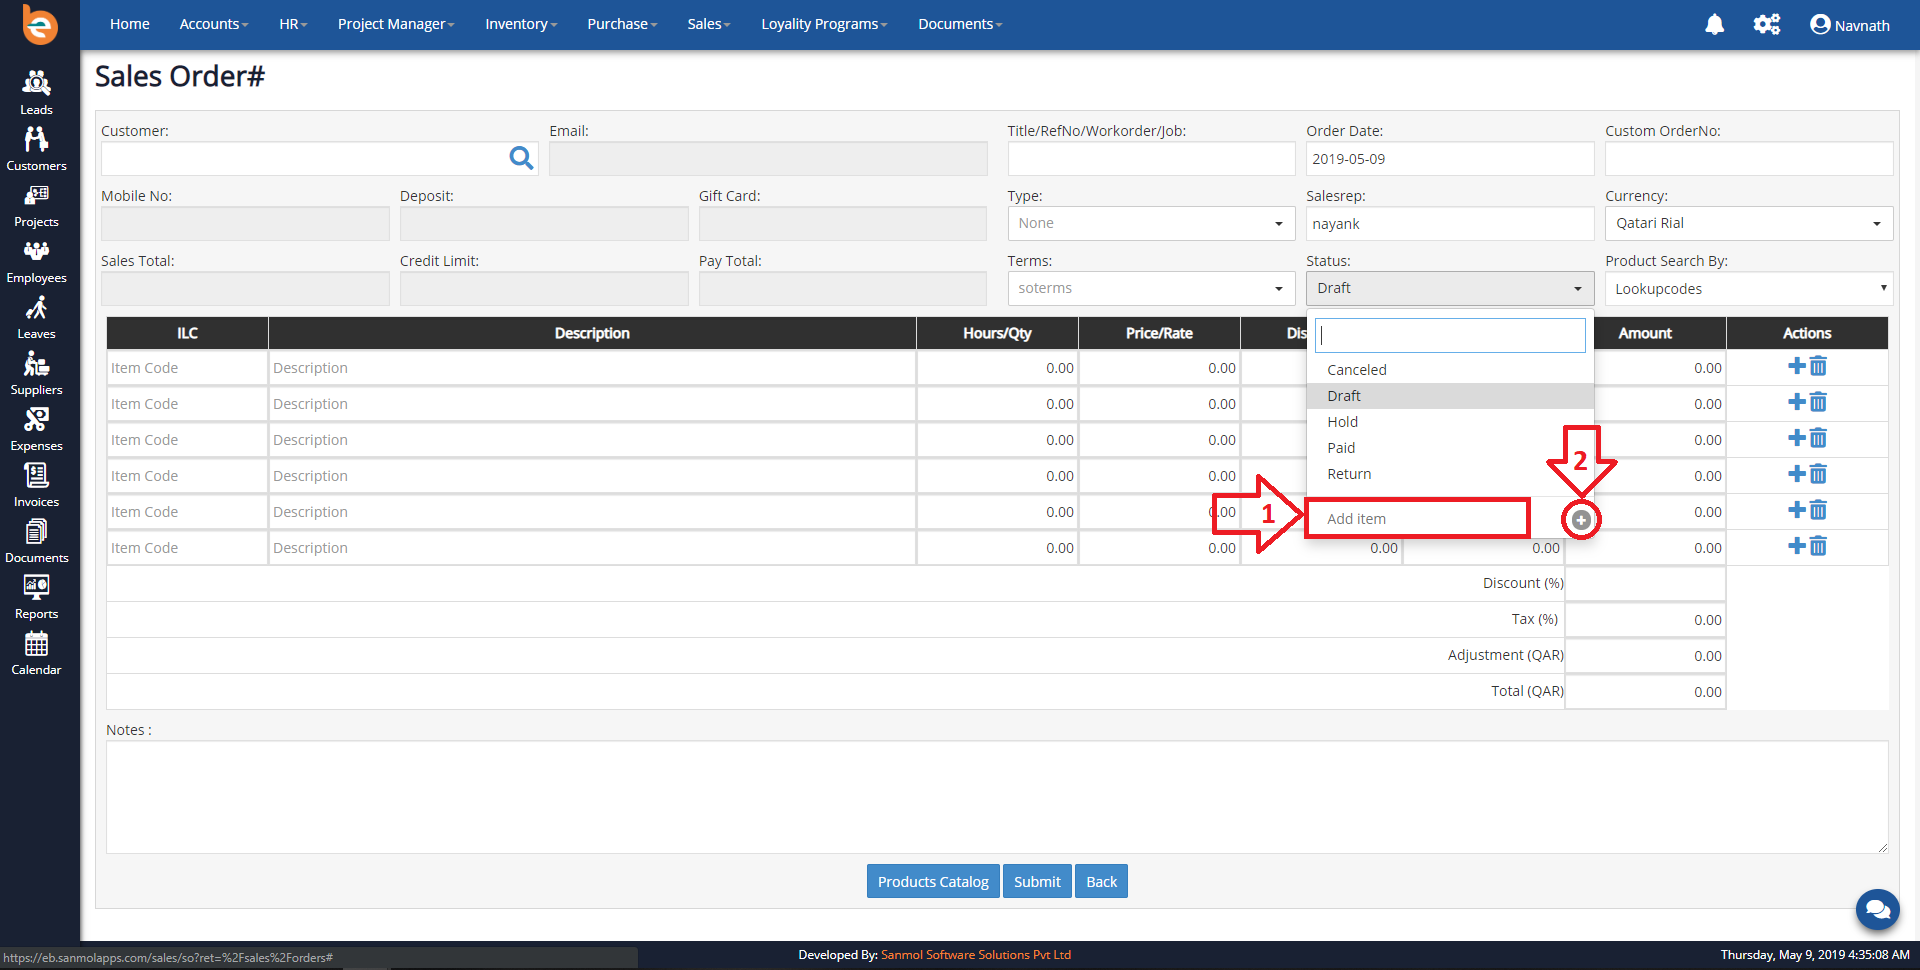
4.8.6 Sales Order Form - Status Types
Initially when you are going to add first Sales Order in the Ezybooks you need to add Sales Order Status as per your company requirement, it is just for first time configuration when you add next time automatically it will show.Examples of the Sales Order Status:
1. Draft
2. Confirmed
3. Closed
4. Void
5. On Hold
As per following screen you have textbox for adding new Sales Order status, just put Sales Order status in the textbox and click enter or on plus given icon.
4.8.7 Sales Order Form - Select Products
For selecting product as per sales order quantity click on search button from the pop-up. All available products will show with image, instock quantity. You need to add sales order quantity and click on "Add to Order" button, please check the following screen.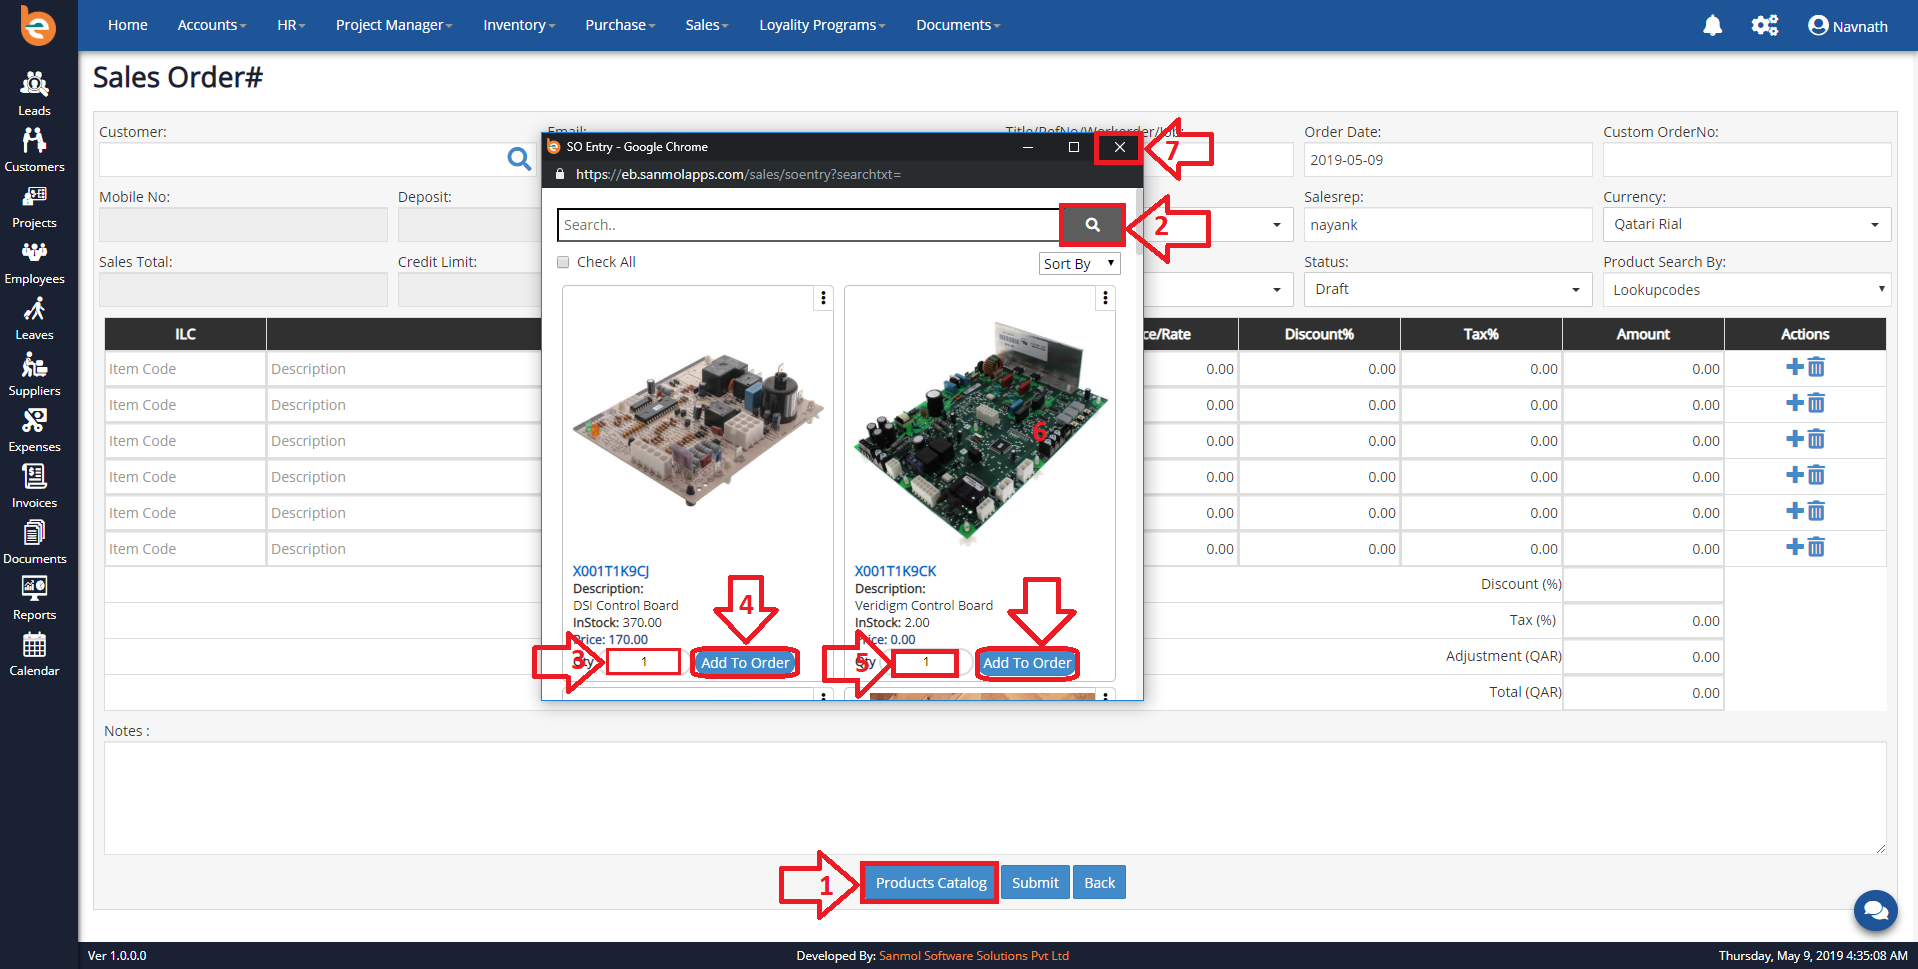
4.8.8 Sales Order List
You can see all sales order list on main screen of the sales order. You have the options for View, Edit, Convert to PO, Convert to Invoice, Pickup Order, Email Order and Delete Order.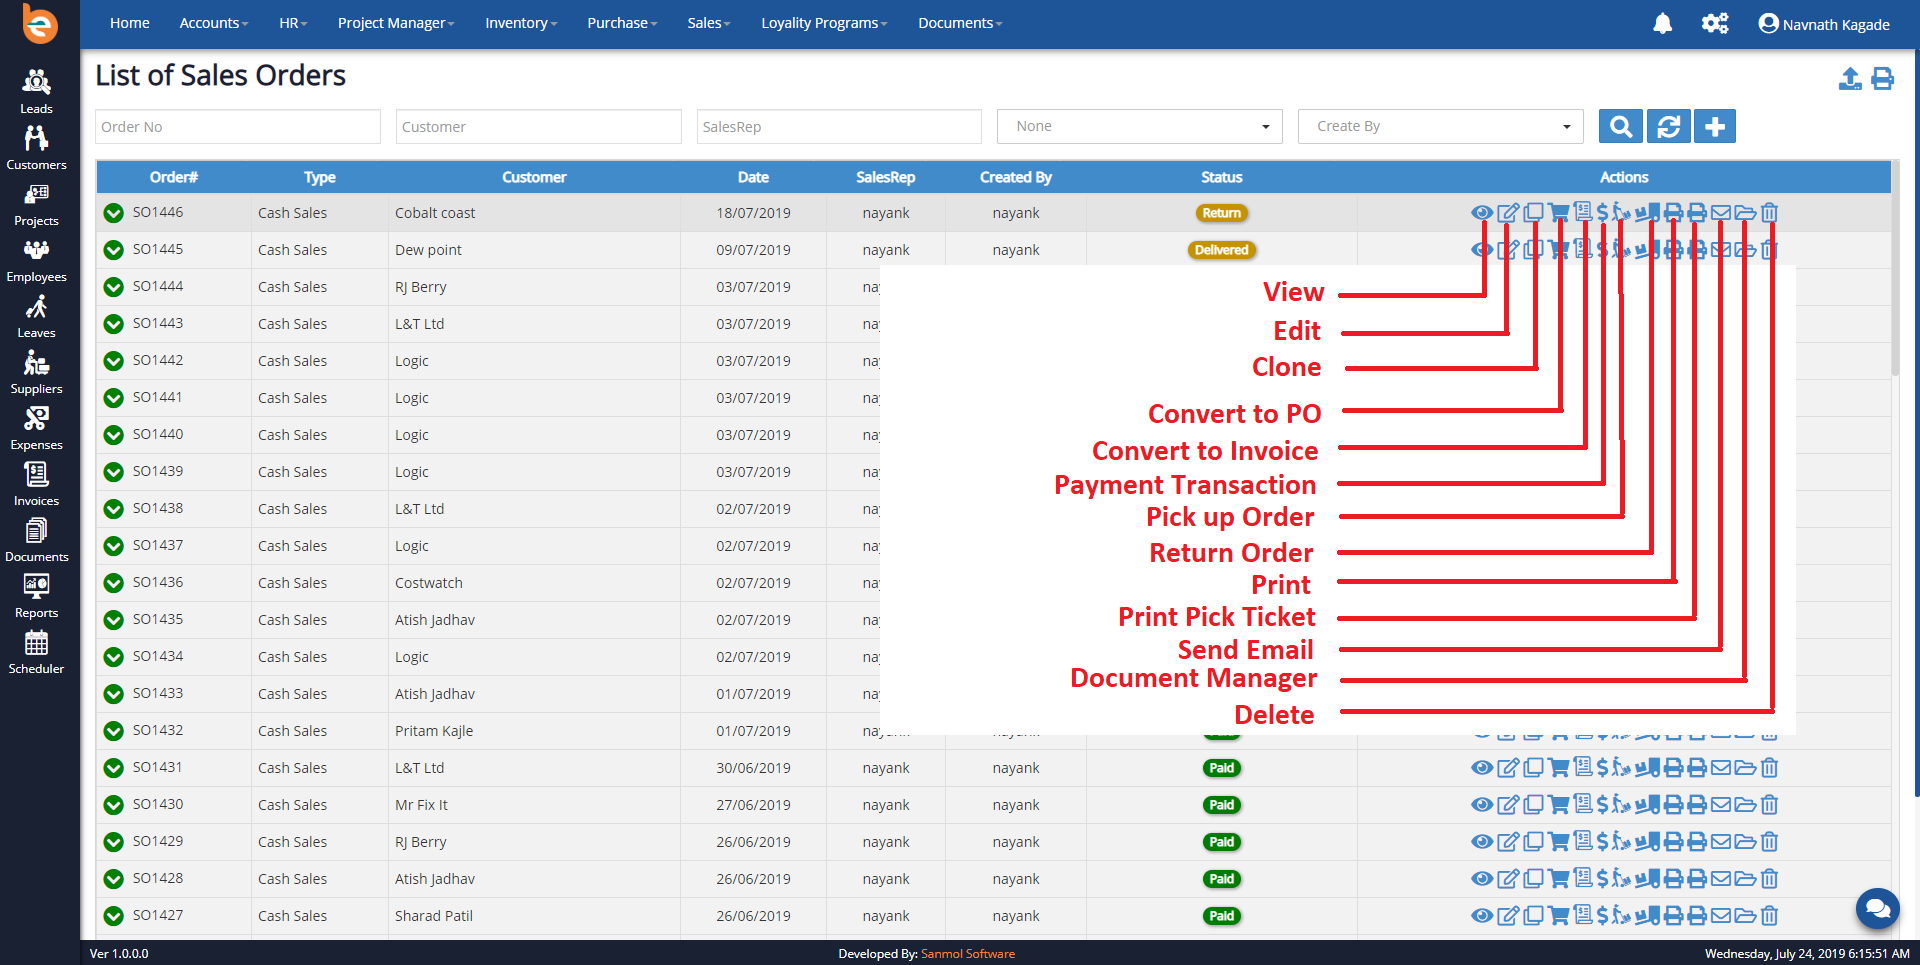
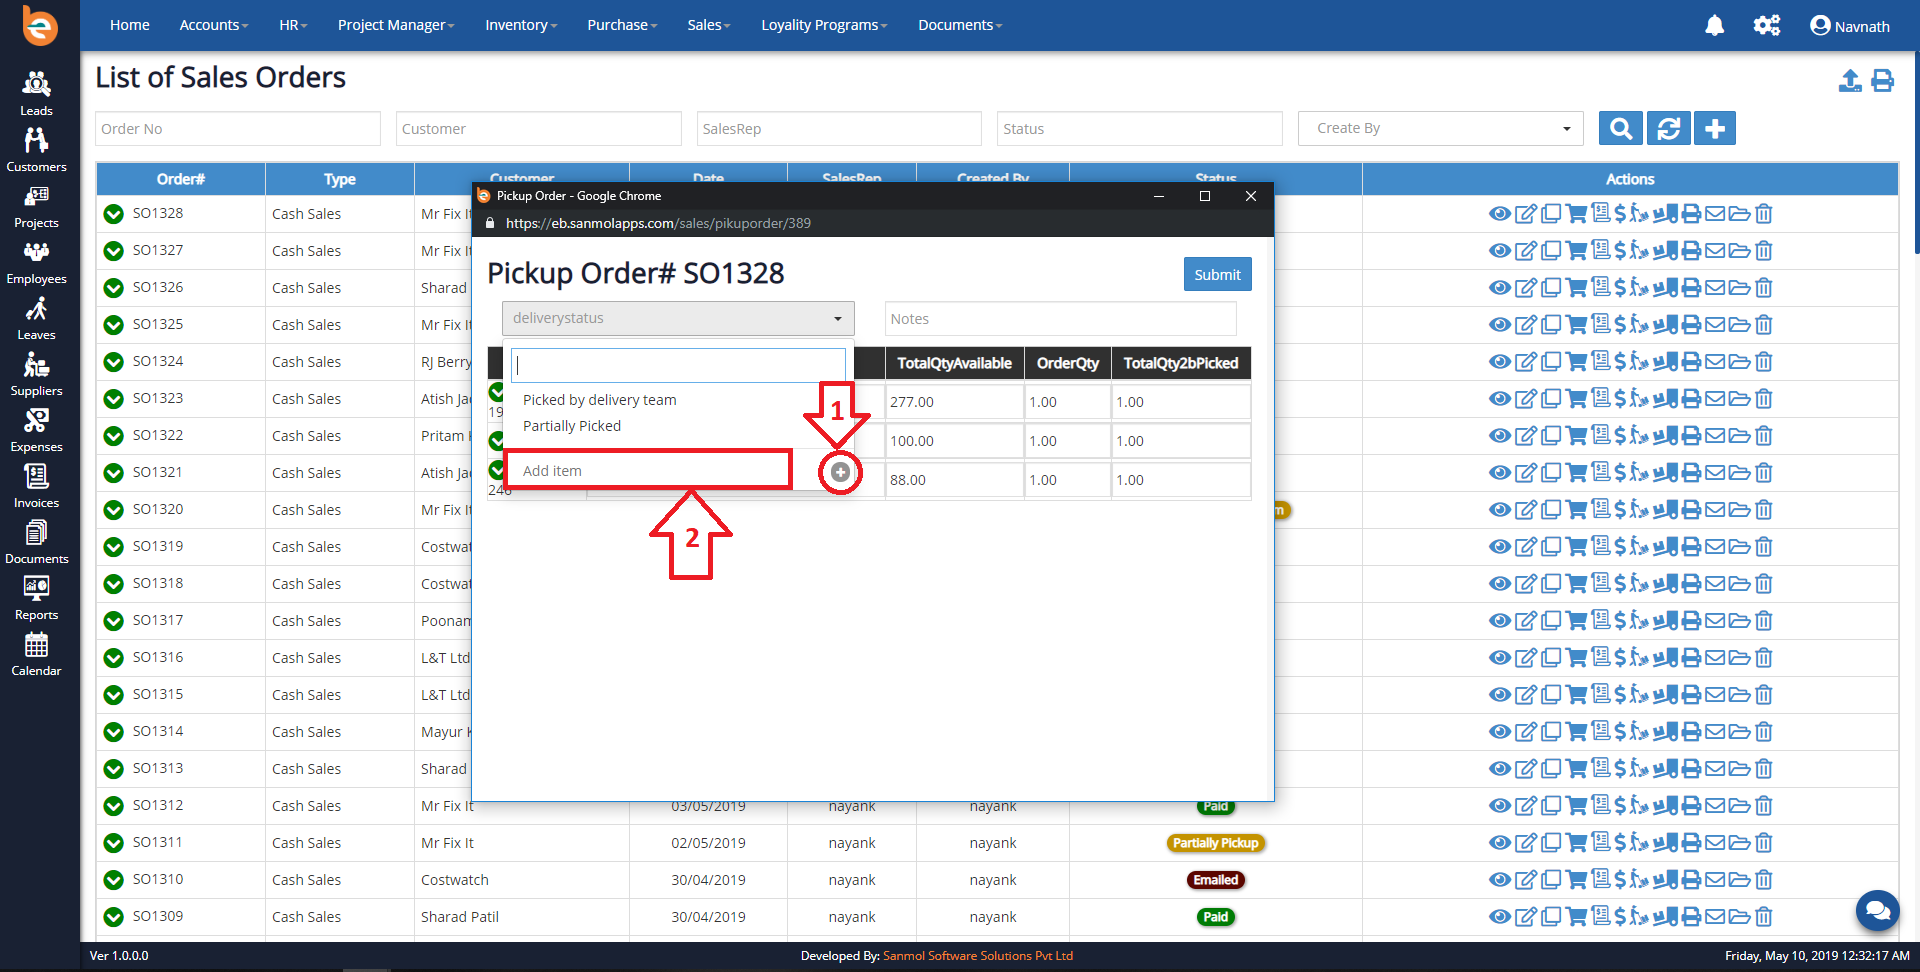
4.8.9 Sales Order - Pickup Order
You can see pickup order icon in the order list after click on that icon pickup order pop-up will show, change the status and click on submit button .
4.8.9.1 Pickup Order Status Types
Initially when you are going to add first Sales Order in the Ezybooks you need to add Pickup Order Status as per your company requirement, it is just for first time configuration when you add next time automatically it will show.Examples of the Pickup Order Status:
1. Picked by delivery team
2. Delivered
As per following screen you have textbox for adding new Pickup Order Status, just put Pickup Order Status in the textbox and click enter or on plus given icon.
4.8.10 Sales Order - Print Order
You can see Print order icon in the order list after click on that icon order pdf pop-up will show and you can give the print.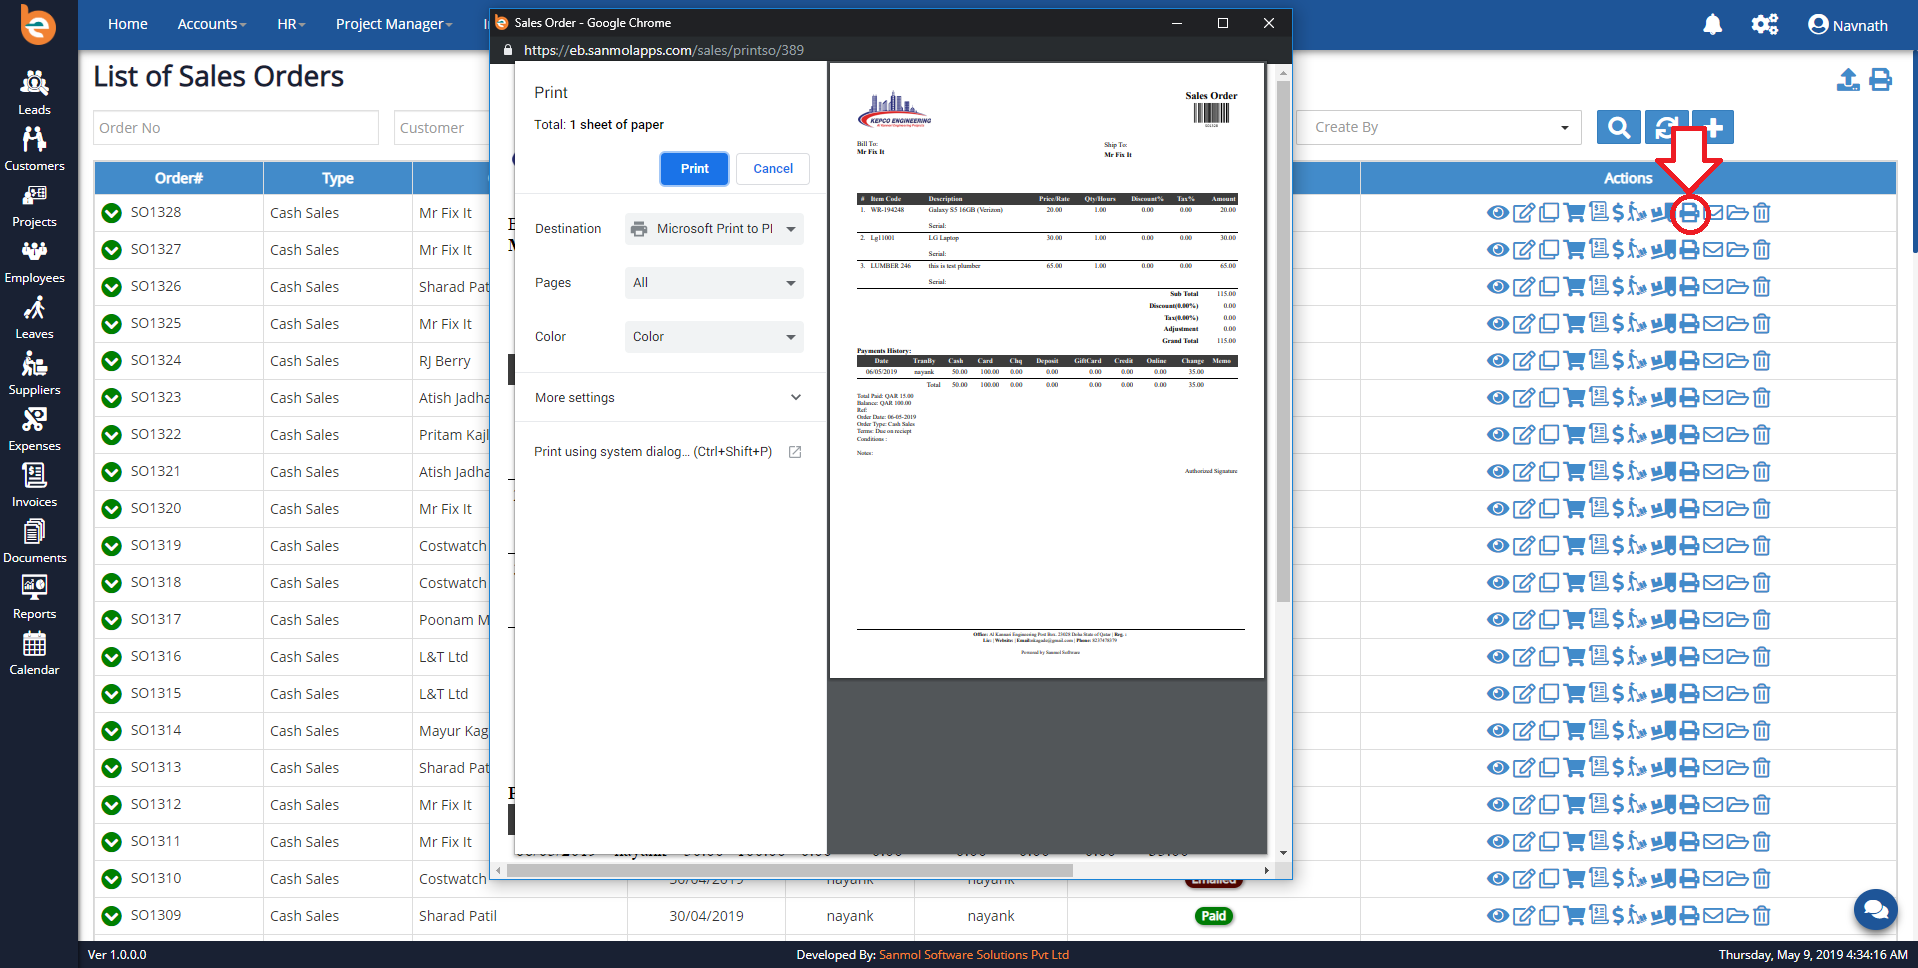
4.8.11 Sales Order - Email Order
When you click on Email action button, email pop-up will open where you can send sales order through email to customer.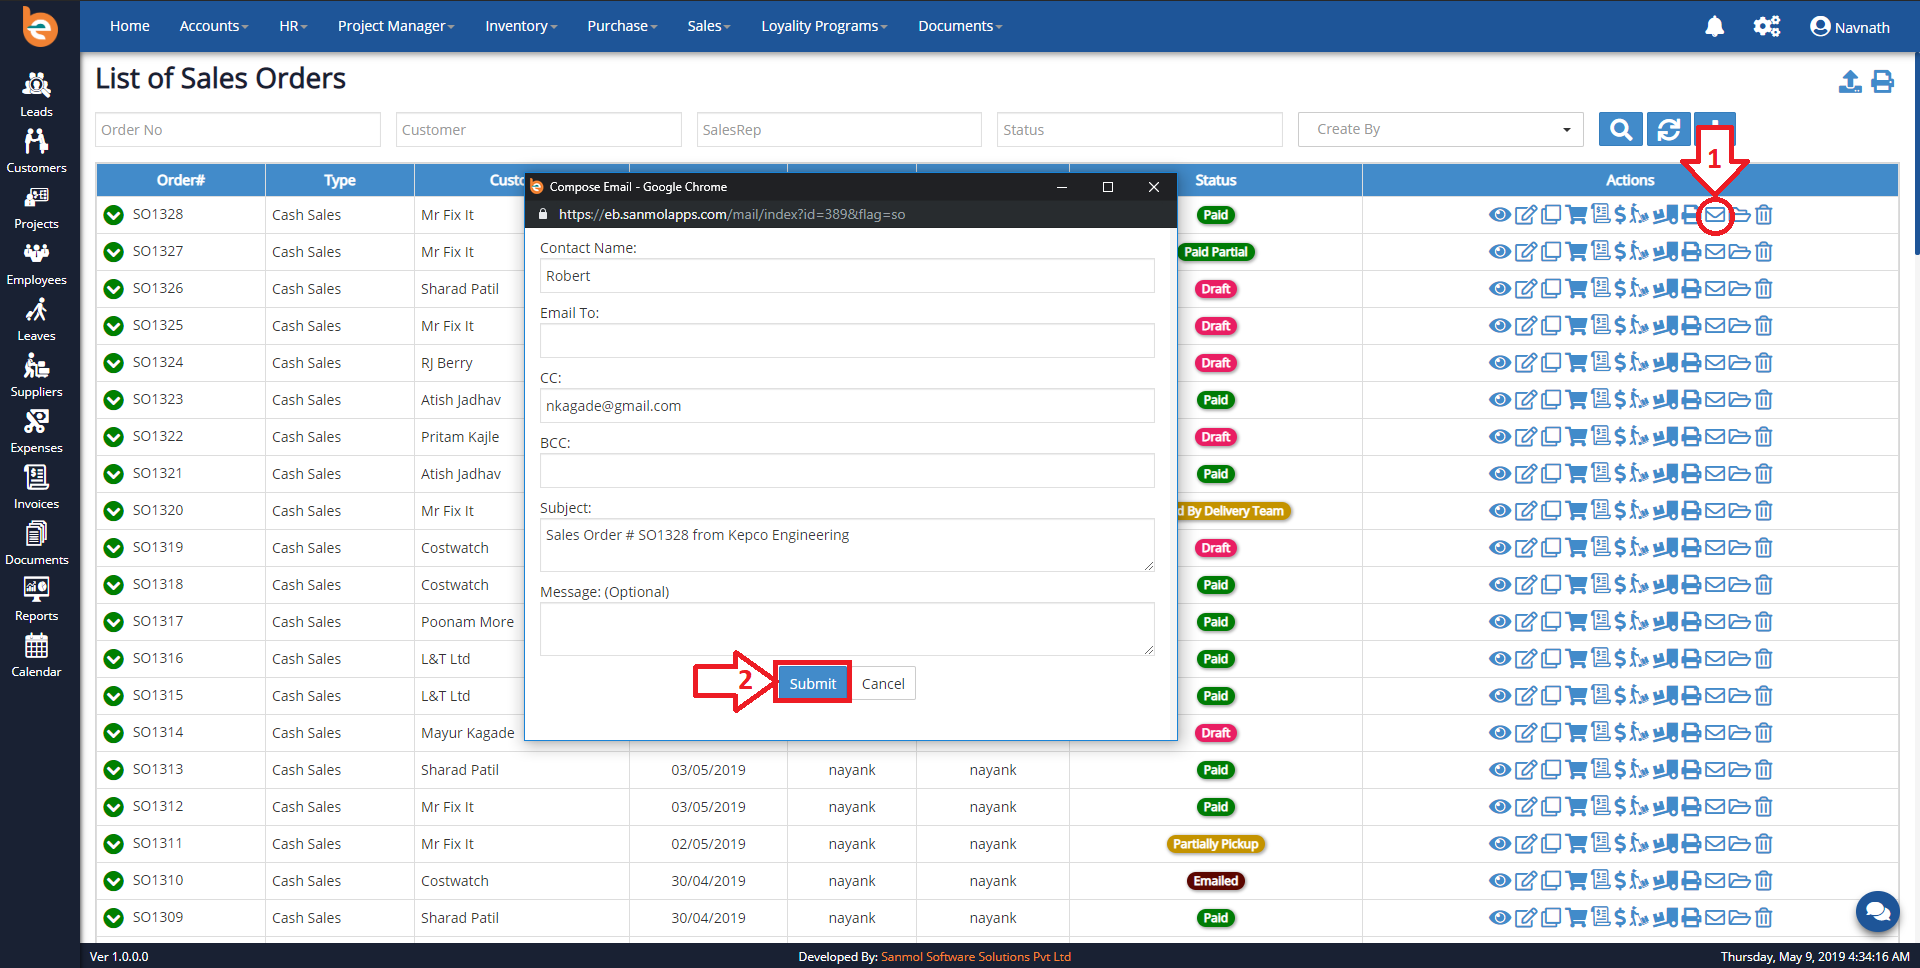
4.8.12 Sales Order - Delete
When you click on Delete action button, confirmation alert will show click ok if you want to delete it.
4.9 Service Item
Under the Inventory menu you can see the Service Item option, from where you can add or view Services. Please follow the following screen.
4.9.1 Add New Service Item
When you click on the Service Item option from the menu, you can see screen as per follows, there is plus icon for adding new Service. Fill all the details.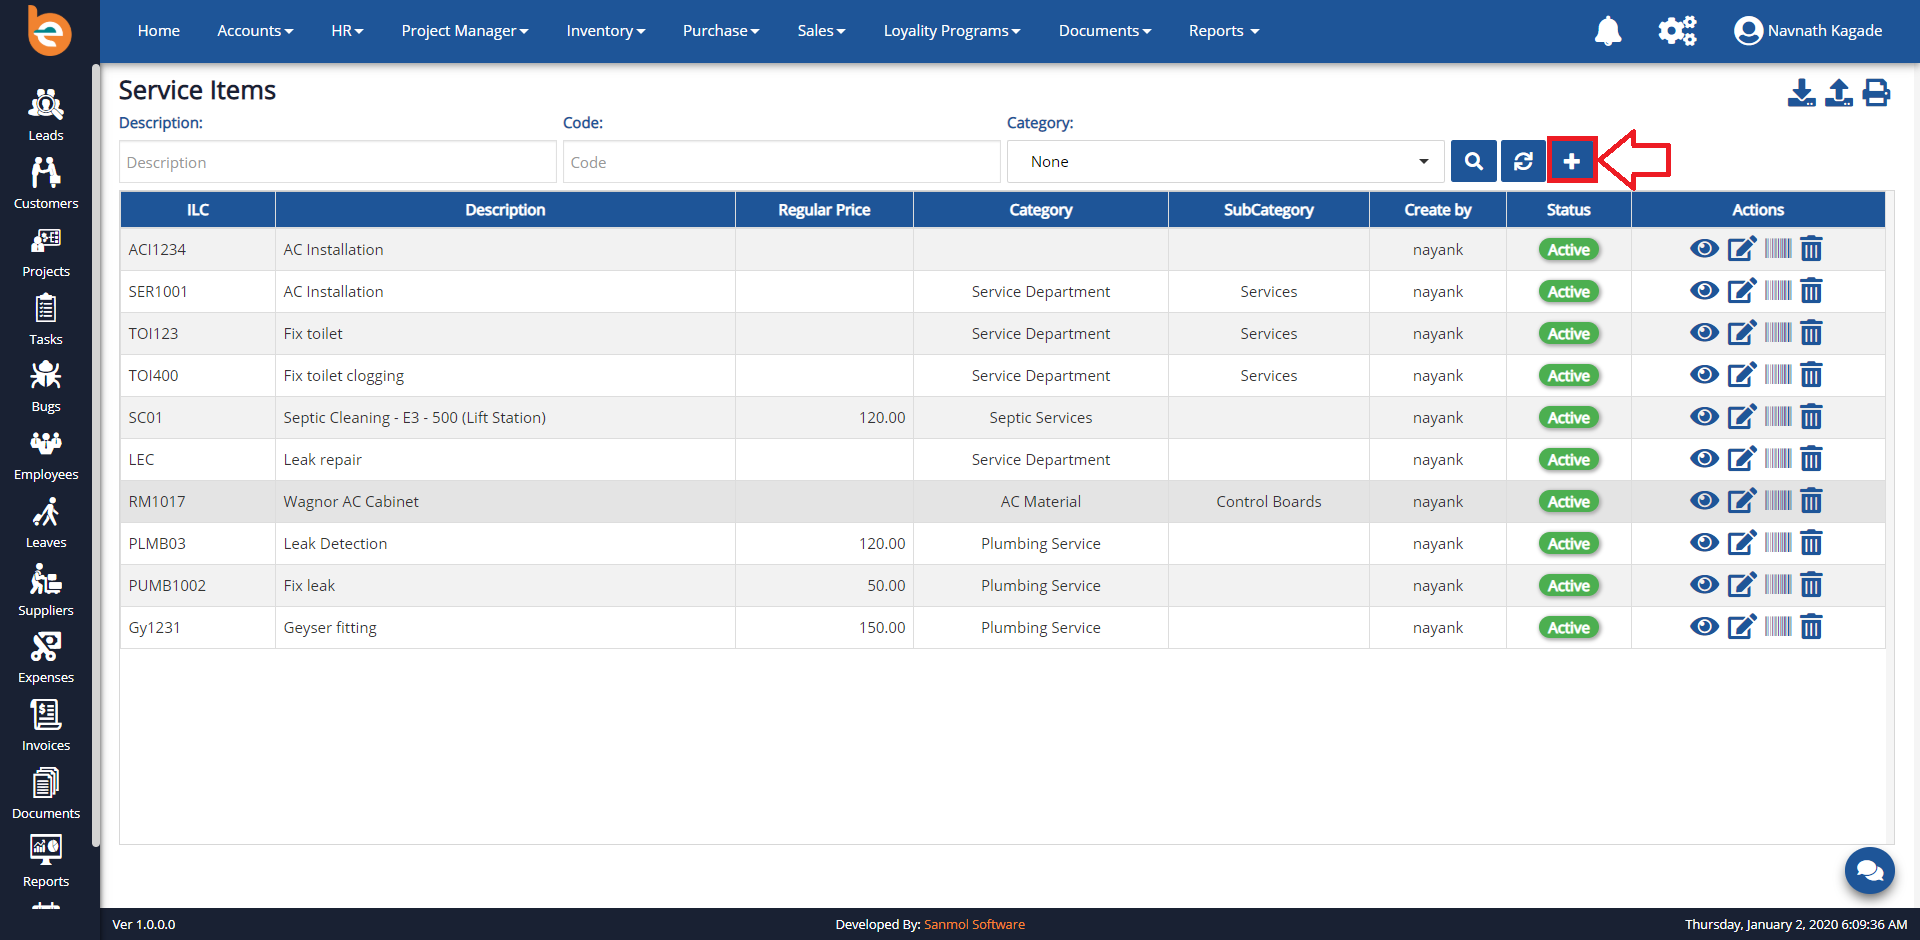
4.9.2 Edit Service Item
If you want to edit service Item description which you have added click on edit button.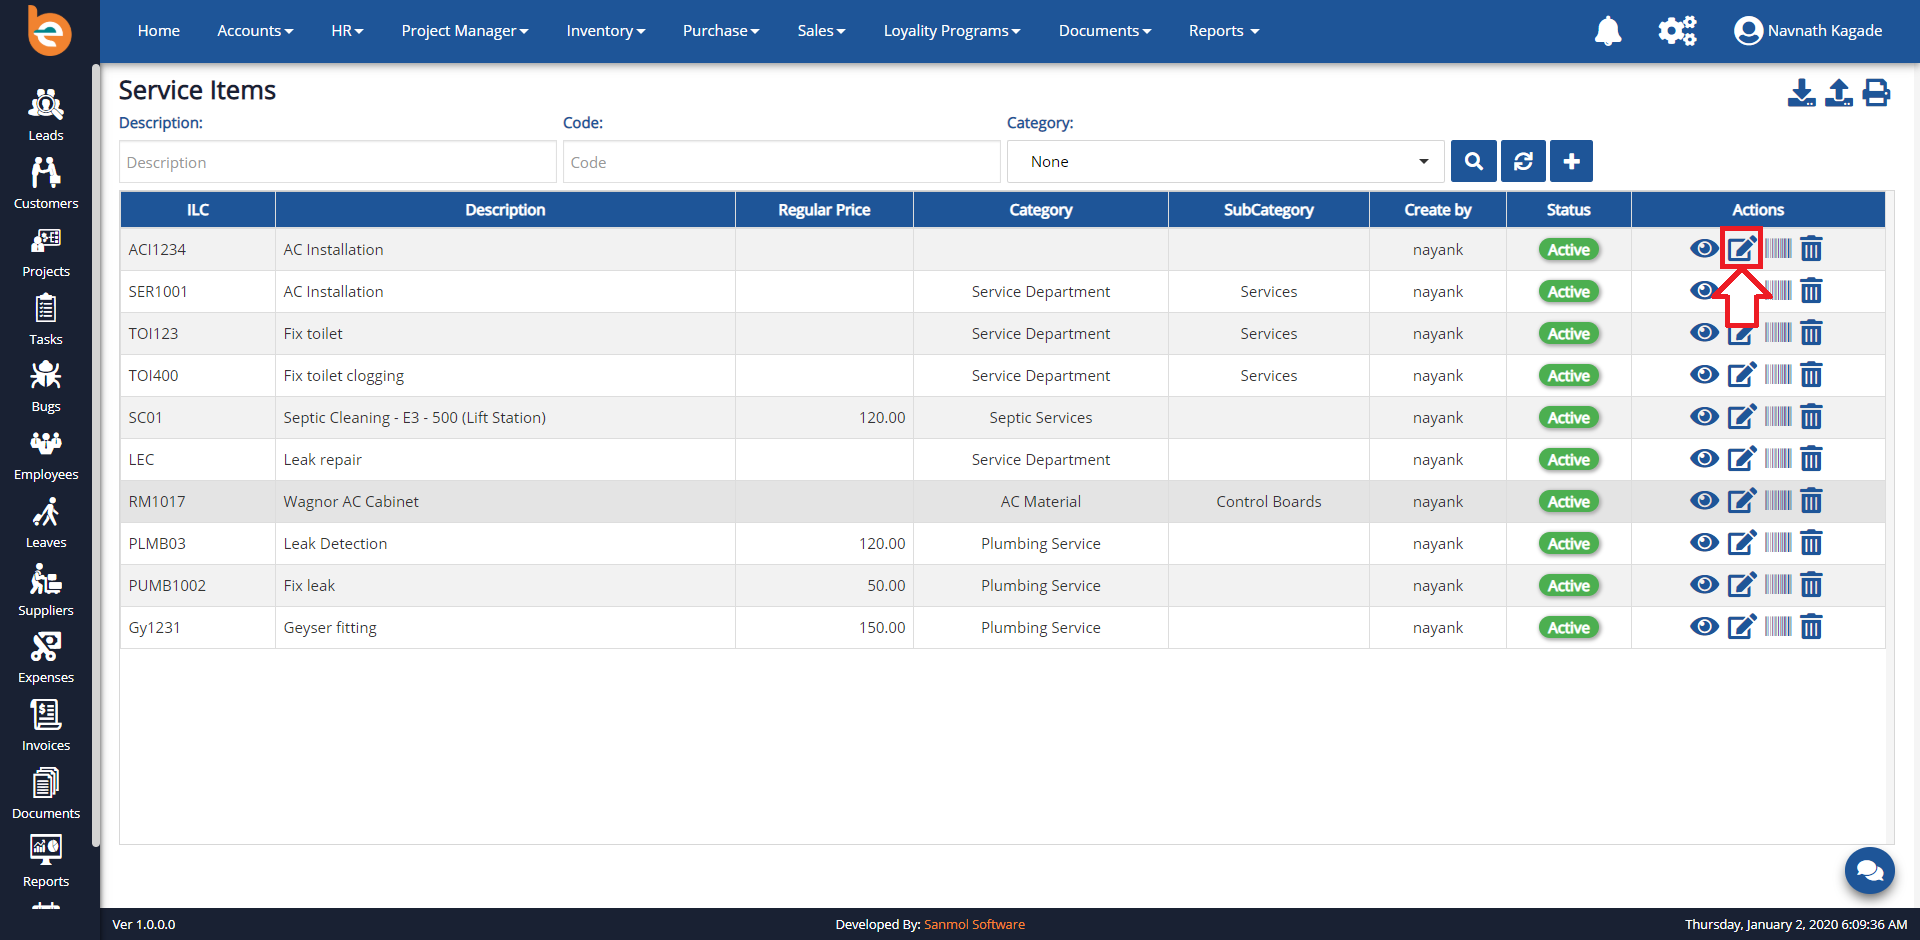
4.9.3 Print ILC
Filled all the details as per requirement and then submit for printing the Main Ilc.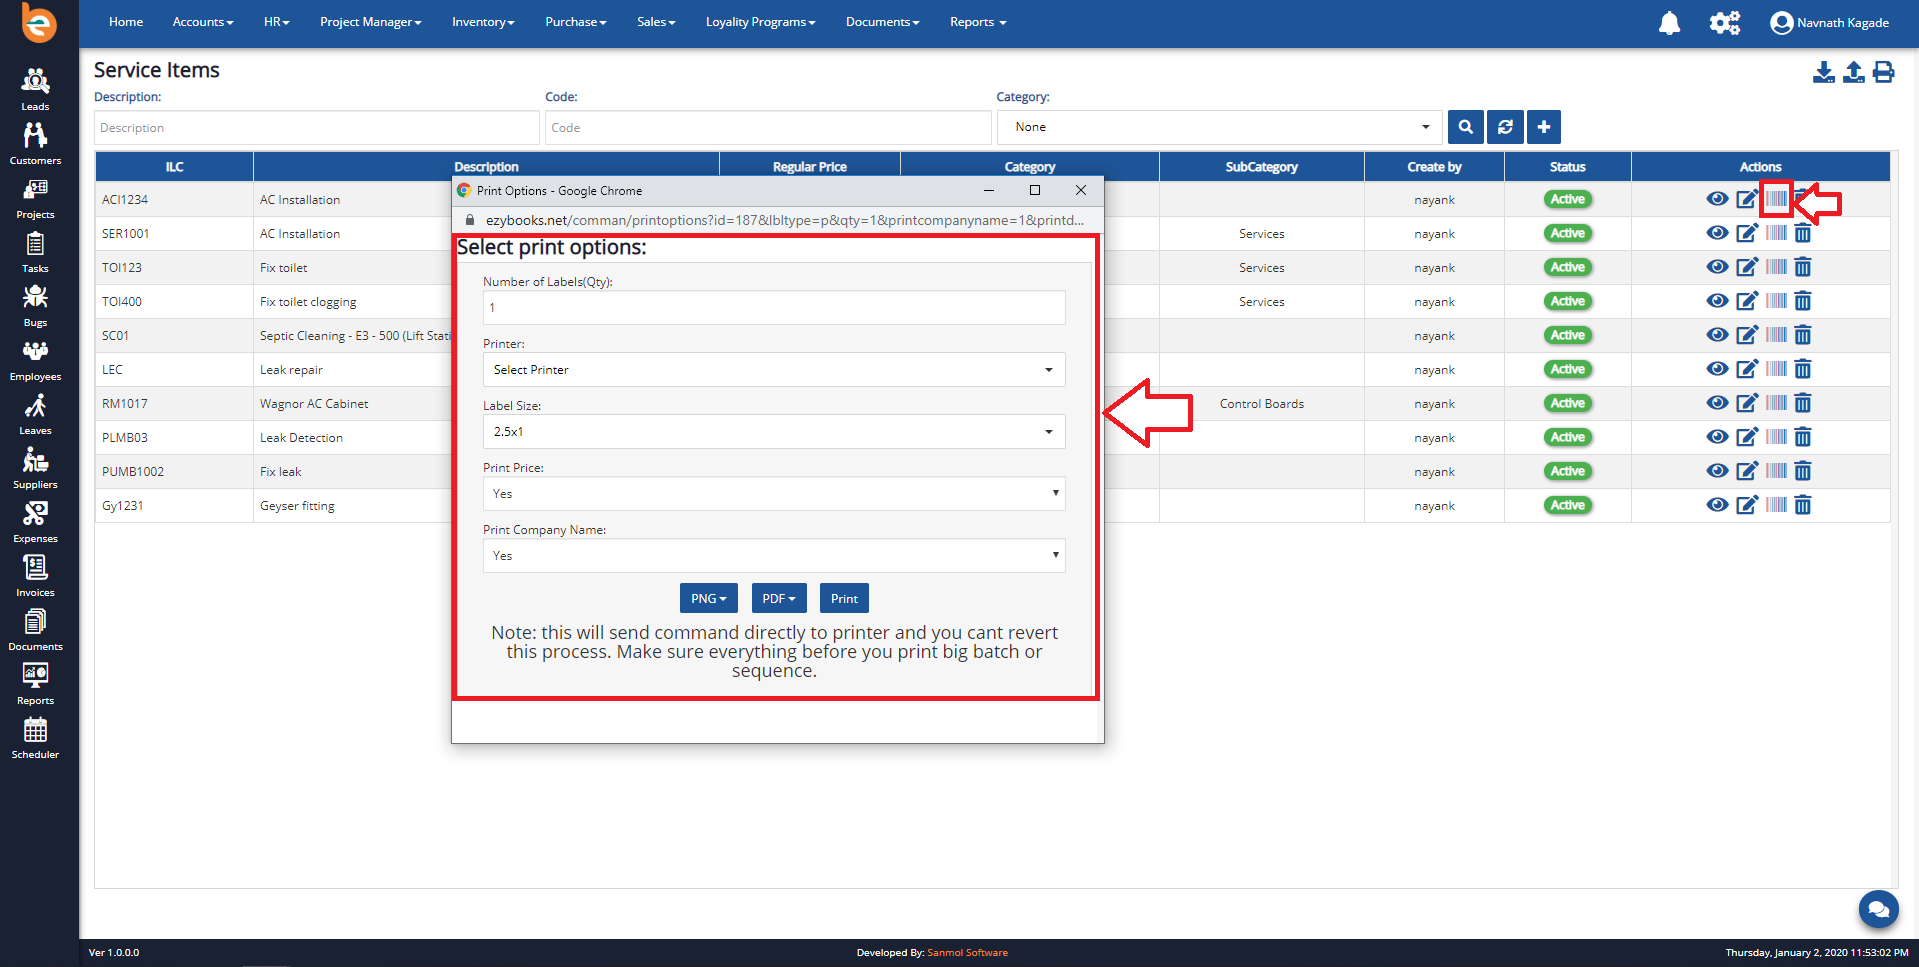
4.9.3 Delete service Item
If you want to delete service Item which you have to click on delete button.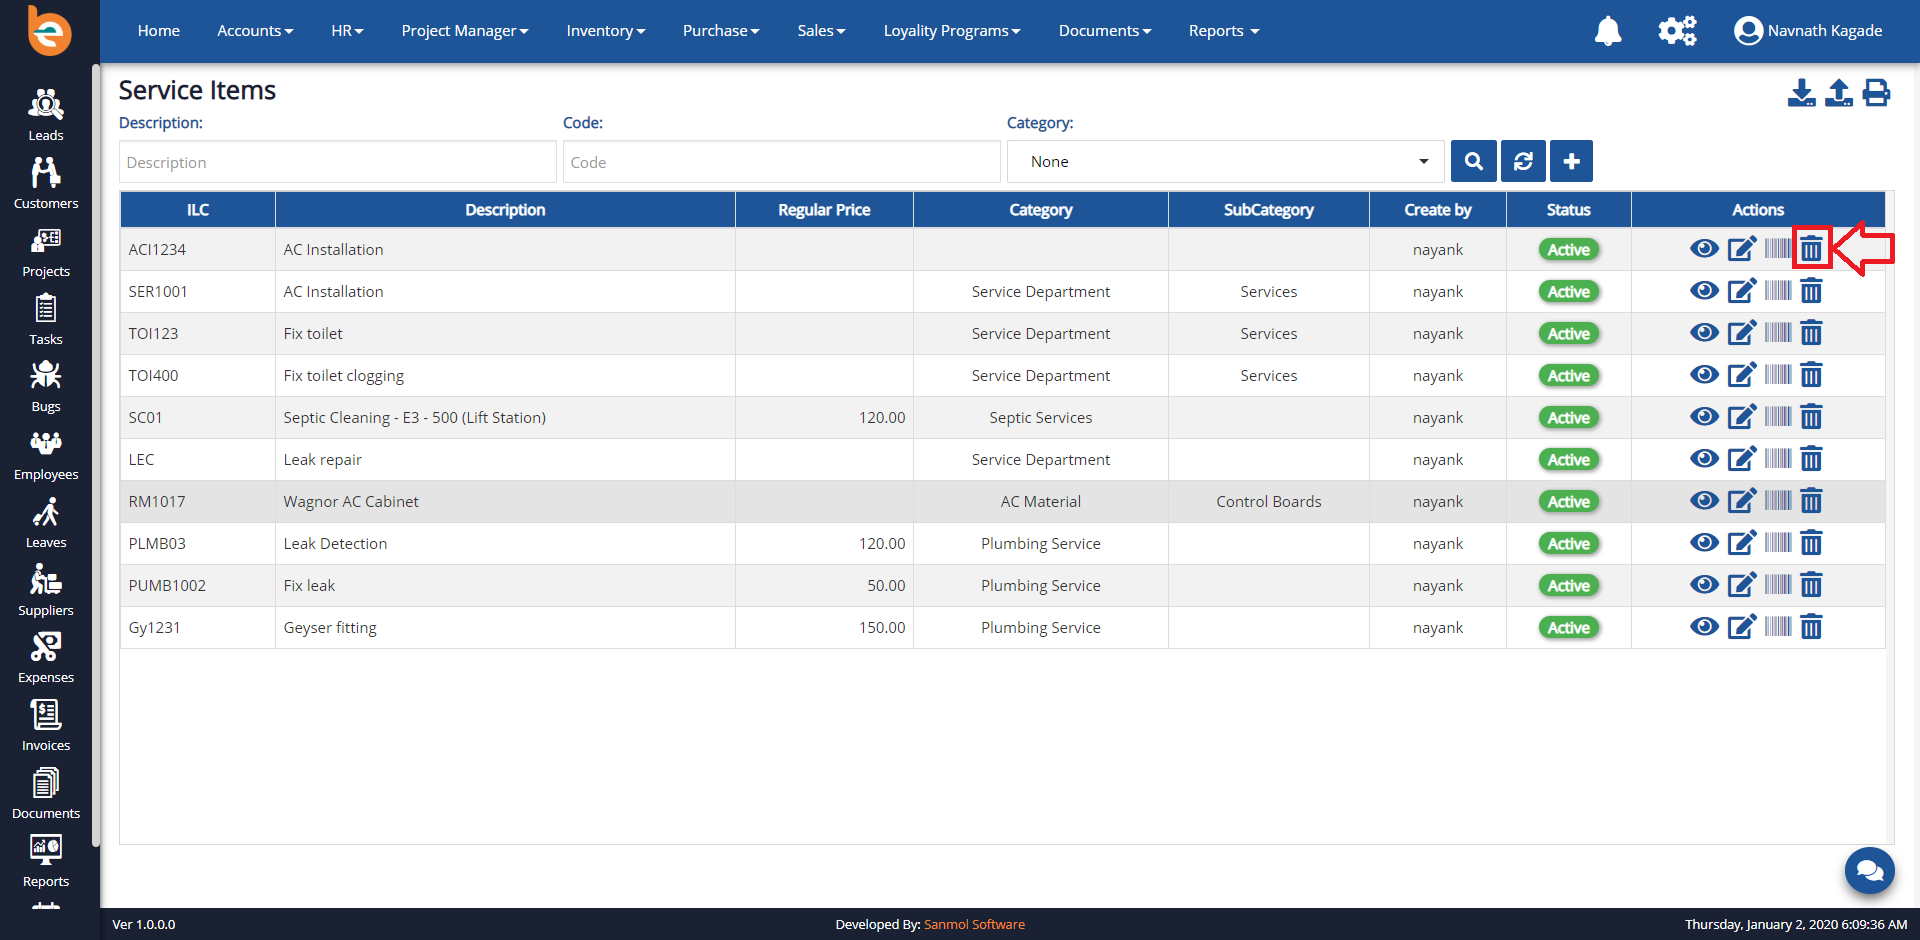
4.9.4 Service Item list
When you added service Item you can see the list of service Item as per following screen.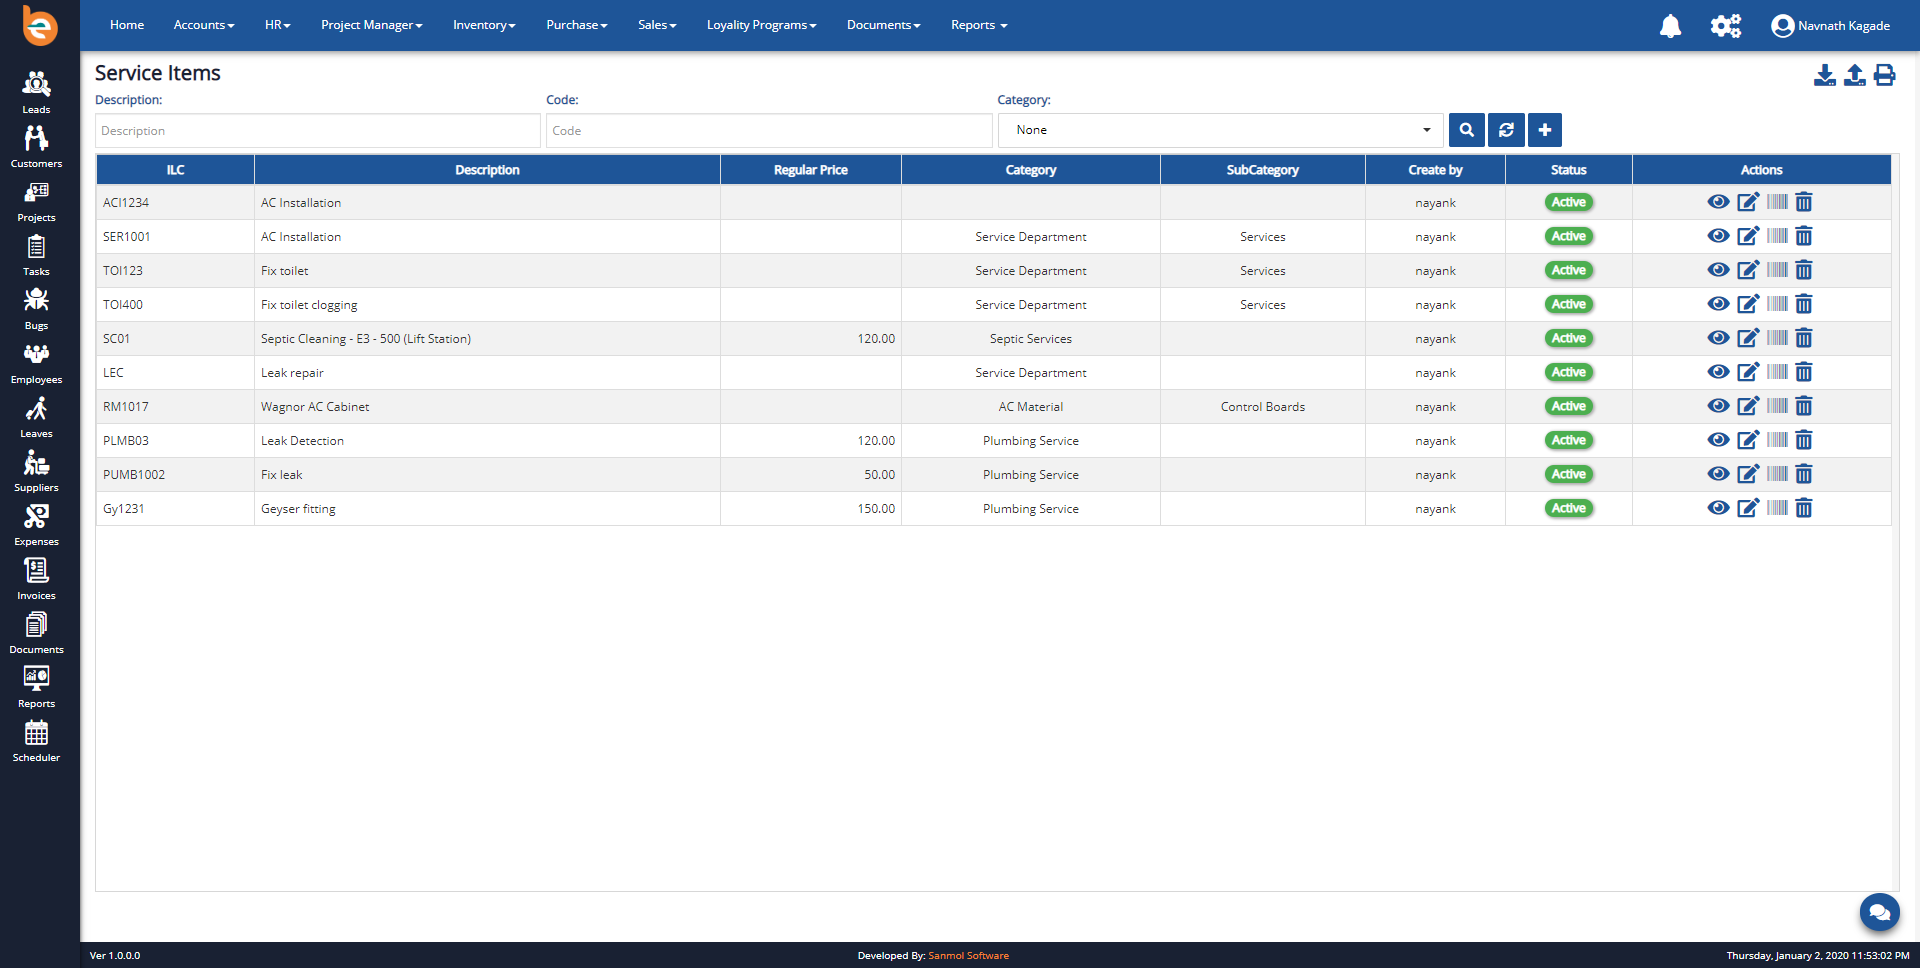
4.10 Print Sequence
Under the Inventory menu you can see the Print sequence option, from where you can add Print sequence. Please follow the following screen.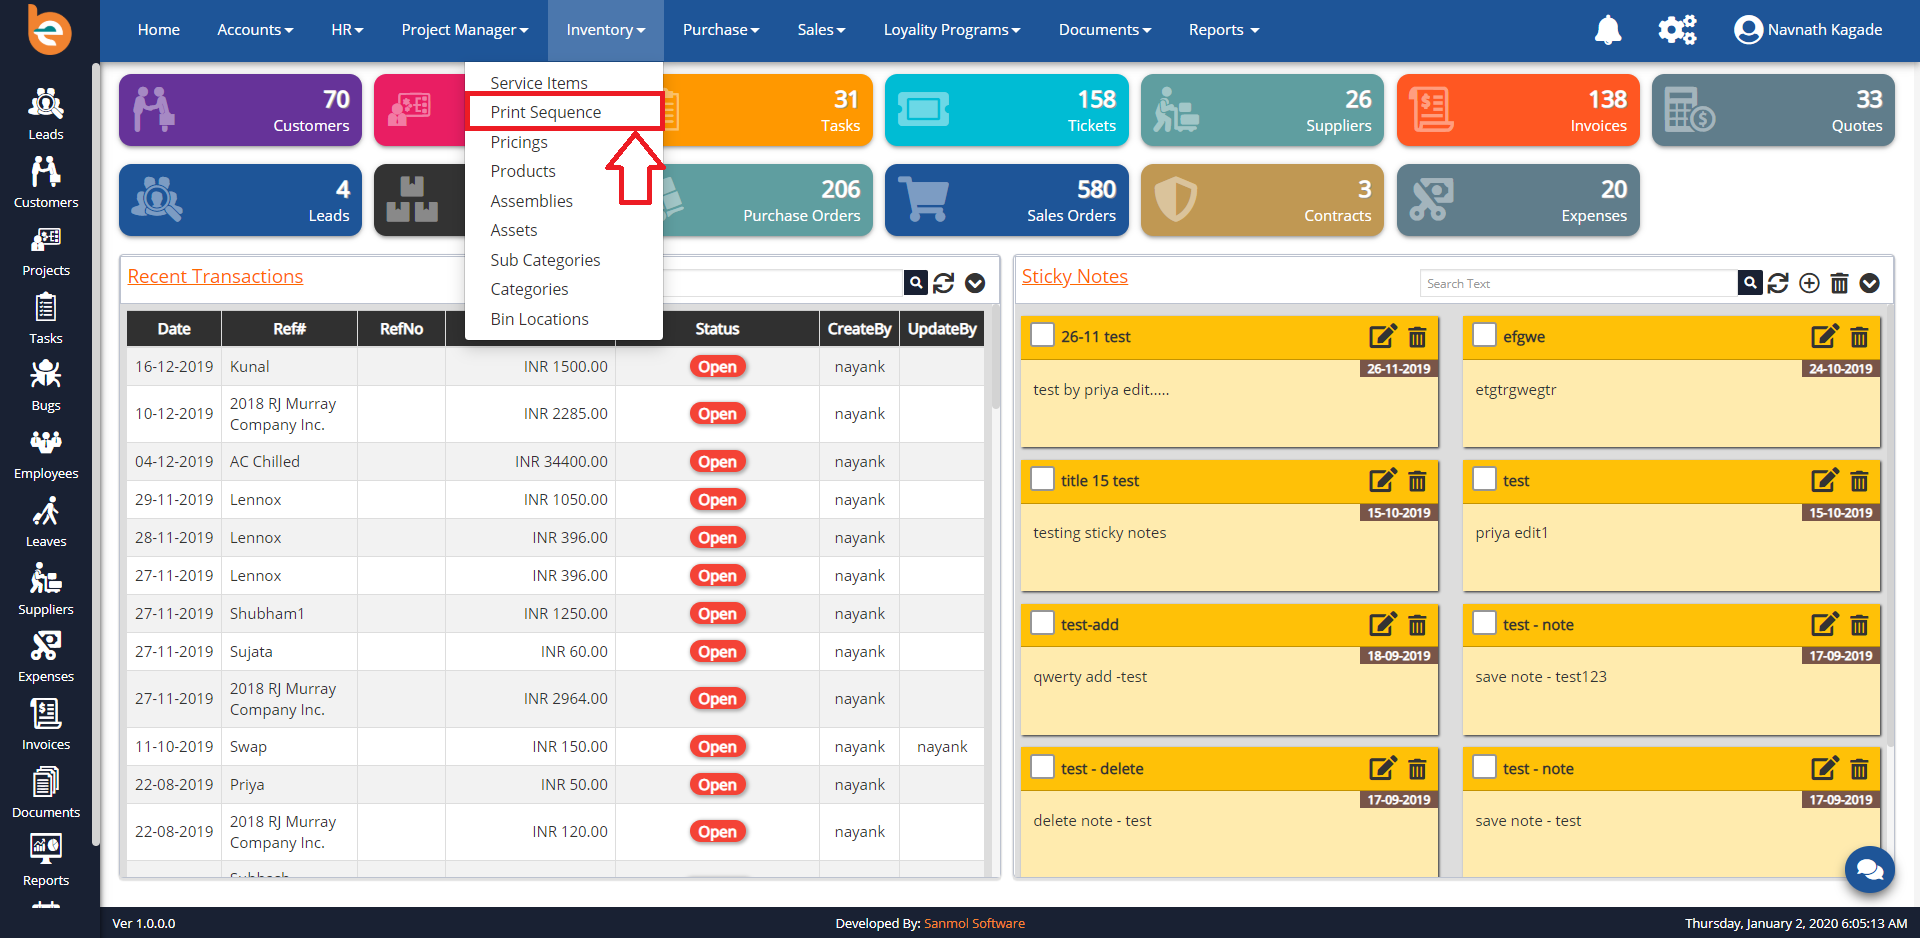
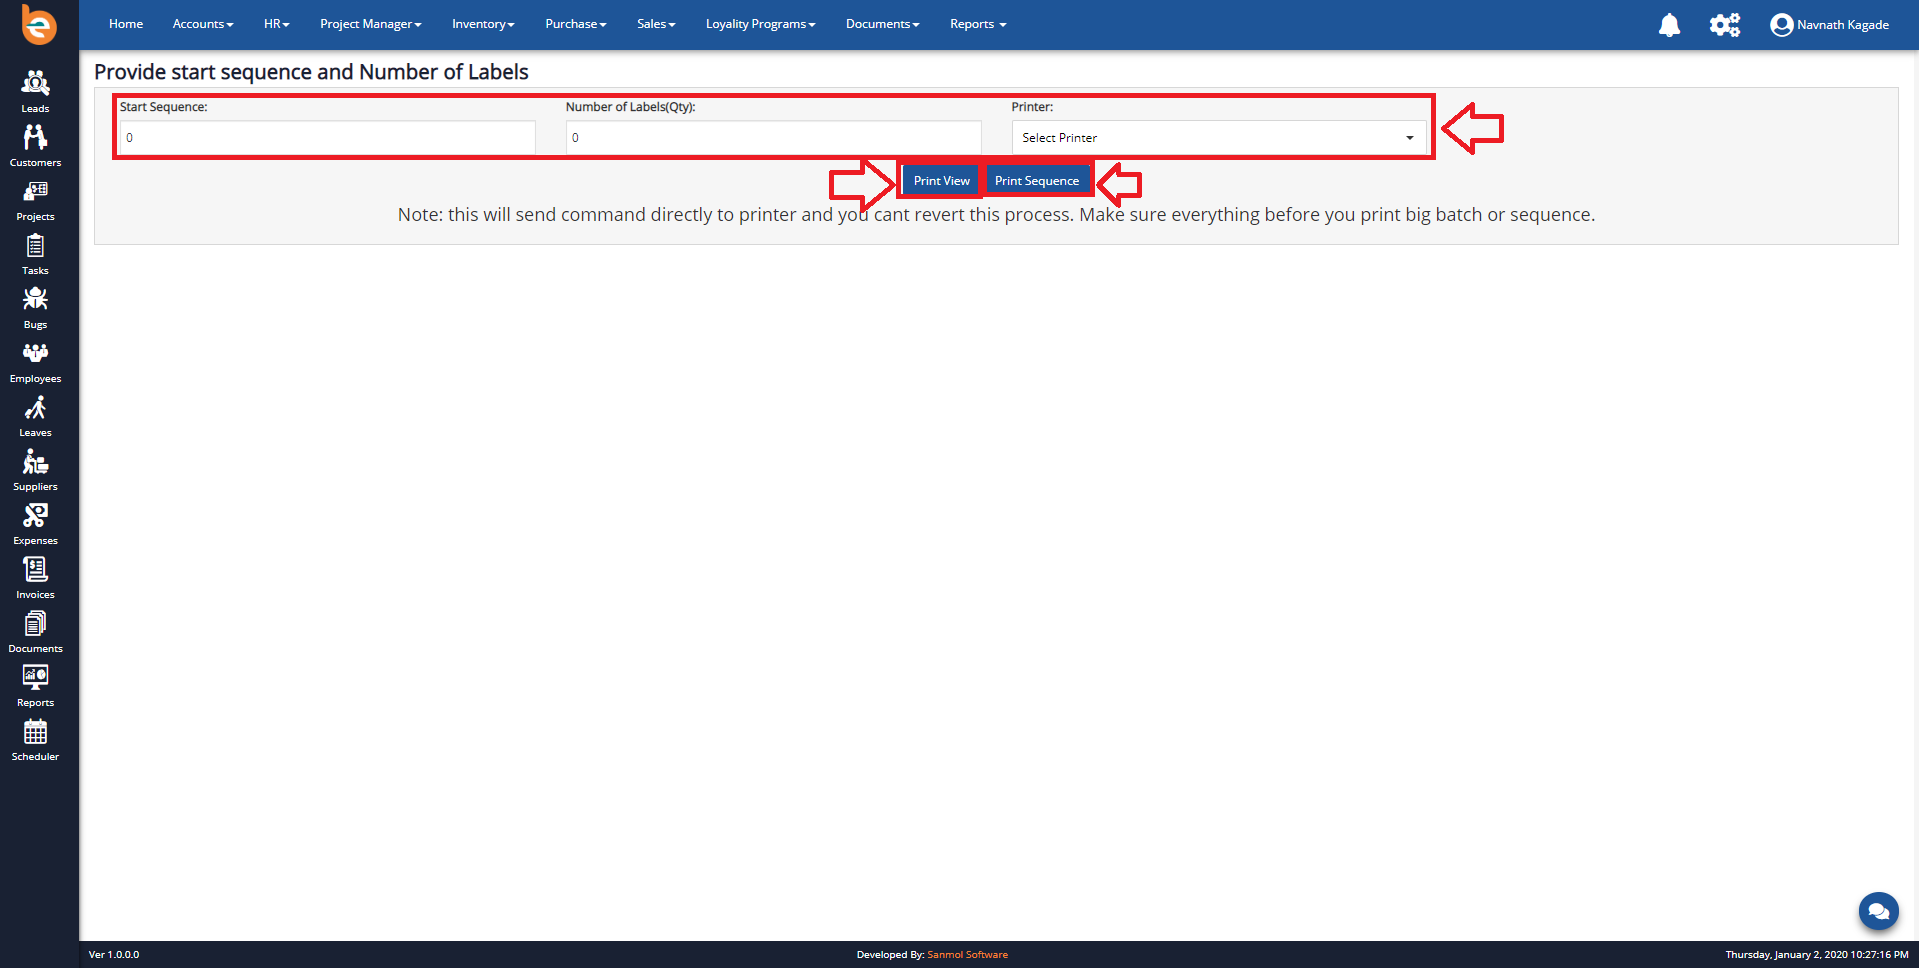
4.10.1 Print sequence
Print sequence Provide start sequence and Number of Labels for the product.Print view - here you can view the print
print sequence - here you can take the print
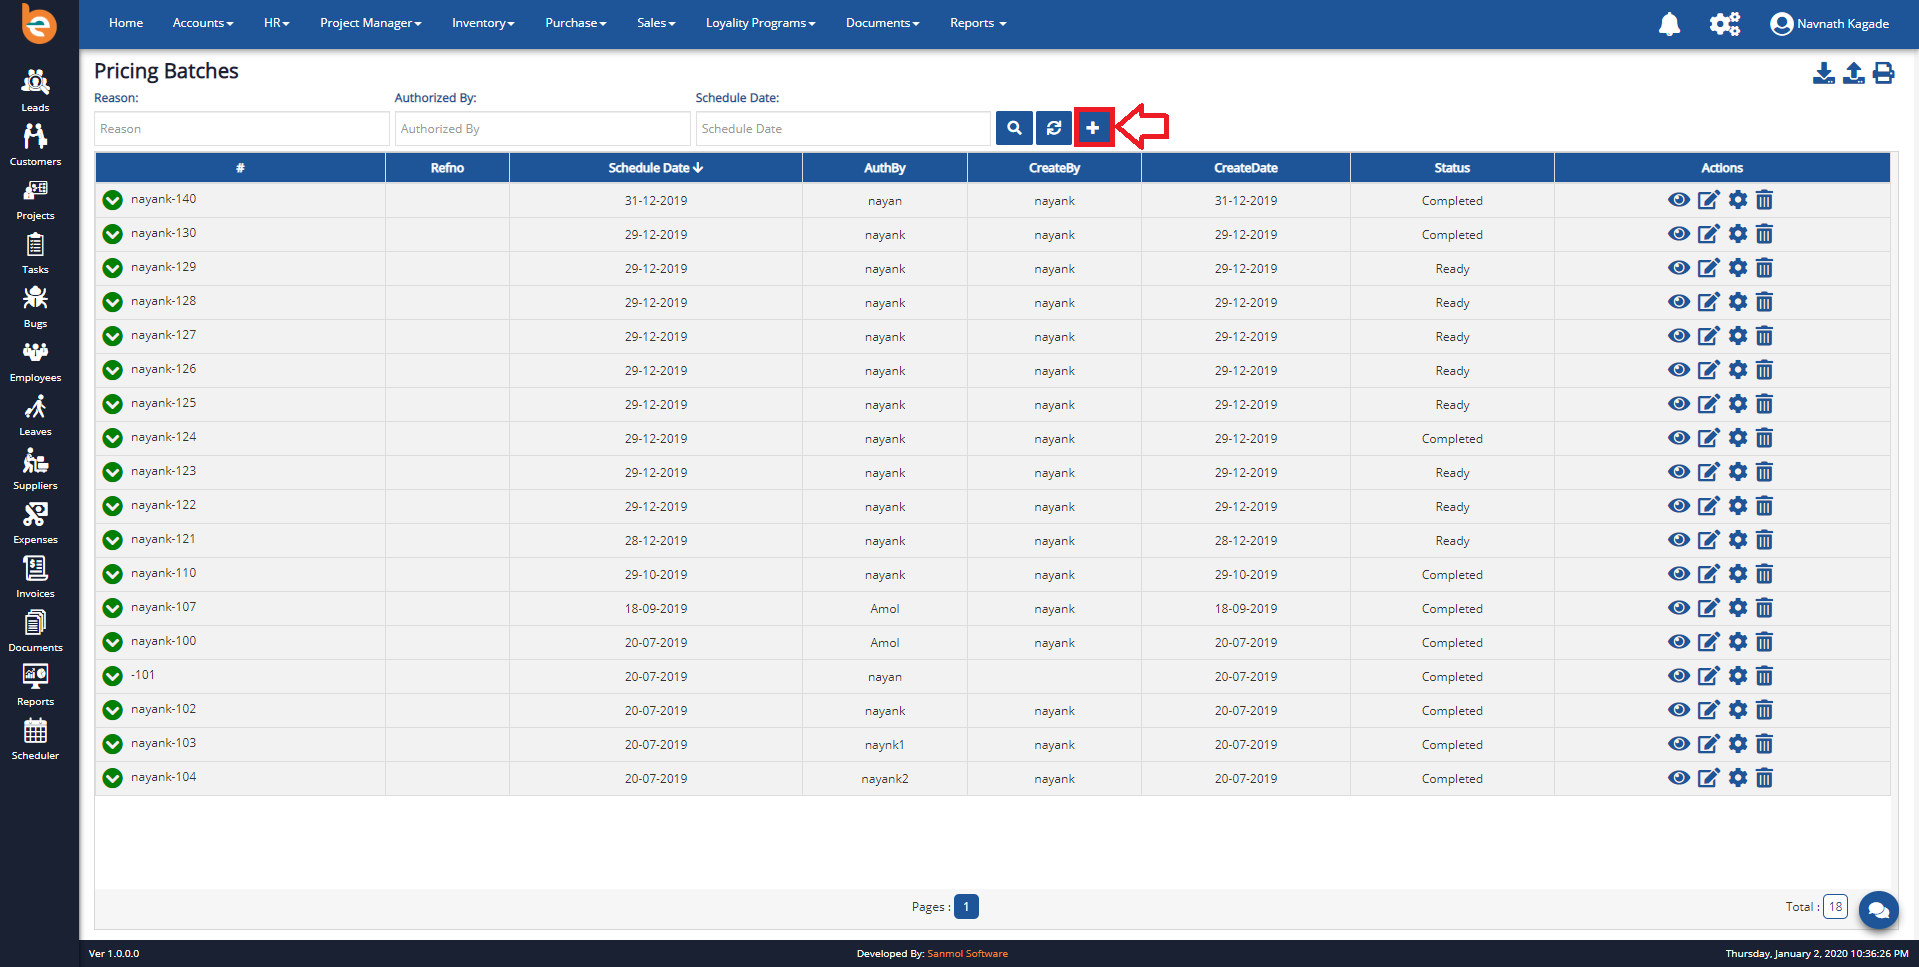
4.11 Pricing Batches
Under the Inventory menu you can see the Pricing option, from where you can add Pricing Batches. Please follow the following screen.
4.11.1 Add New Pricing Batches
When you click on the Pricing option from the menu, you can see screen as per follows, there is plus icon for adding new Pricing Batches.Fill all the details.
Put the Ilc code of the particular product for which you want to update the price.
4.11.2 Edit Pricing Batches
If you want to edit Pricing Batches description which you have added click on edit button.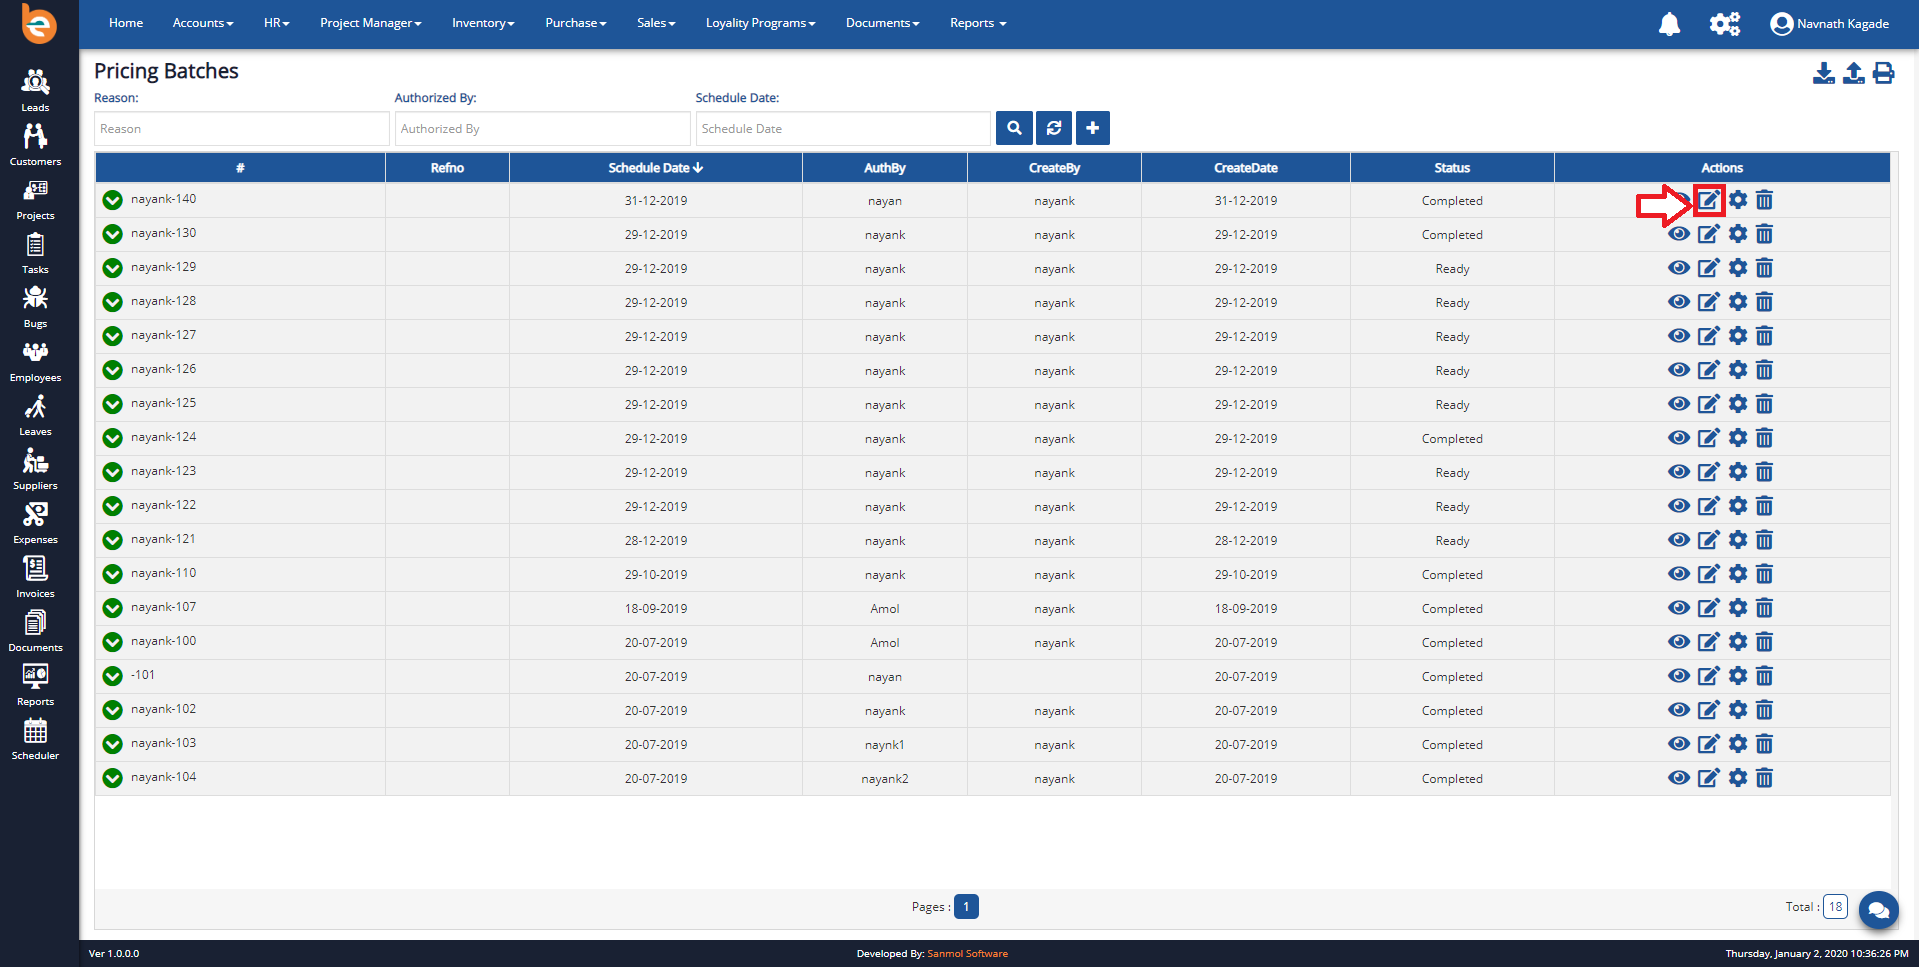
4.11.3 Apply Price changes
These button is to approve the updated price of the product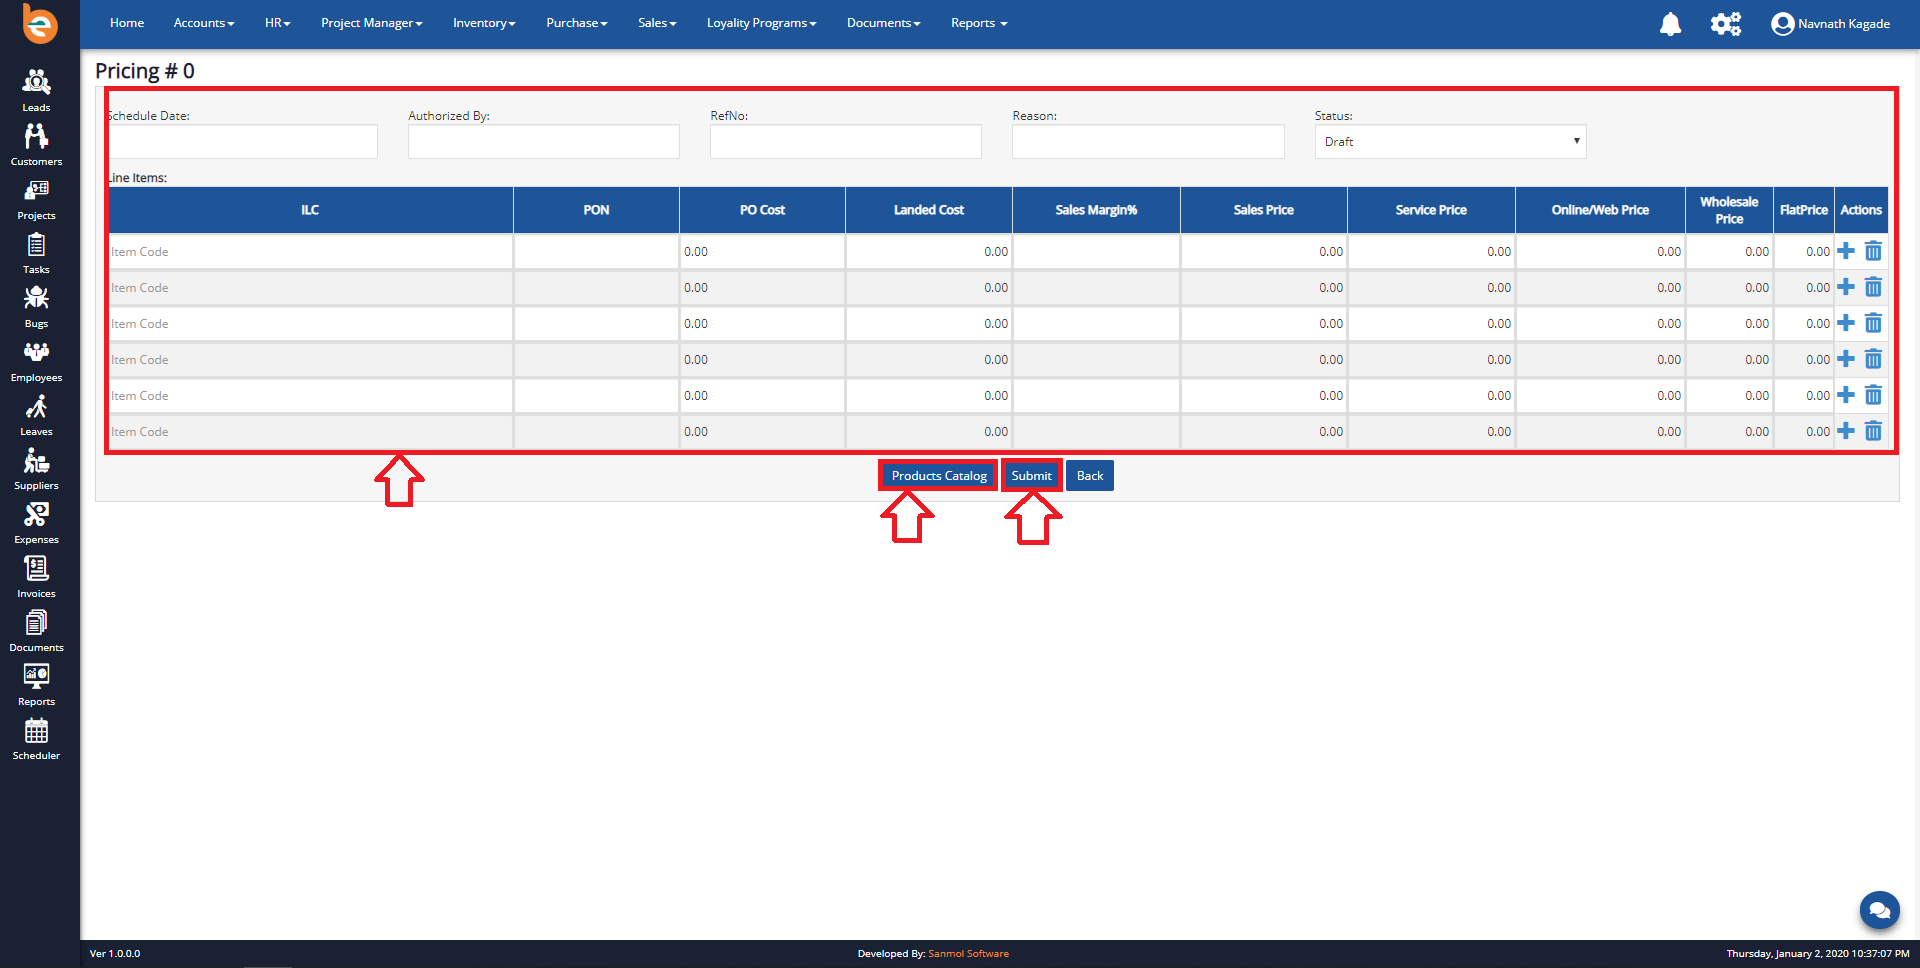
4.11.4 Delete Pricing Batches
If you want to delere Pricing Batches description which you have added click on delete button.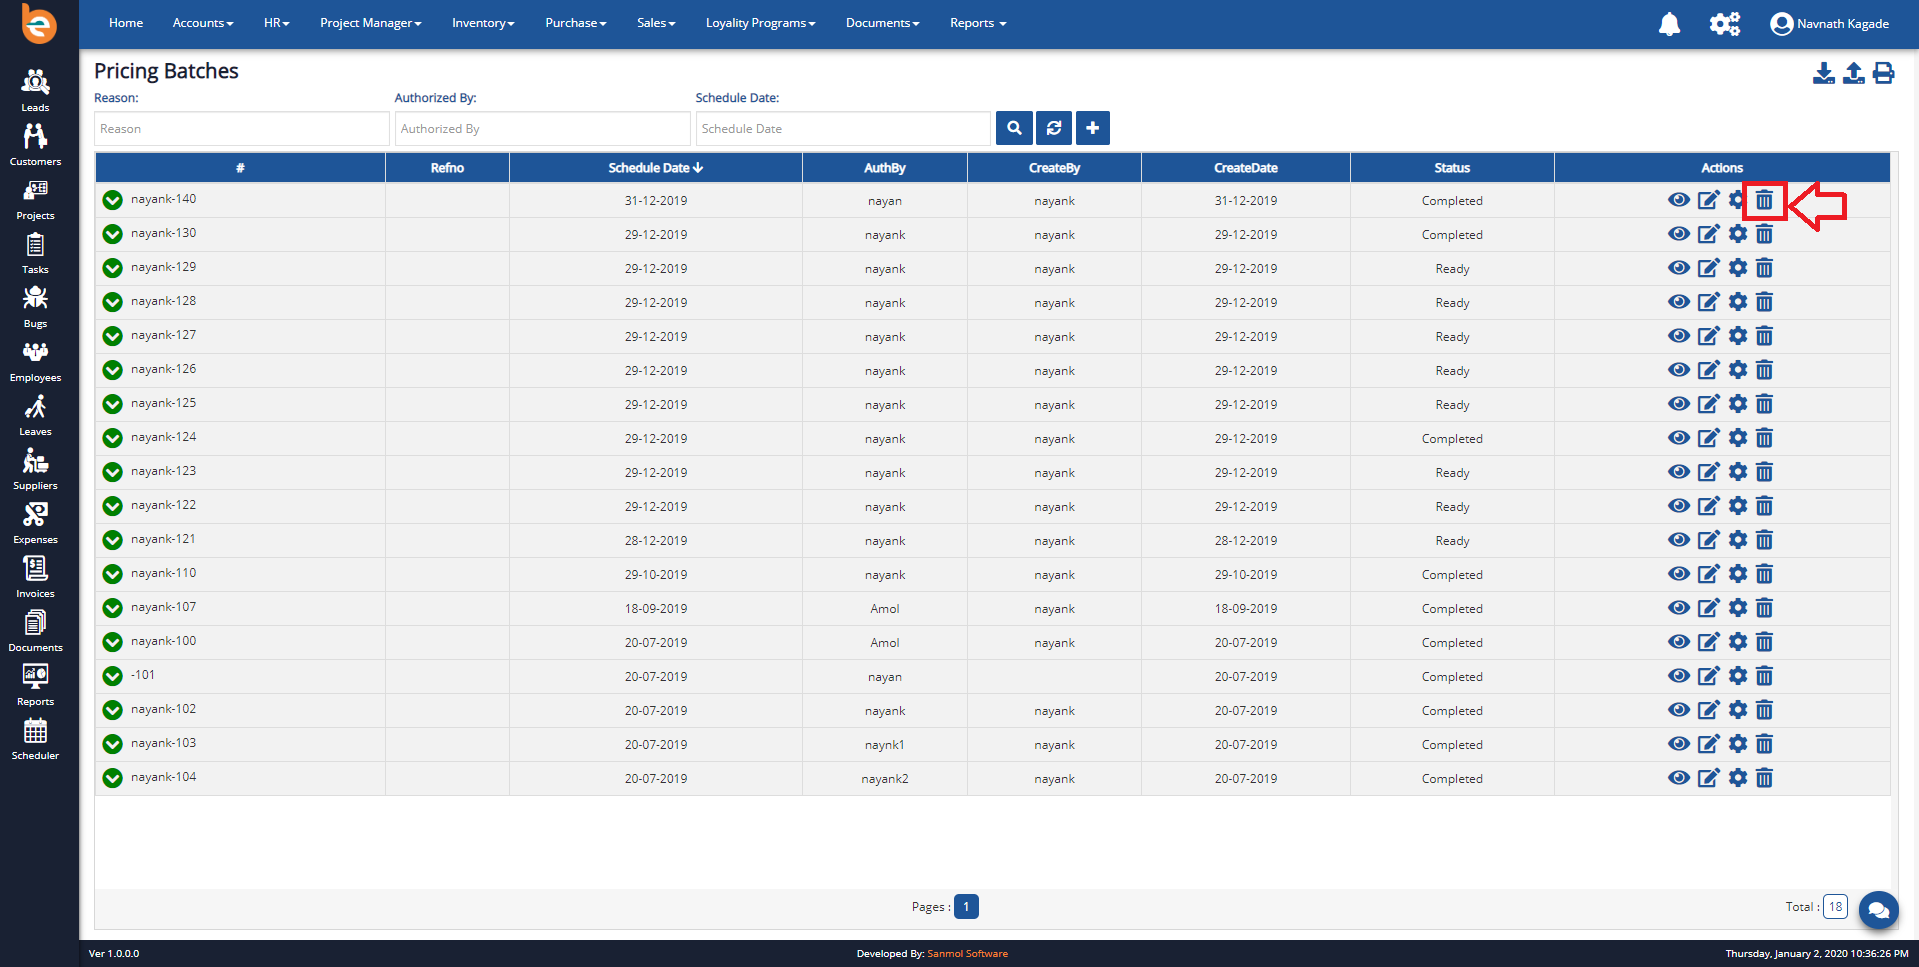
4.12 Assemblies
Under the Inventory menu you can see the Assembly, from where you can add Assembliy Product. Please follow the following screen.
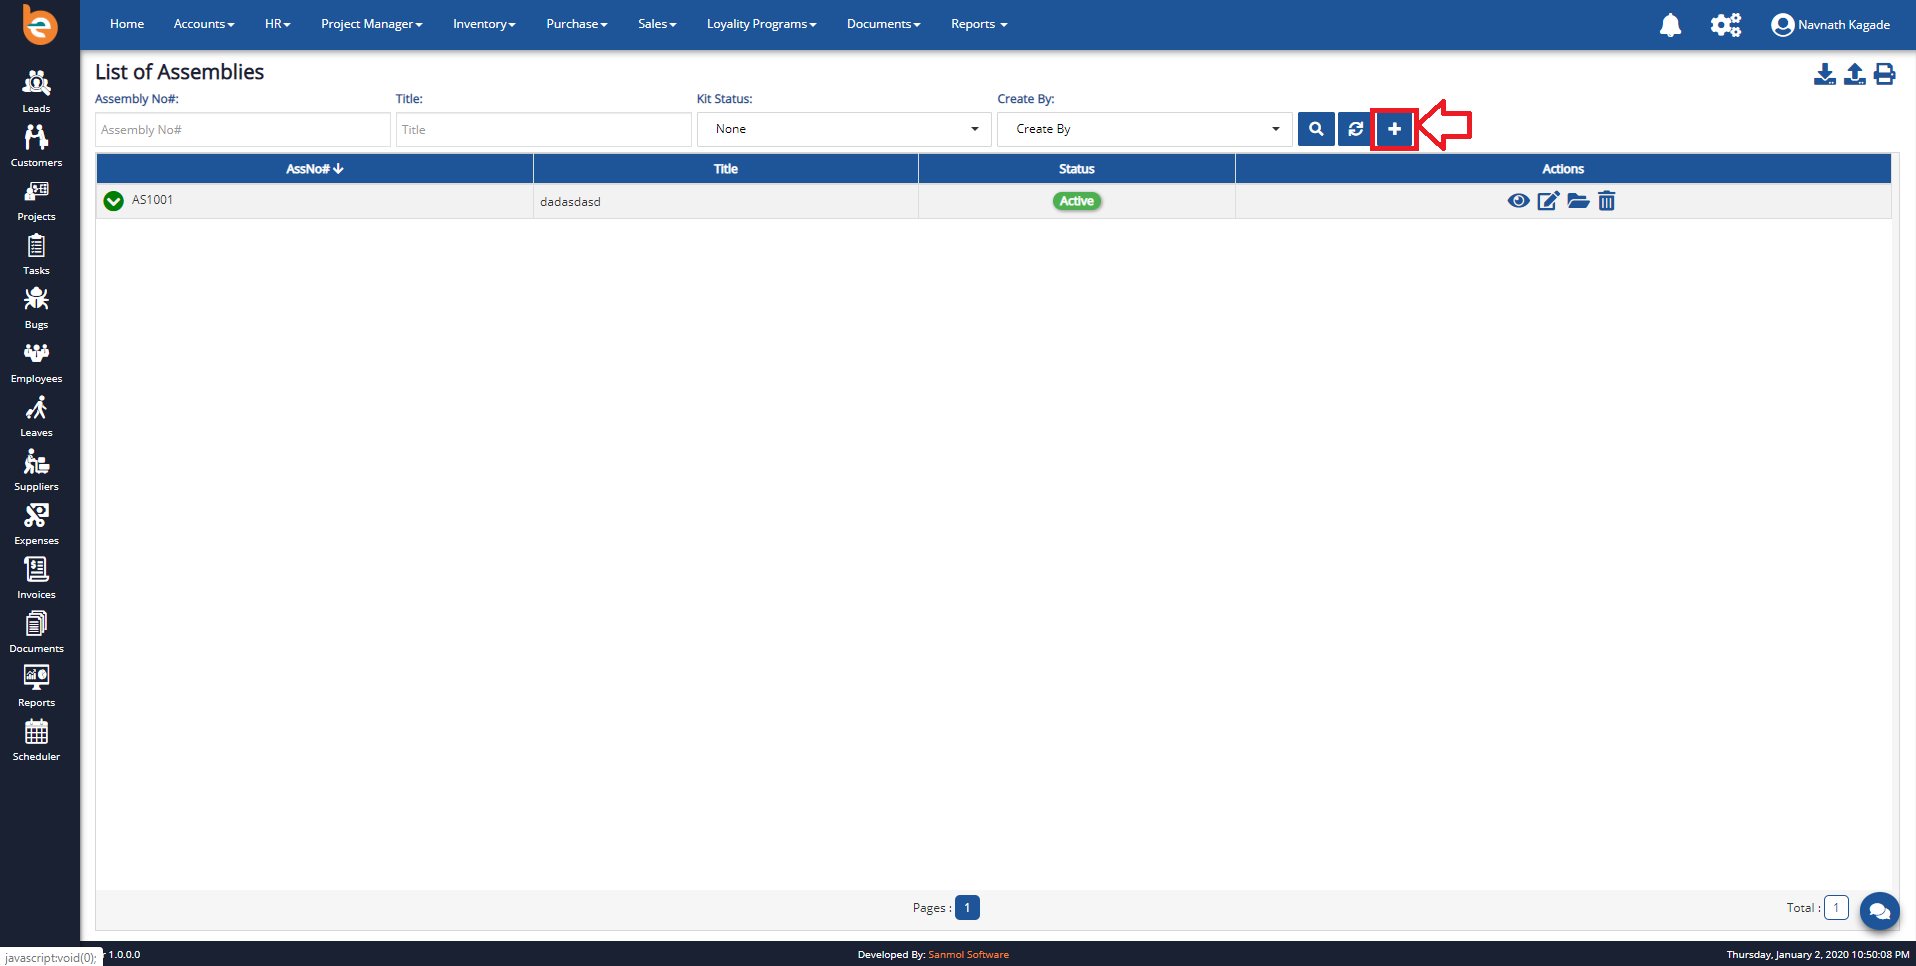
4.12.1 Add new Assembly
When you click on the Assembly from the menu, you can see screen as per follows, there is plus icon for adding new Assembly.Fill all the details.
Put the Ilc code of the particular products for which you want to assemble.
Assemble is nothing but the kit of particular product or you can say combination of product in one assembly.
4.12.3 Edit Assembly
If you want to edit assembly description which you have added click on edit button.
4.12.4 Document manager
Here we can keep the Document related to the Products also we can keep a copy if any.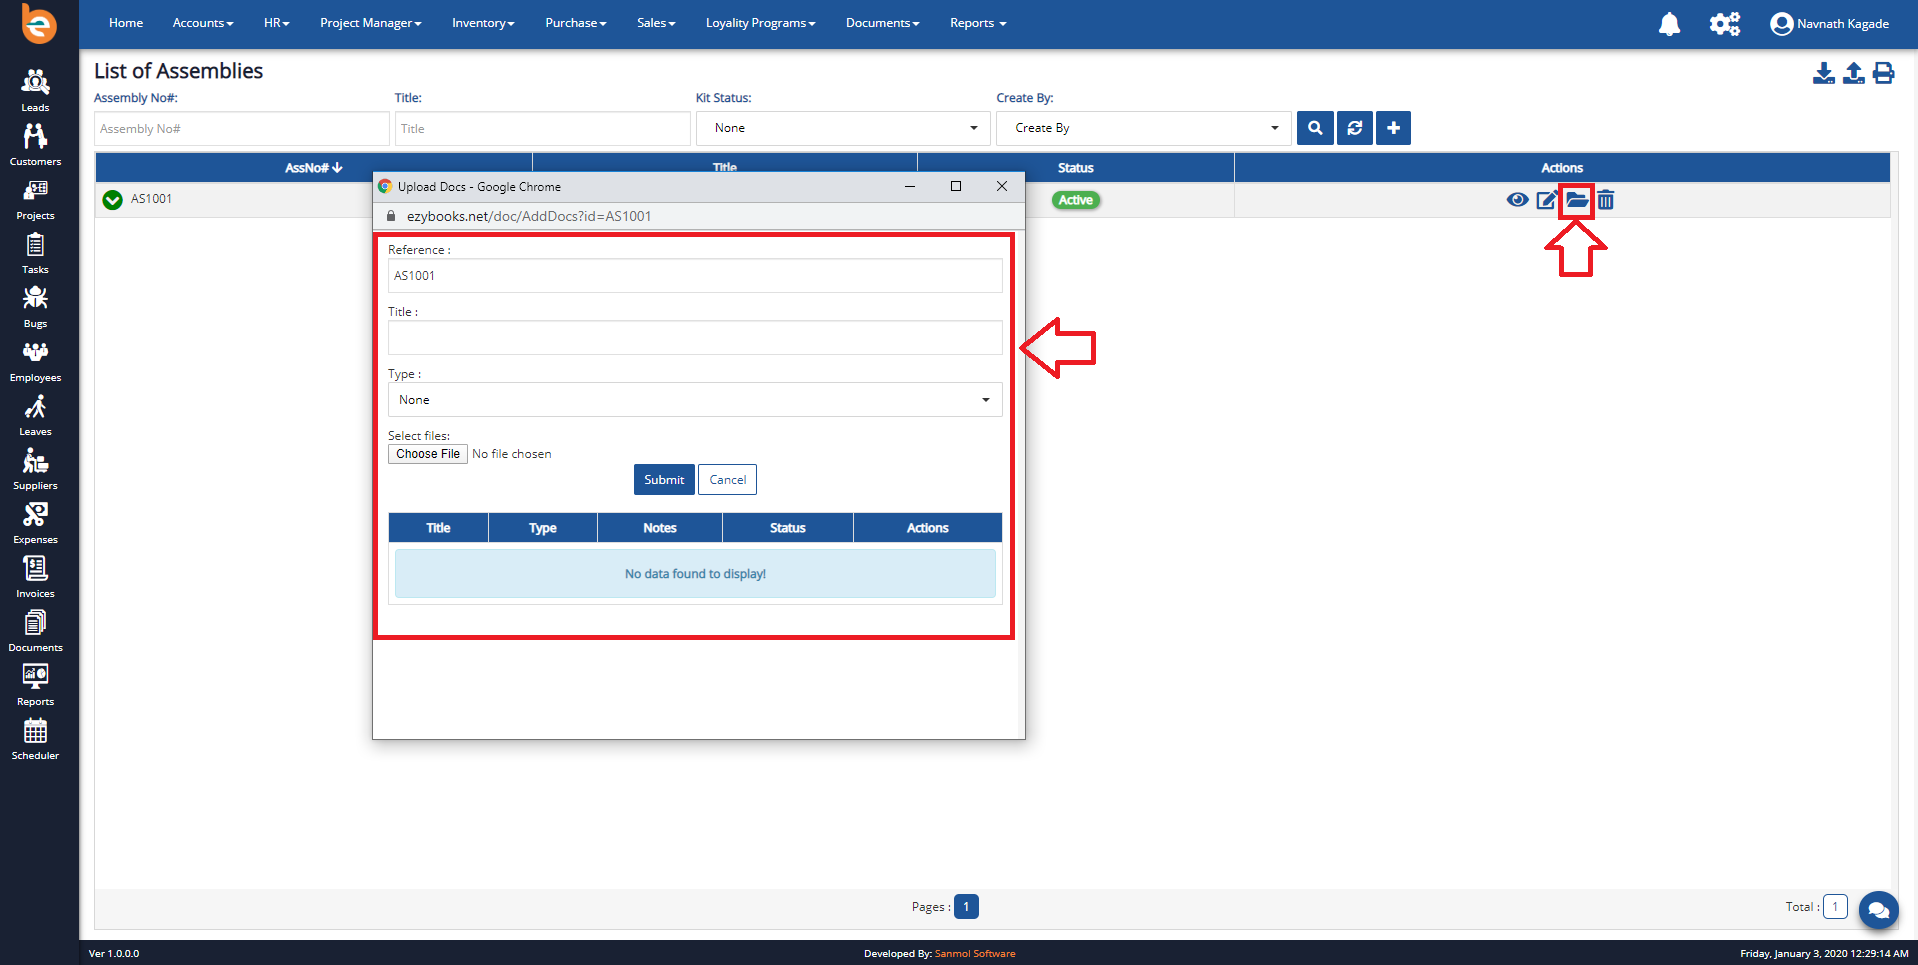
4.12.4 Delete Assembly
If you want to Delete assembly description which you have added click on Delete button.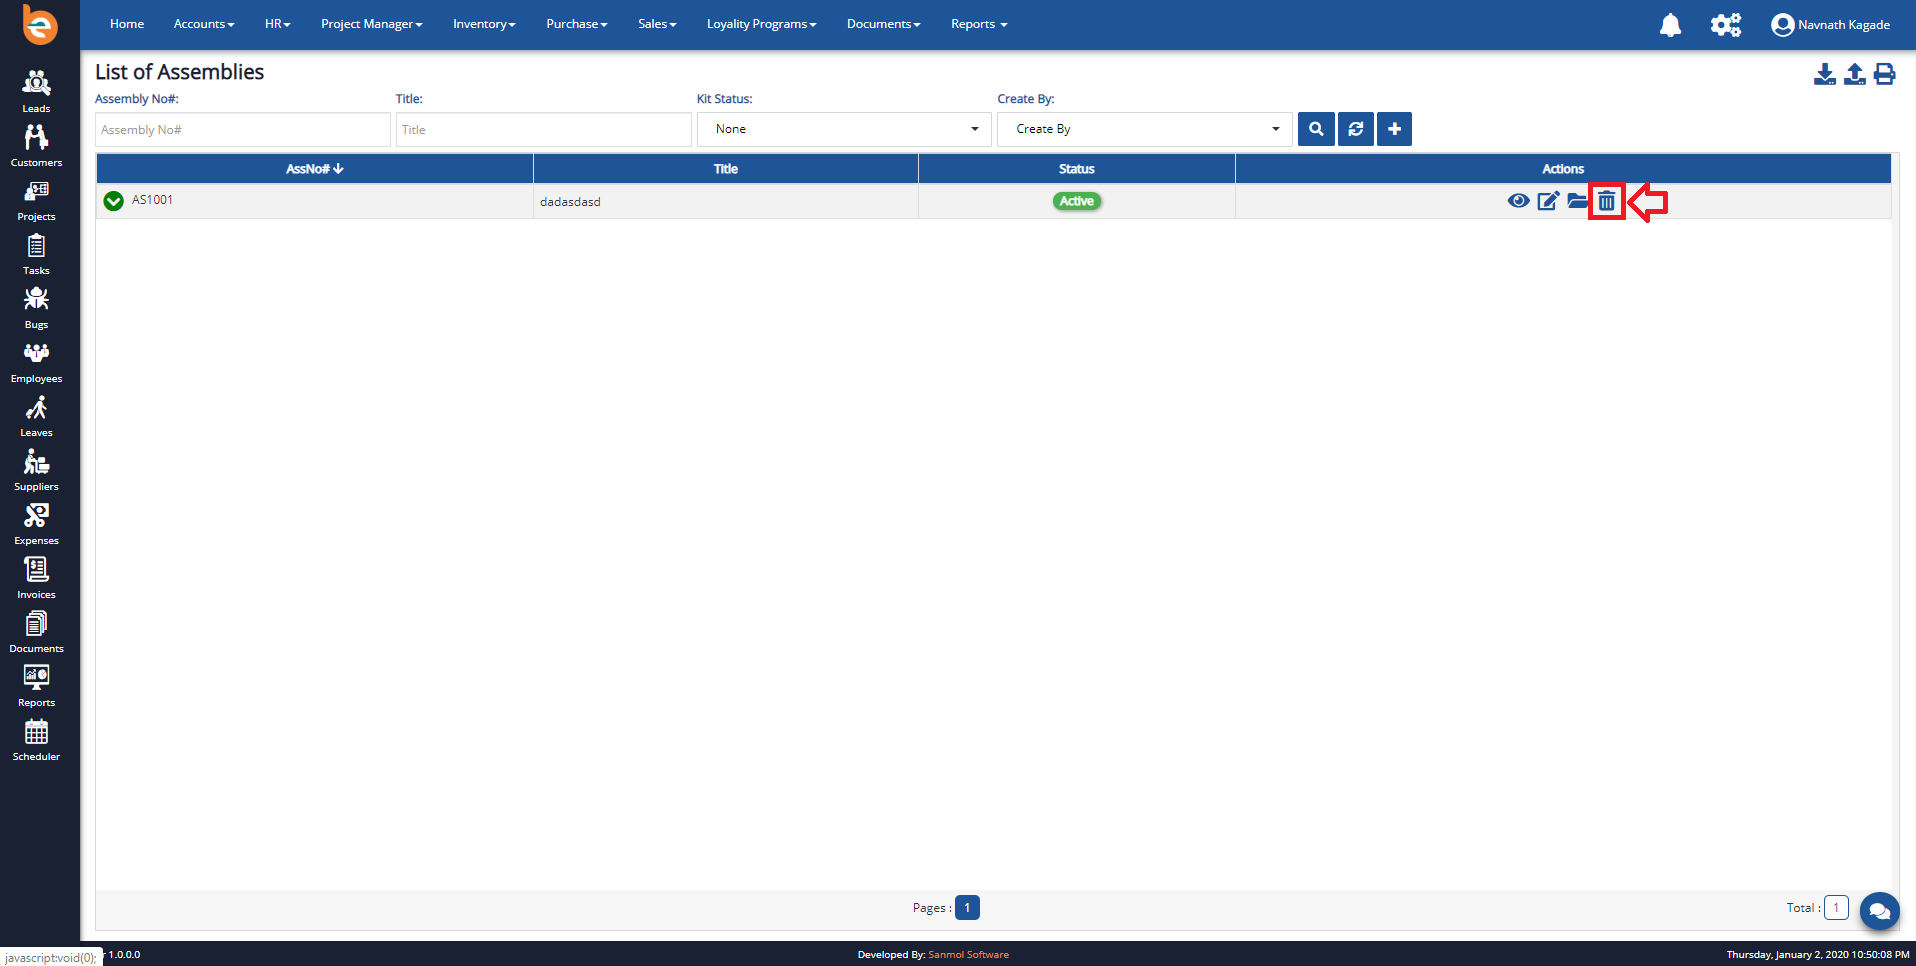
5 Declarations
Click on the Purchase main menu you will get Declaration option click on that, please check following screenshot.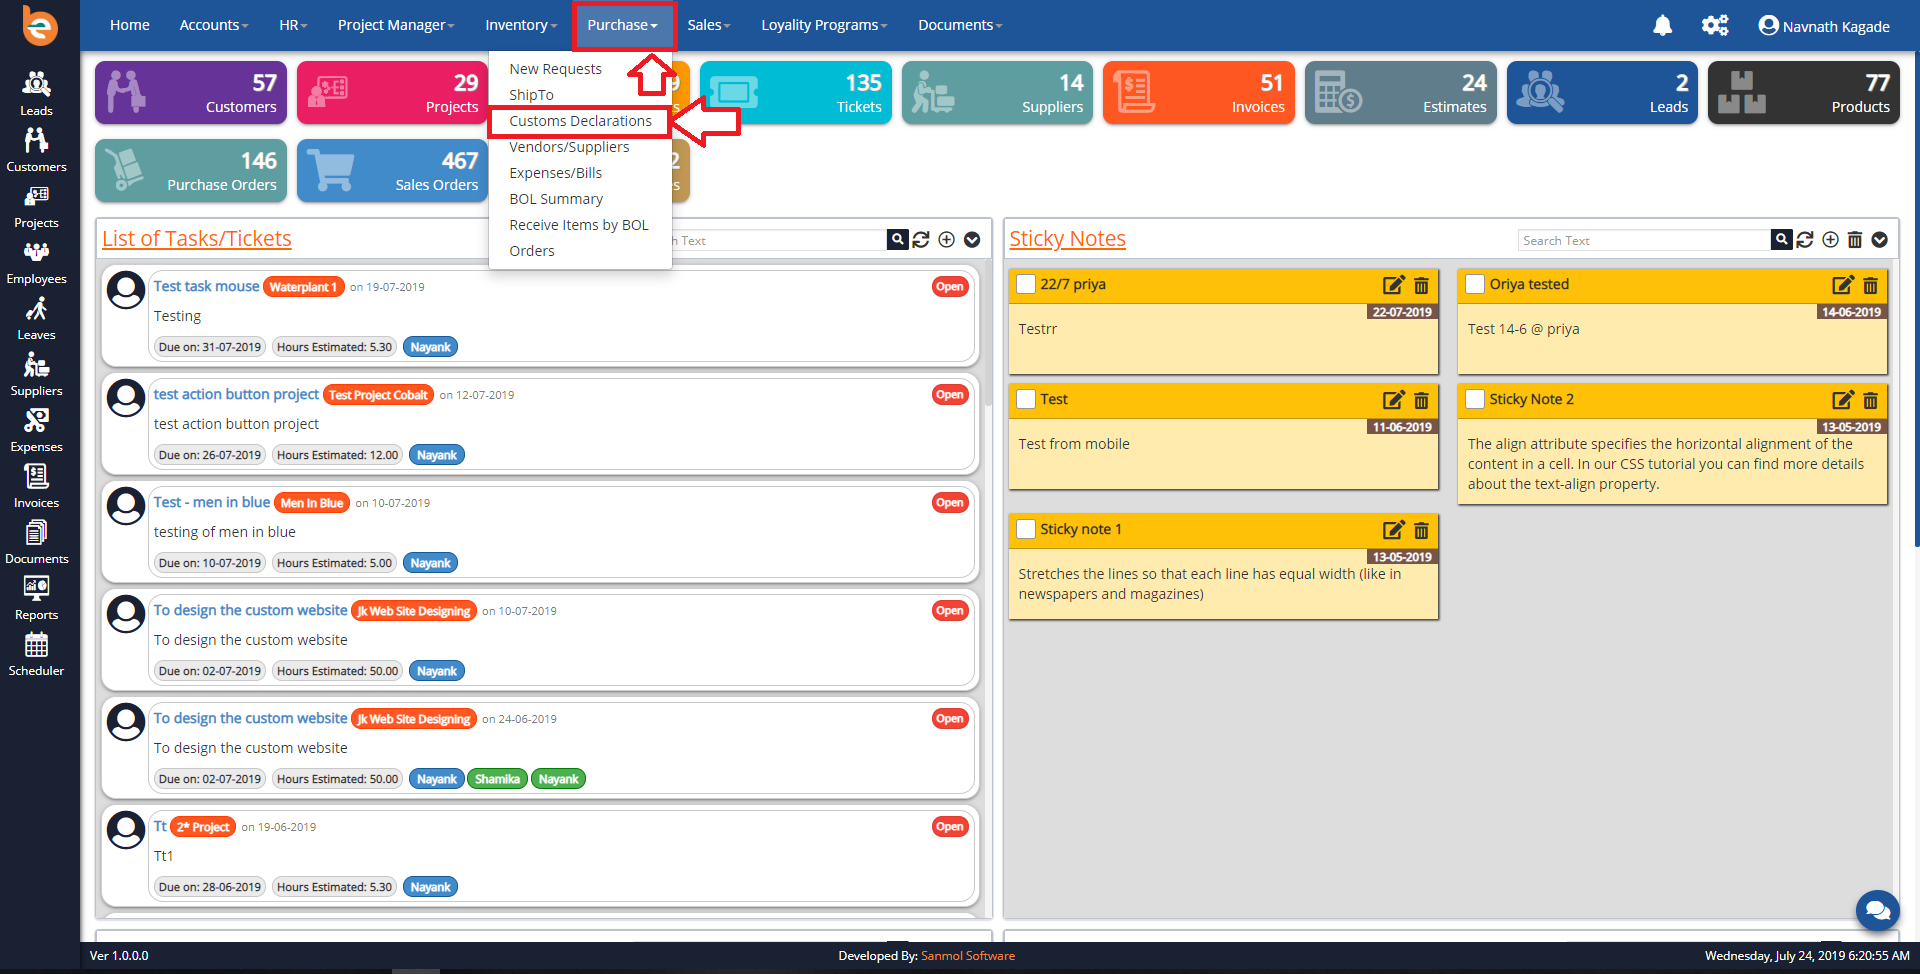
5.1 Declarations - Add New
Click on Declarations option from main menu. You can see list of declarations which you added previously, if you are using this application first time blank screen will show. Click on Add New button from the main screen of the declaration as per shown in the screen. Note: Don't click on submit button till all tab forms fill, just click on perticular tab and fill the require details.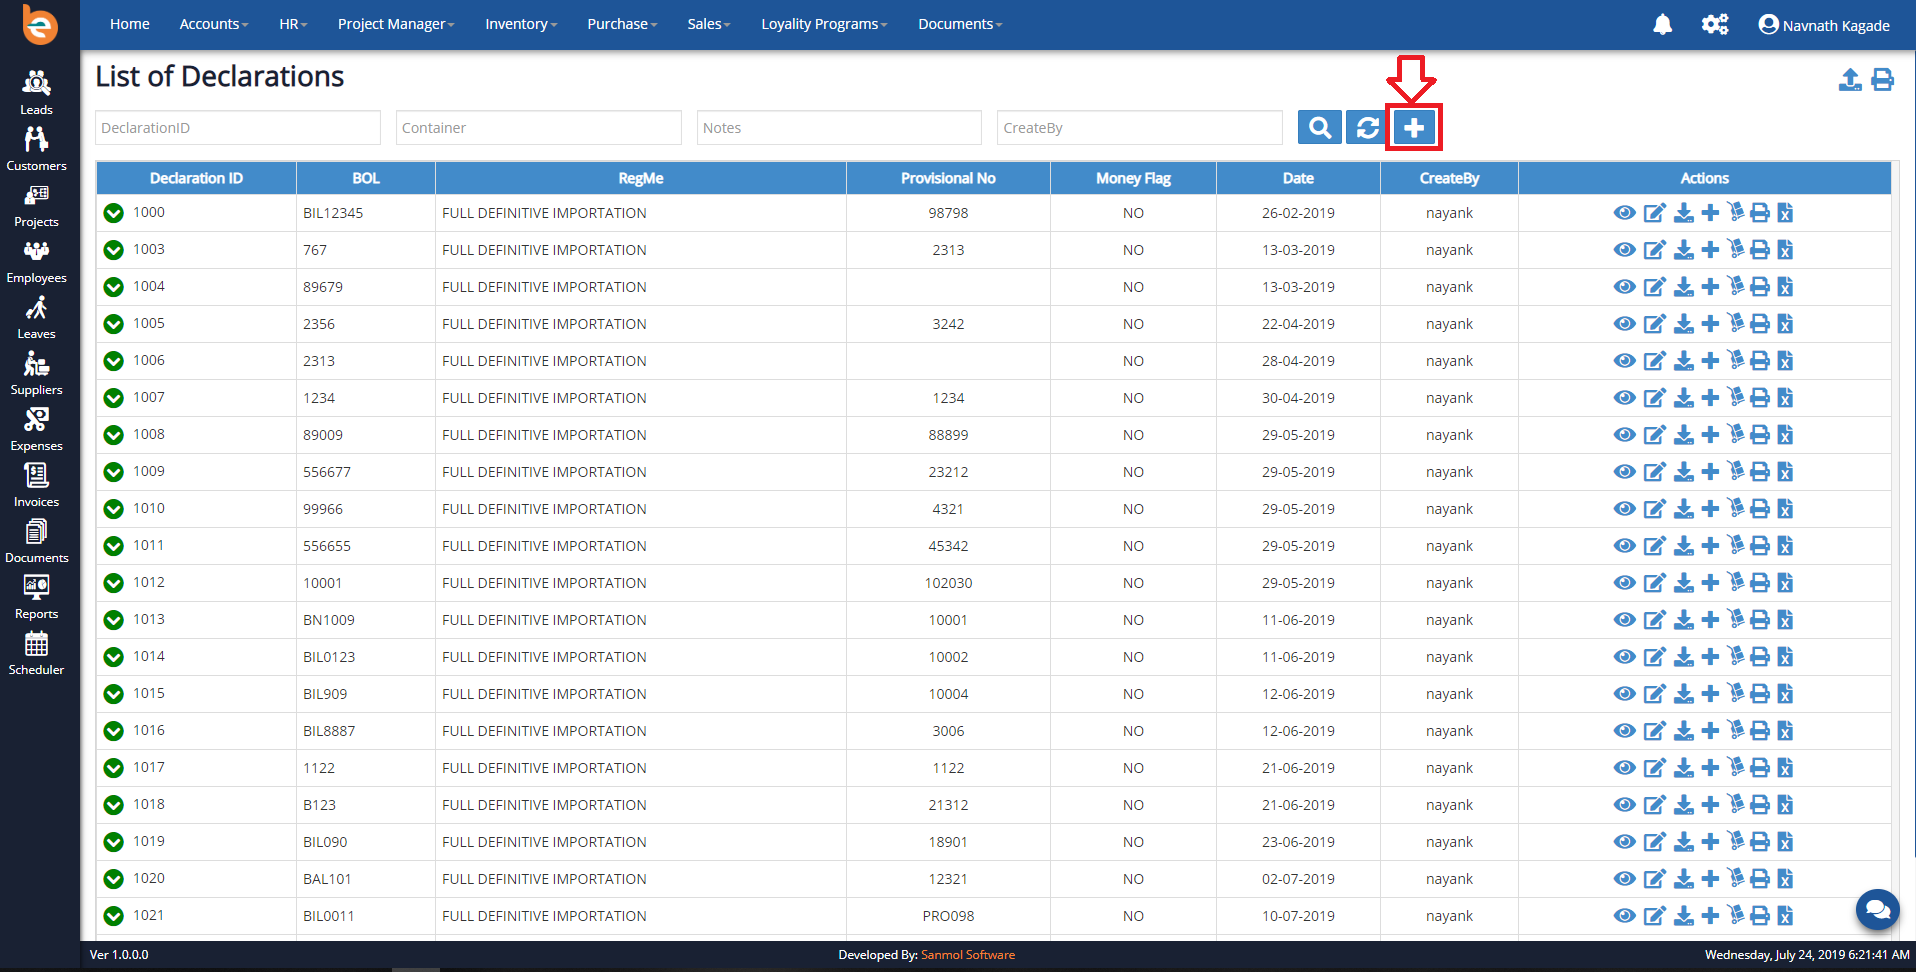
5.1.1 Declarations - Create
In this tab you need to fill Date, Regime, Provisional Declaration No, Money Declaration Flag, Status.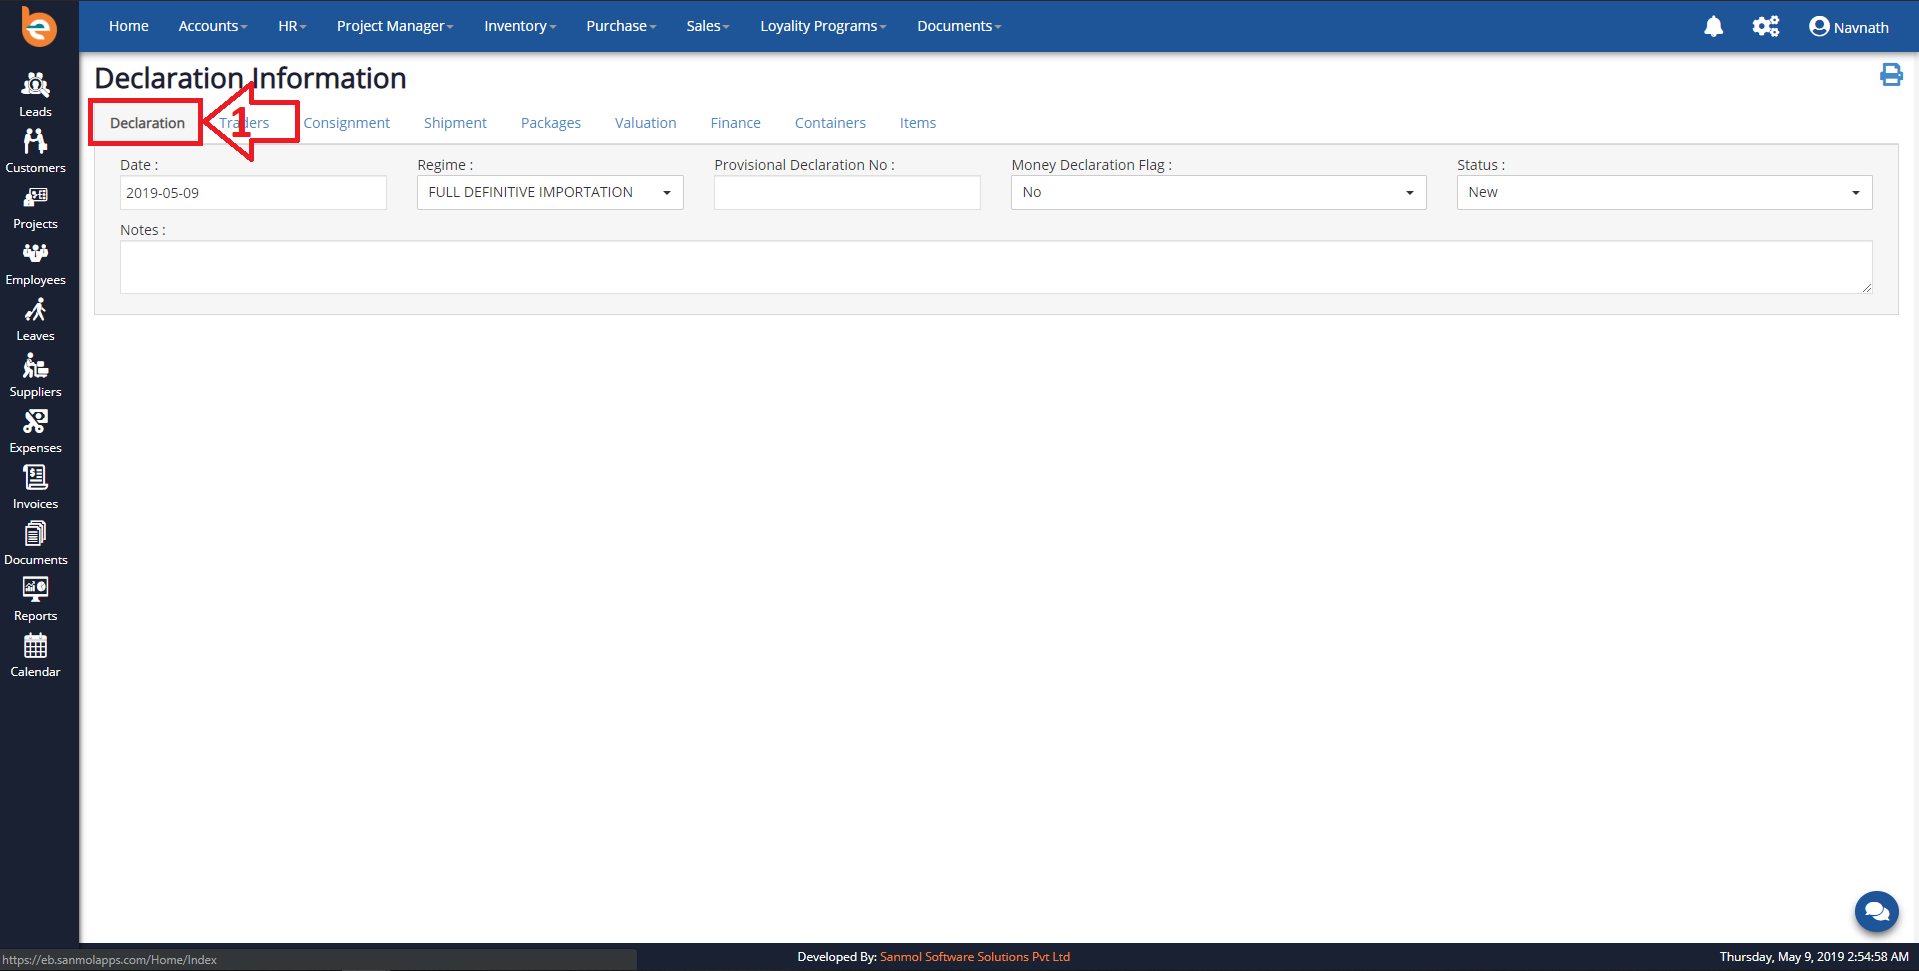
5.1.2 Traders
In this tab you need to fill all the Importer Exporter details. For state and country use the country'shortcodes like CYM for Cayman Islands, USA for United States of America.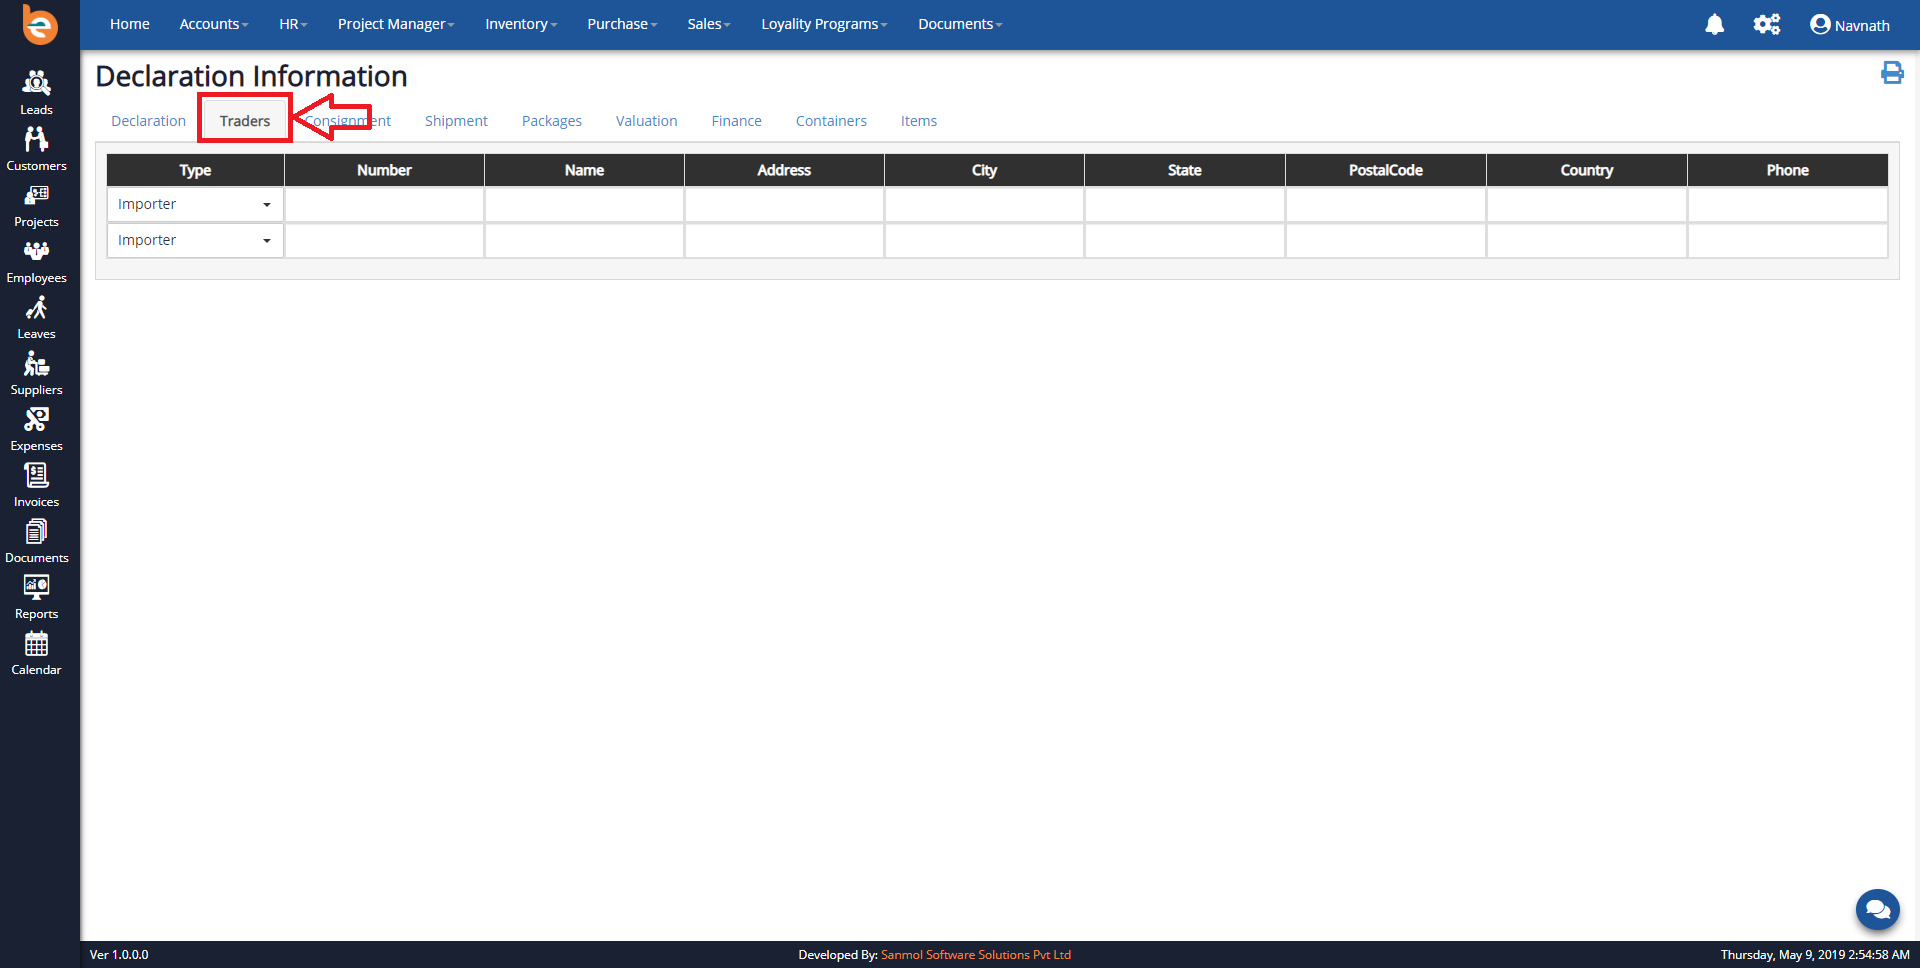
5.1.3 Consignment
In this tab you need to fill all the Consignment details. Departure date, Arrival date, Export country, Import country, Shipping port, Discharge port, Transport mode.
5.1.4 Shipment
In this tab you need to fill all the Shipment details. If you don't have some information you can keep blank.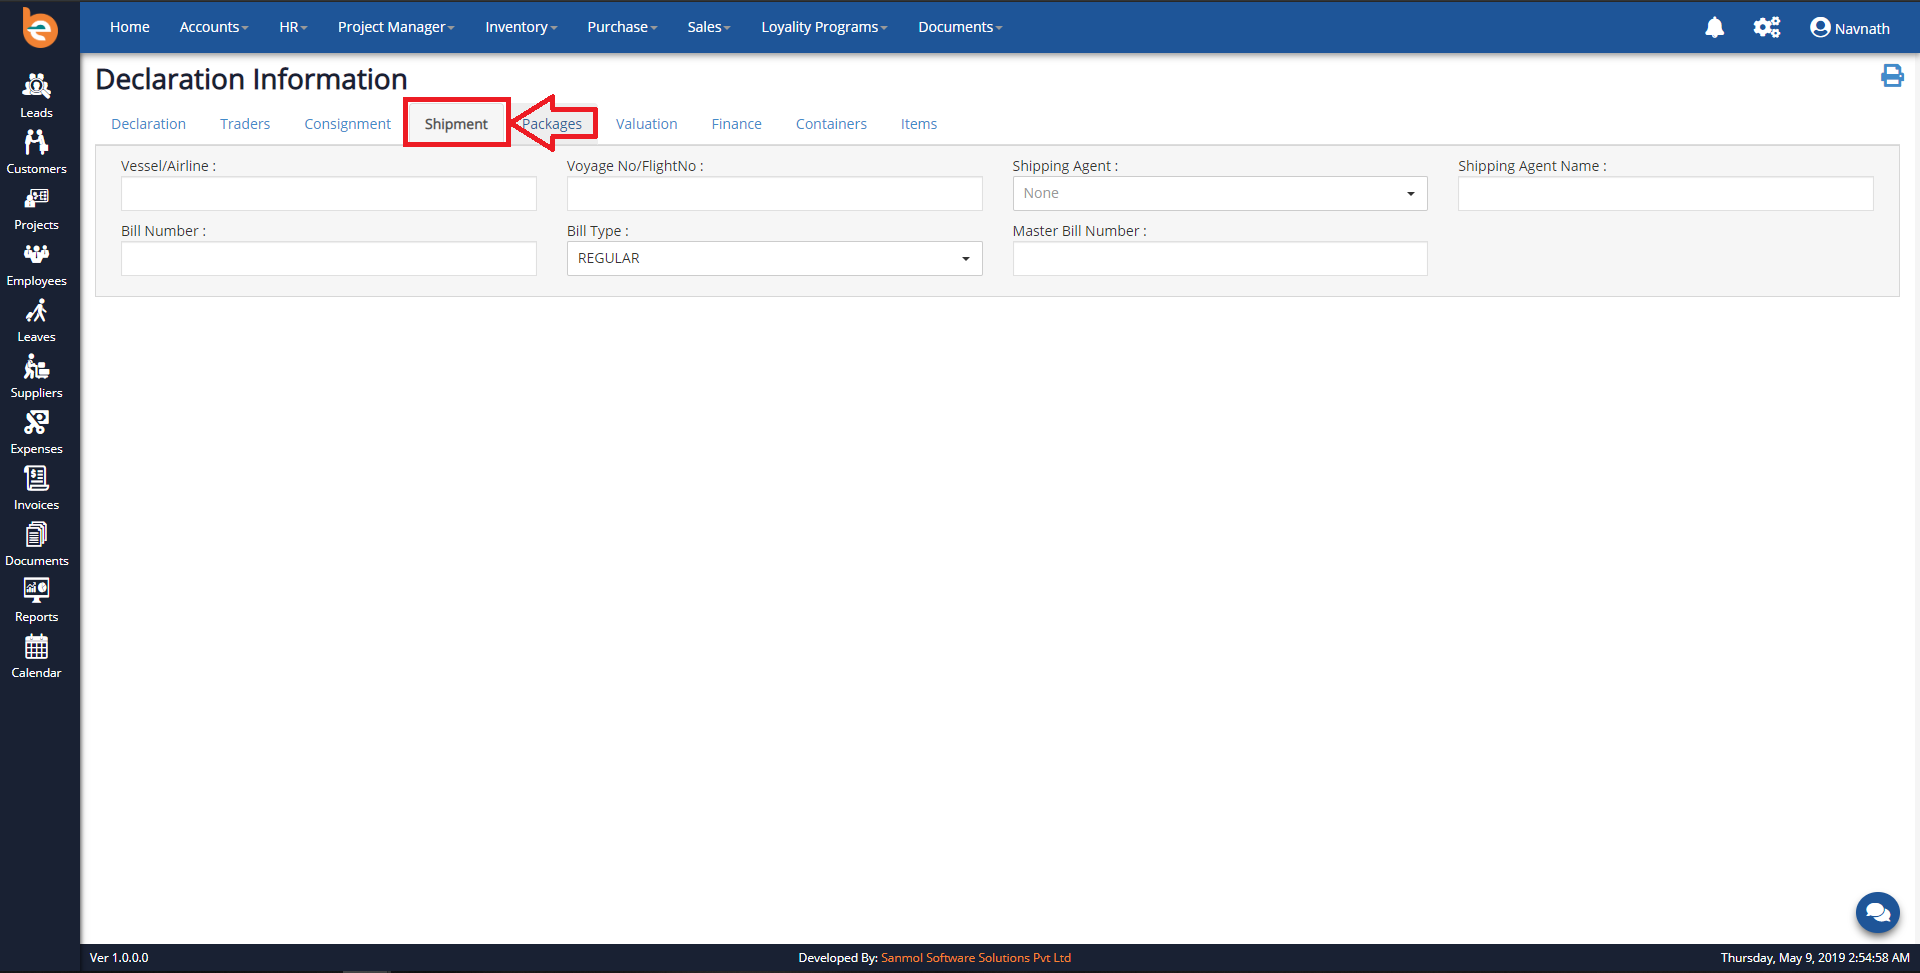
5.1.5 Packages
In this tab you need to fill all the Packages details. Here Package count means total number of boxes or pieces, select Package type as per shipment packages, Total weight of the all pieces, Weight unit, Goods Category keep regular, Contents you can keep blank if you want.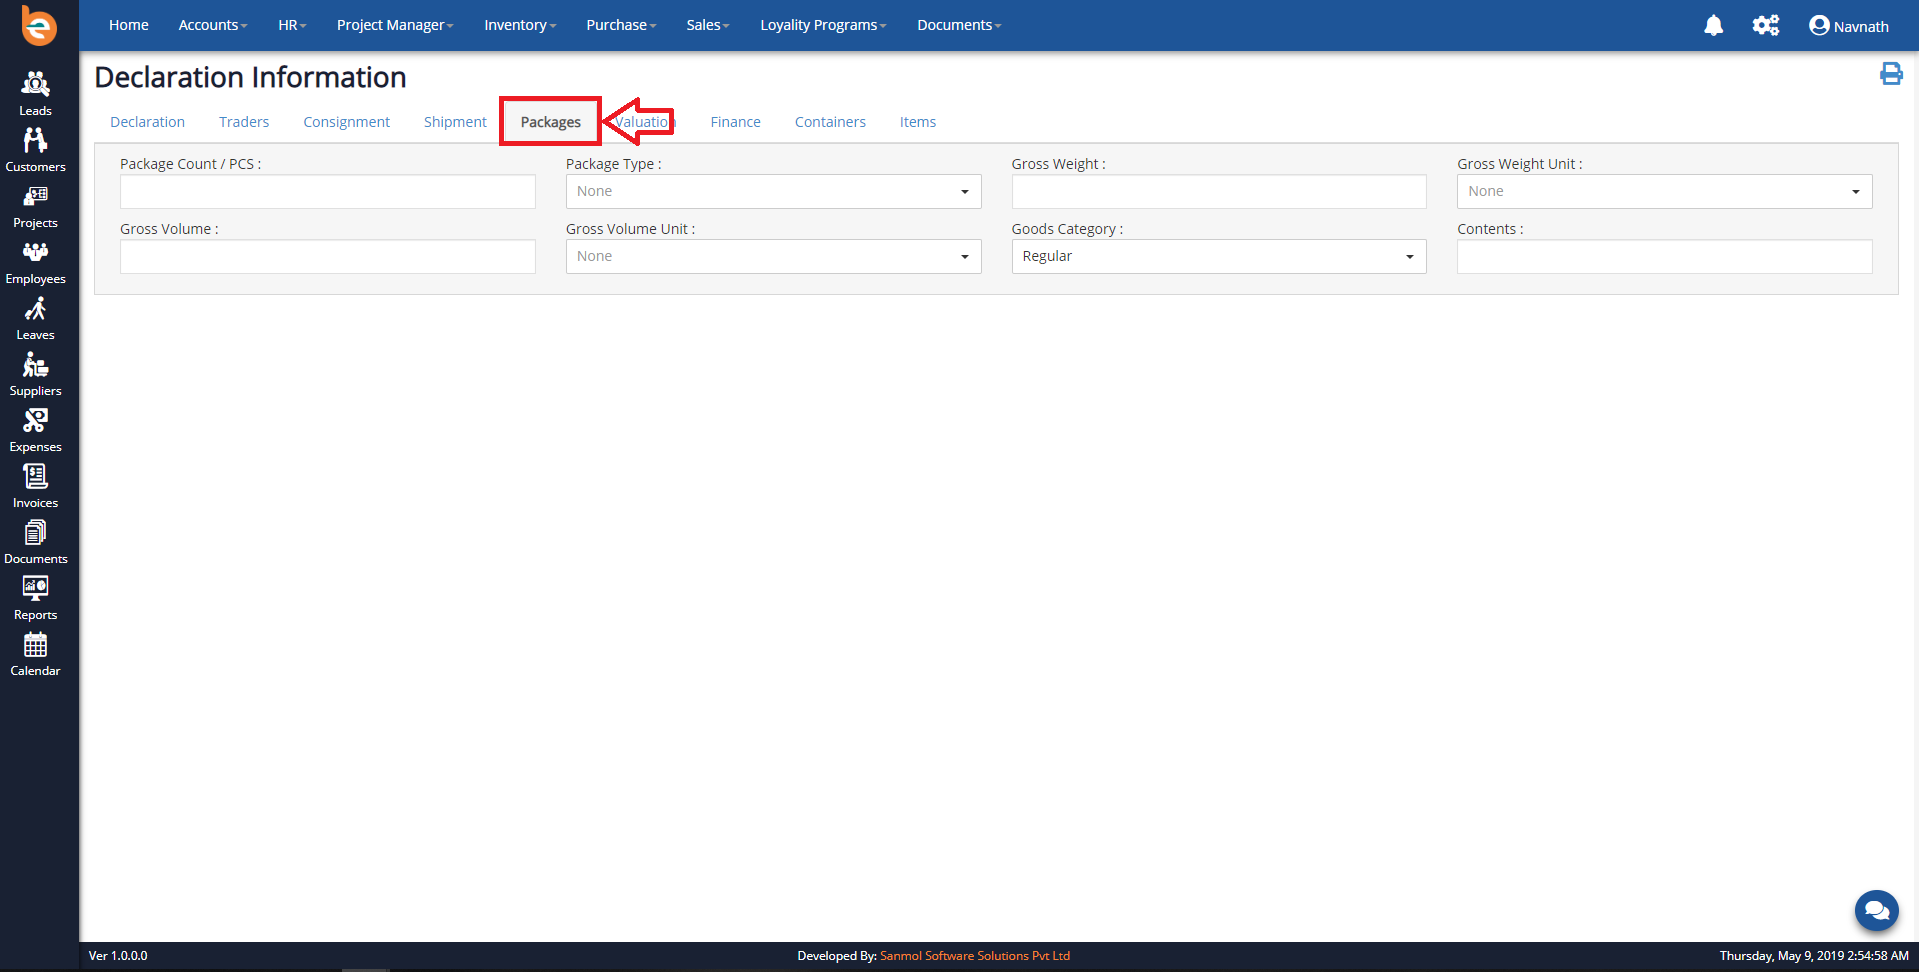
5.1.6 Valuation
In this tab you need to fill all the Valuation details.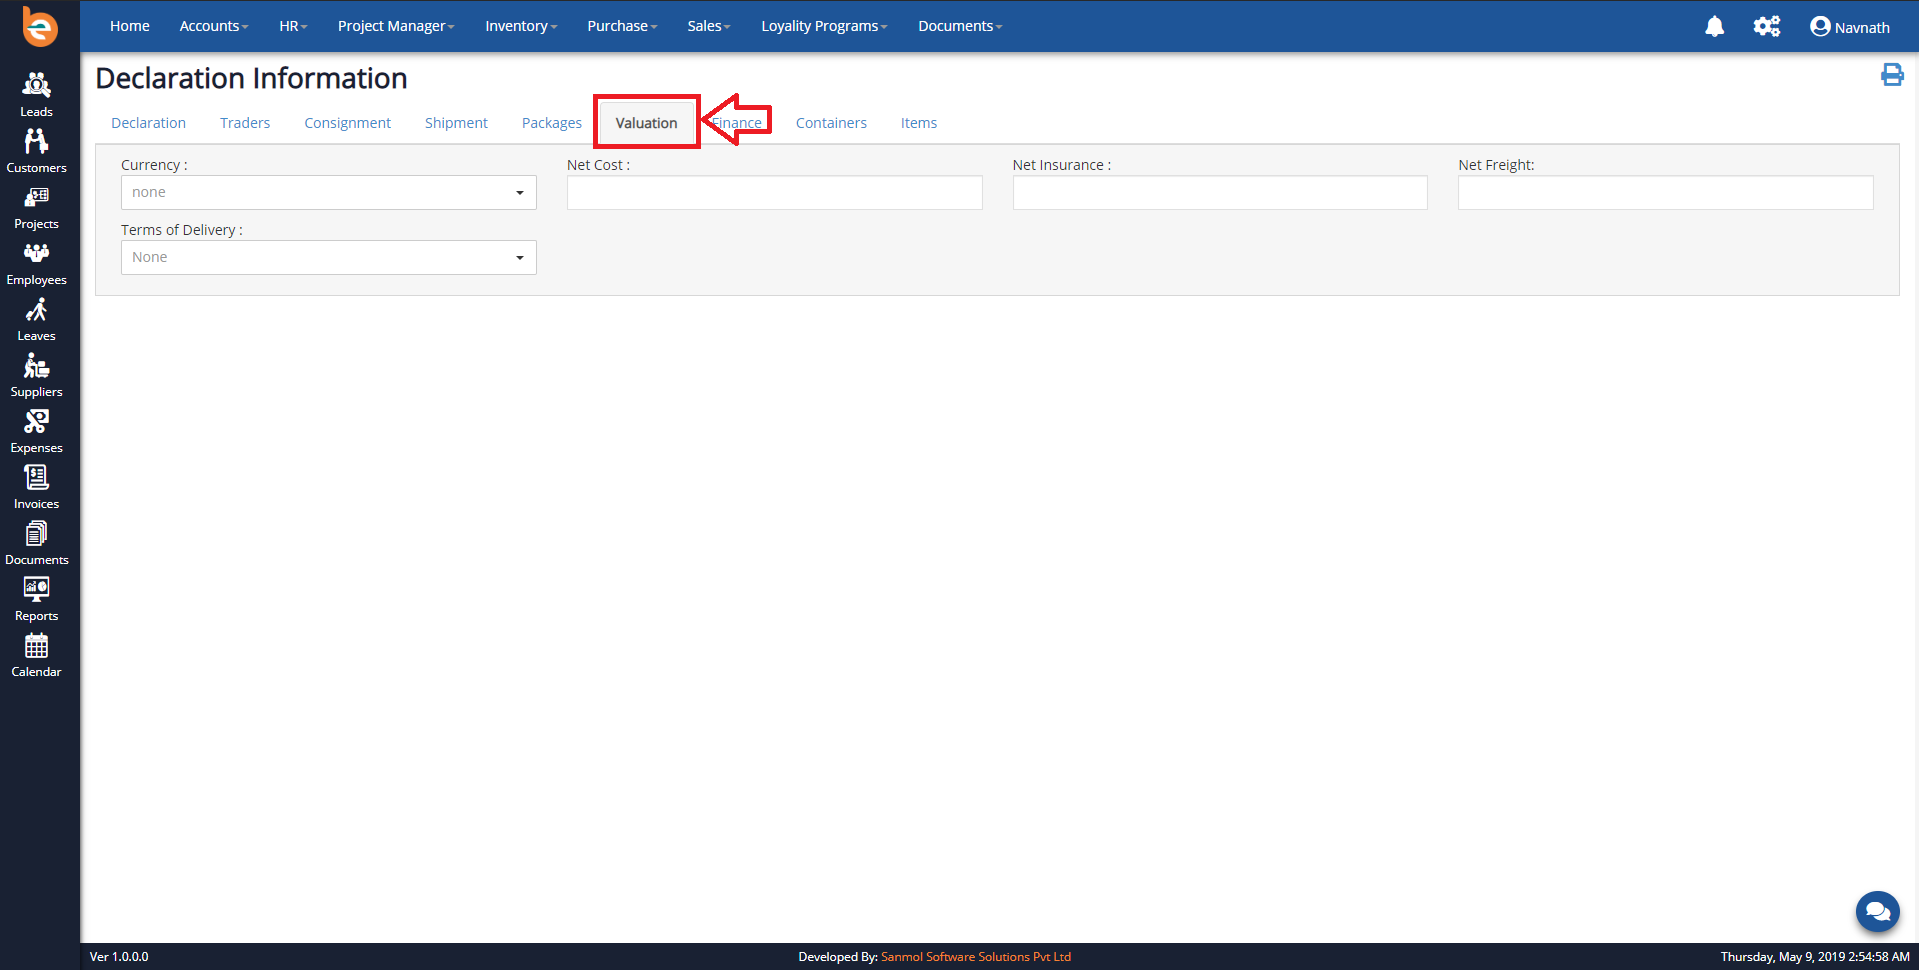
5.1.6 Finance
In this tab you need to fill all the Finance details.
5.1.7 Containers
In this tab you need to fill all the Containers details. You can keep this blank.
5.1.8 Items
In this tab you need to fill all the Items details. If you prepared item excel file no need to add items one by one. Finally click on submit button. It will redirect to Declarations list and there is option available to upload items excel file. Please download sample excel file from here Click for download
5.1.9 Upload items excel file
In this option you can upload items excel file.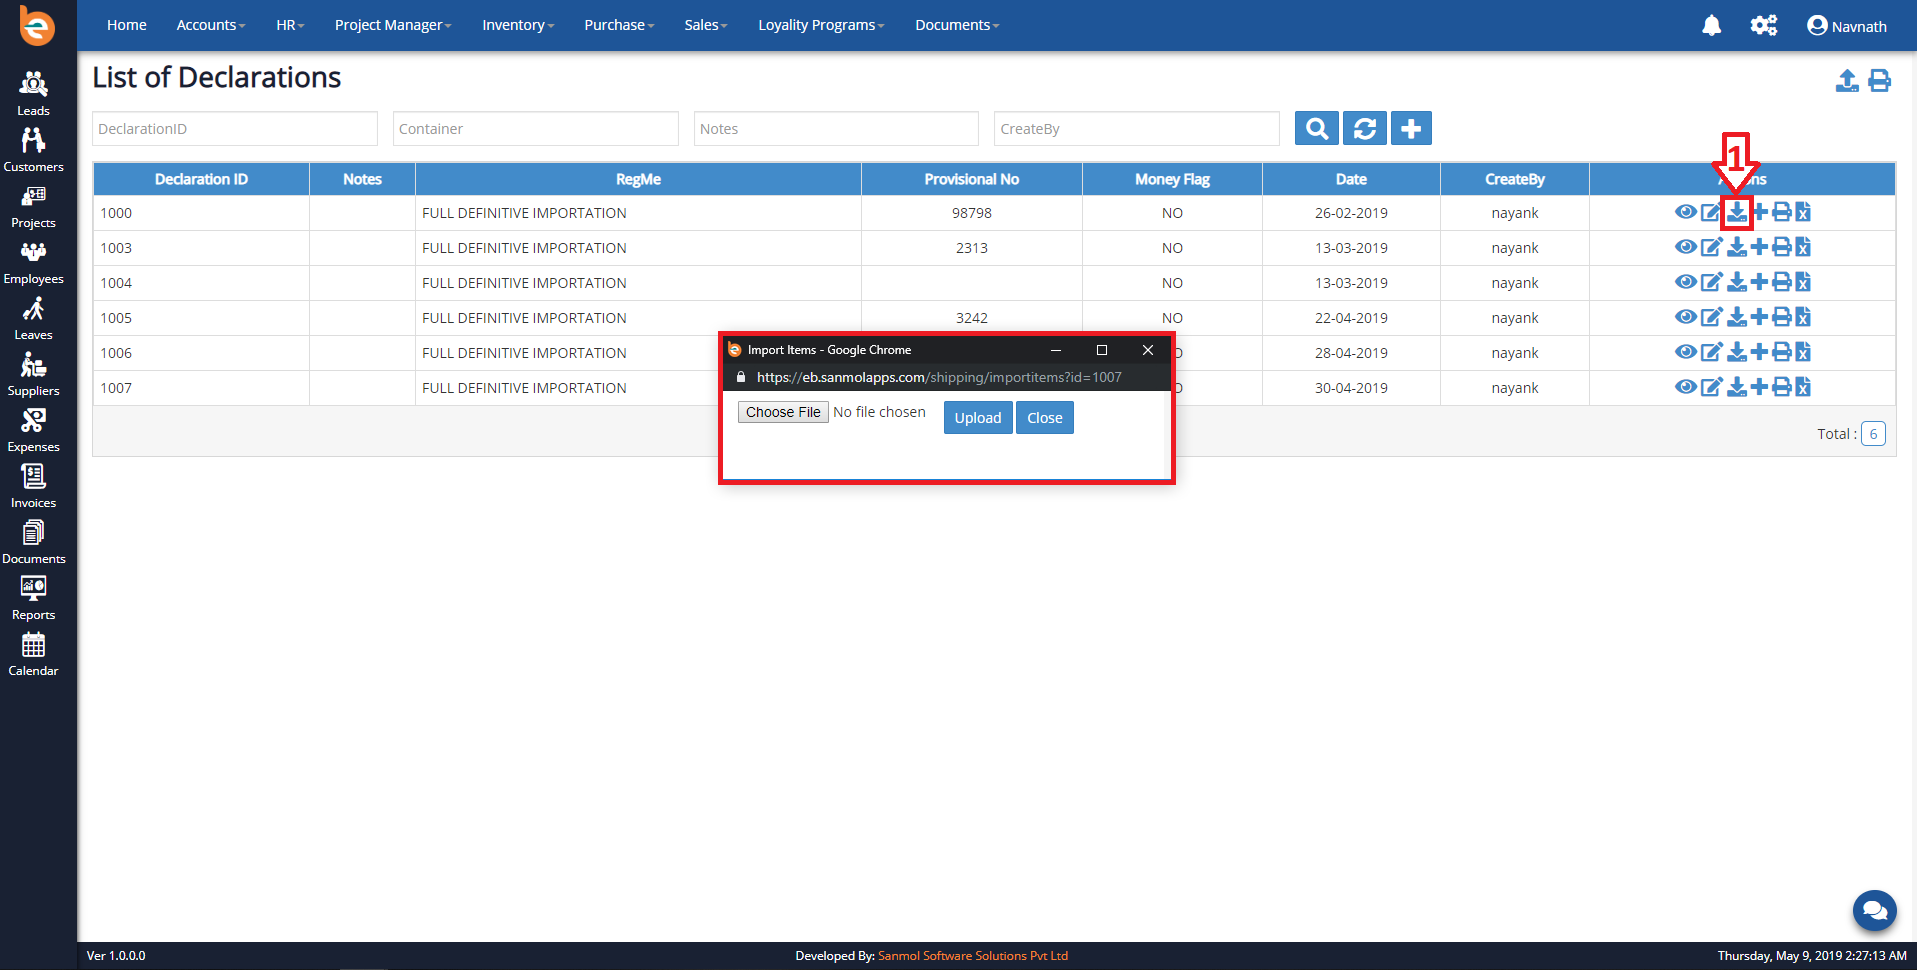
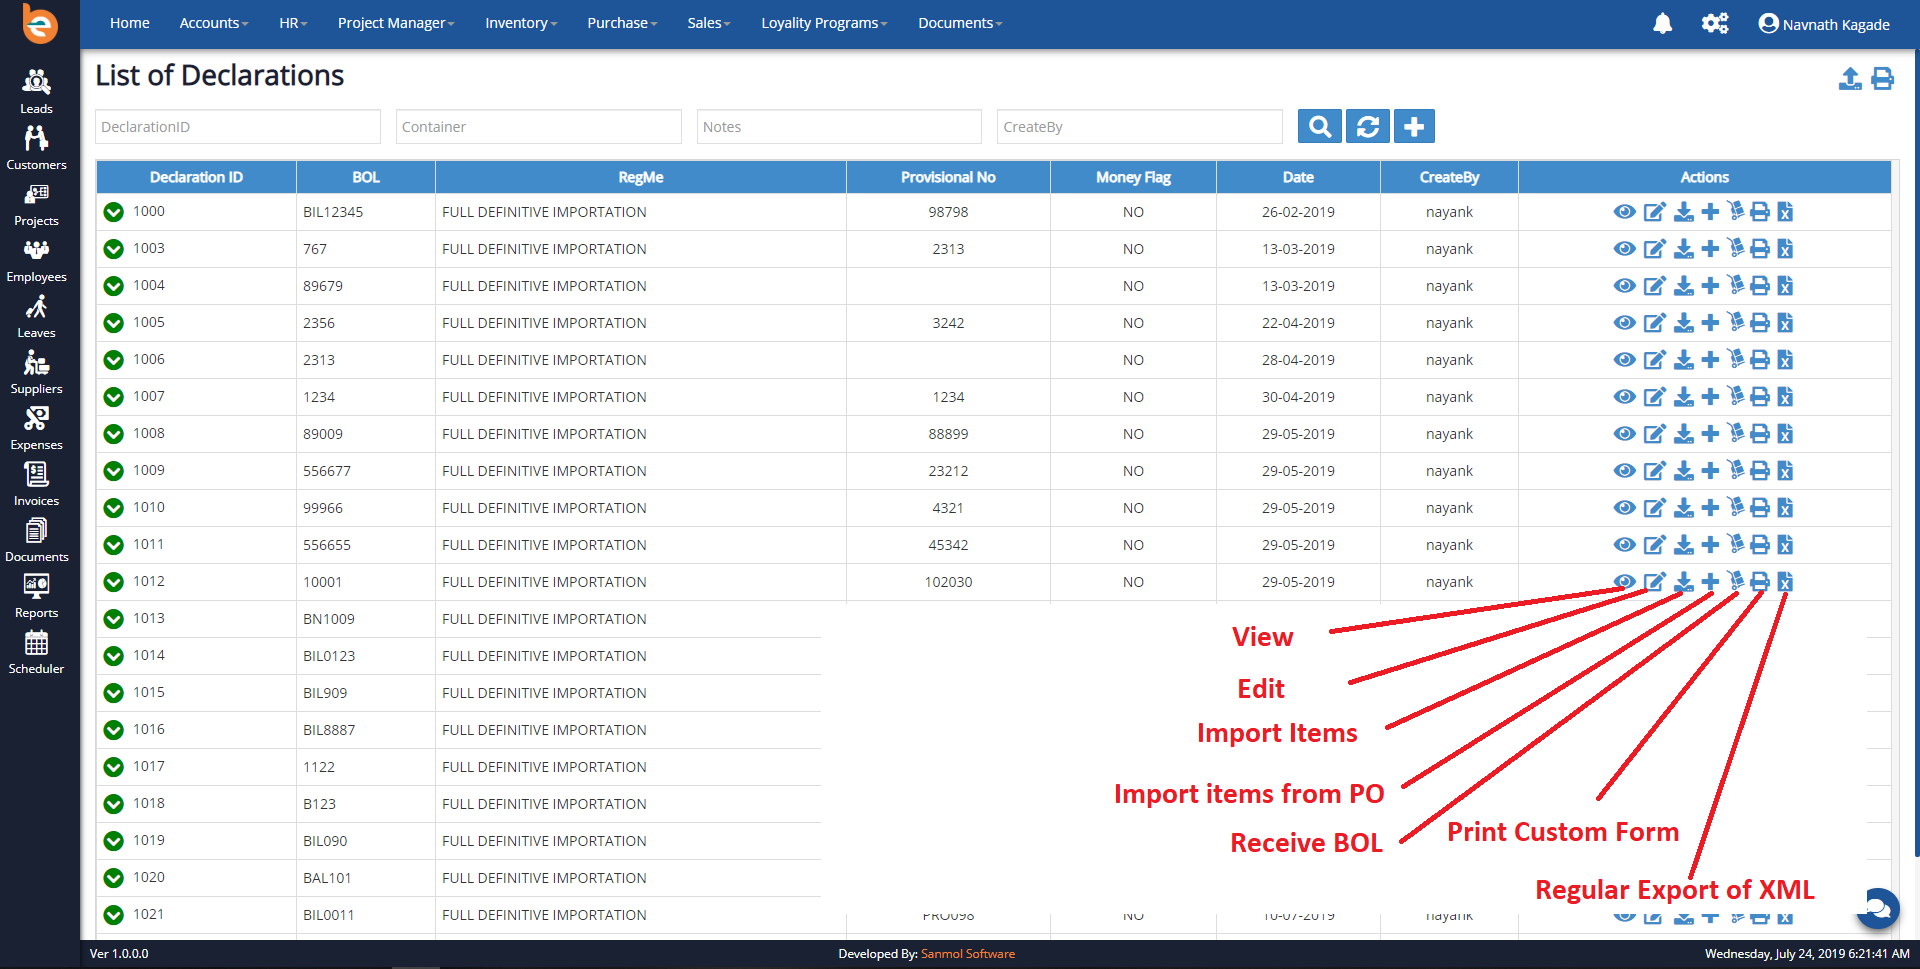
5.1.10 Declarations List
On the dashboard you can see all previously added declarations list. You have various options to do the operation on the specific declaration entry. You can see various icons shown there.1. View icon given for viewing the declaration entry.
2. Edit icon given for updating the declaration entry.
3. Import items excel icon given for importing the items excel file into the declaration.
4. House - Export to XML (This XML Require to upload on Govt Cols site)
5. Master - Export to XML (This XML Require to upload on Govt Cols site)
6. Print Custom Form (You can use this form to submit to Customs if Govt Cols site is down)
7. Regular Export to XML (This XML Require to upload on Govt Cols site)